Sew a simple unboned historical peasant bodice with front lacing for historical reenactment or as modern cottagecore lace-up corset top!
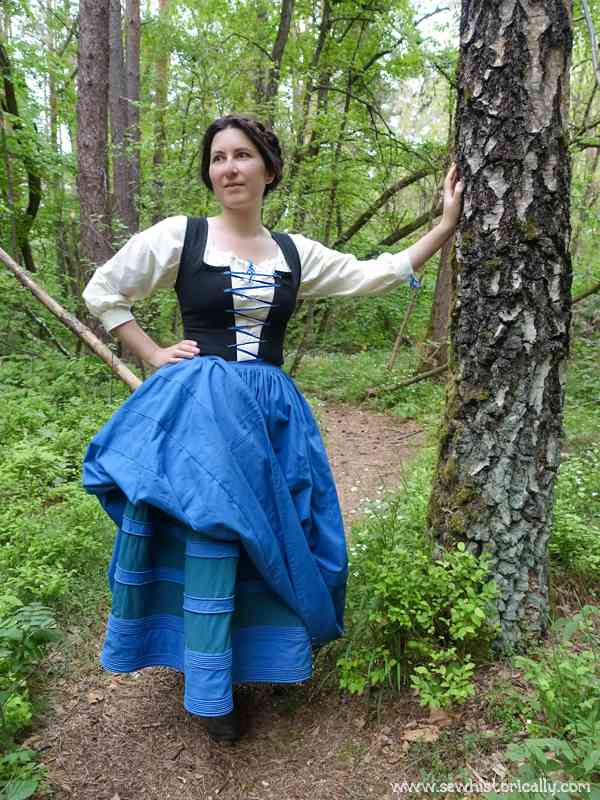
In the past, peasants and other working women often wore simple unboned bodices or lightly boned stays. My historical working woman stays are based on antique rural stays. This historical peasant bodice features a low neckline, shoulder straps, spiral lacing at the center front and princess seams at the back. You can make it completely unboned or just lightly boned.
Related: Historical Peasant Woman Outfit: Unboned Peasant Bodice, Bumroll & Corded Petticoat
The peasant stays are quick and easy to sew and are suitable for historical reenactment as well as modern historybounding clothing, as cottagecore lace up corset top or medieval wench renaissance peasant corset bodice, as rural folk wear like the Dirndl or even as an alternative to modern bras!
For historical wear, wear the peasant bodice over a chemise (shift). But for modern wear, the peasant corset bodice is comfy enough that you can also wear it next to your skin.
For Which Era Is The Historical Peasant Bodice Suitable?
The historical peasant bodice is suitable for the 18th century, Victorian era and Edwardian era. And even in medieval paintings, women wore similar stays like here!
Most antique working woman stays didn’t survive so it’s difficult to know exactly how they were constructed. These historical peasant stays are mainly based on painting from the Edwardian era, also on rare extant rural stays from the 18th century, the Victorian and Edwardian era, and on various antique European peasant bodices and stays (which later evolved into Dirndl bodices).
My Inspirations For The Historical Peasant Bodice
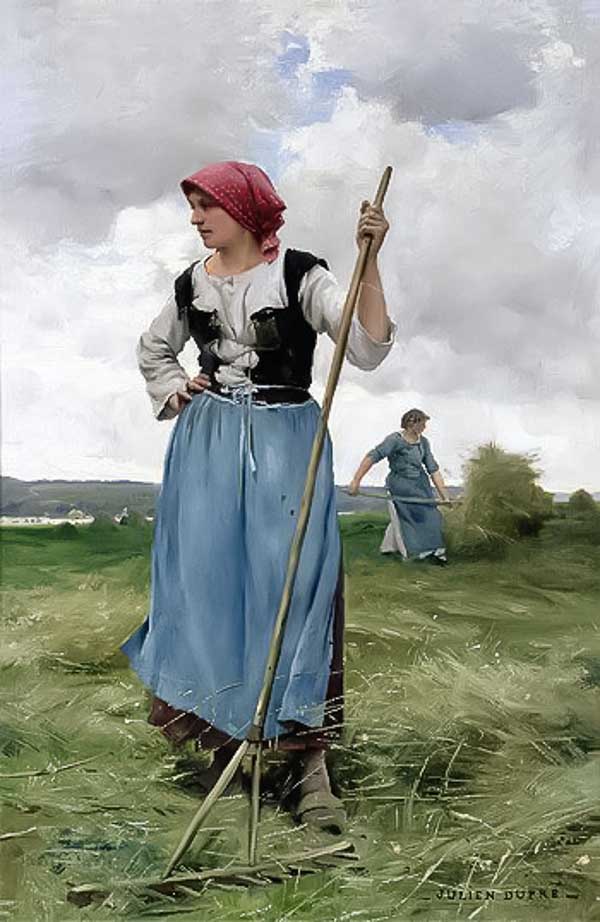
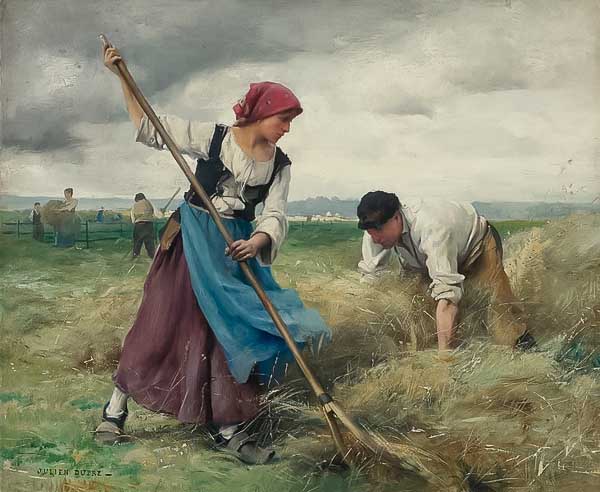
My rural stays are inspired by various working stays in late Victorian paintings by Julien Dupré like this 1892 painting at the MFA showing the back of the peasant stays. Peasant stays didn’t change much during the Victorian and Edwardian era as the following antique paintings show: 1904 painting “Brunette” by Camille Bellanger, 1857 painting of a peasant girl by Alexander Küster and 1850s painting by Jean-Baptiste-Camille Corot. And here are working woman stays from the 18th century: 1797 hand-tinted engraving at the LACMA and “The Beautiful Kitchen Maid” by Francois Boucher.
Related: A Victorian Reaper
My historical working woman stays are also inspired by extant rural stays like these at the Nordiska Museet (Nordic Museum) and Glomdalsmuseet (Glomdals Museum): 1860-90 Victorian dark blue wool stays with unbleached cotton lining; 1825-50 black wool stays with linen lining, blue silk ribbons at the shoulder straps and boning at the center front; 1860-70 black wool stays with princess seams at the back, slanting shoulder seams, hook & eye closure and boning at the center front; 18th century blue wool stays, black wool-linen-blend stays with colorful hand embroidery from 1830; Victorian black wool & silk stays with colorful hand embroidery, red binding, decorative metal eyelets and a metal lacing tip (aglet).
Details Of Antique Working Woman Stays
Antique working woman stays were closed with spiral lacing at the center front. In contrast to other types of stays and corsets, rural stays usually had no lacing at the back or the sides. The eyelets were hand-stitched or the stays had decorative metal lacing eyelets.
Peasant stays were close-fitting with a low neckline in the front and higher in the back. The neckline was usually a rounded square at the front and rounded at the back. In addition, working stays had shoulder straps with a slanting shoulder seam – slanting shoulder seams were particularly popular in the Victorian era. Working woman bodices and stays were often unboned or just lightly boned. Rural stays for special occasions could be hand-embroidered with colorful silk thread. Also, working stays were always worn over a linen or cotton chemise (shift).

What Fabric & Color Should I Use For My Historical Peasant Bodice?
Use two layers of sturdy fabric or three layer of ordinary fabric for your historical working woman stays. Extant working woman stays usually had an outer layer of wool, linen, or silk velvet fabric. But I suspect that antique velvet stays were probably theatrical costumes of the Edwardian era.
Black was a popular color for working woman stays but there were also all sorts of colors like blue, green or red. The lining fabric was usually unbleached beige linen or brown glazed cotton fabric.
In this tutorial I used green cotton moleskin fabric as outer fabric and unbleached calico as lining. Moleskin – also known as fustian, beverteen and under various other names – is a strong, twill-weave cotton fabric. It‘s similar to denim fabric except that it has a nap at one or both sides. I don’t know if it was used for peasant bodices but in the Victorian and Edwardian era, moleskin was used for heavy-duty workwear and weatherproof military uniforms. However, I’d already made black wool working woman stays years ago and they’re surprisingly comfortable even while working in summer! 😀
Here at the Nordiska museet are antique 18th century stays made of blue cotton fabric with linen lining.
Unboned Corset Bodice?
You can make the historical peasant bodice without boning! Because of the sturdy fabric and welt seams it’s so stiff and structured even without boning. Here I’m making the peasant corset with two bones at the front edges. Without these bones, the edges become distorted (wonky) after lacing. But not all rural stays had boning at the front: you can see how uneven the edges are in various old paintings of working women like in the 1890s painting by Julian Dupré below.
Related: Modern 18th Century Recycled Denim Stays (Unboned) – History Bounding
Historical Peasant Bodice – Sewing Details
This historical peasant bodice is constructed using the welt seam method. The welt seam method is quick and easy to sew and creates a sturdy corset even without boning. In addition, all raw edges are encased so there are no visible raw edges on the right or wrong side of the fabric.
Related: How To Sew An Edwardian-Style Bra
How To Sew A Historical Peasant Bodice
You’ll Need:
- about 1/2m (1/2yd) each of outer fabric and lining fabric
- matching sewing thread
- about 3m (120″) bias binding
- German plastic boning
- lacing cord
- optional: metal grommets
1. Cut Out The Pattern Pieces
Cut out your pattern pieces. (Pattern coming soon – stay tuned!)
Related: How To Sew A Bum Roll
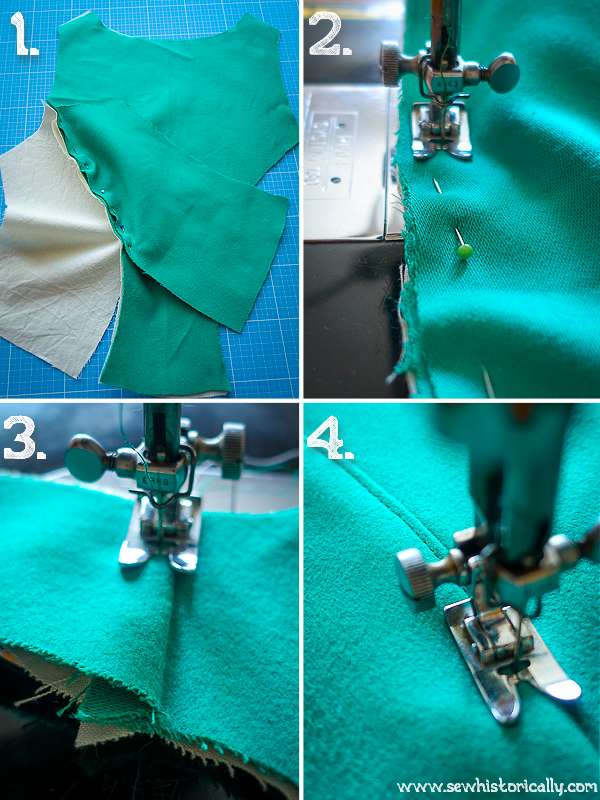
2. Sew The Back Princess Seams Using The Welt Seam Method
Start with the back princess seams of the historical peasant bodice. By the way, you start at the back because historically the ridge of welt seams, flat felled and similar seams always fell to the back.
2.1 Place the wrong sides of outer fabric and lining together and align the edges. Then place the side piece (outer fabric) on top and the lining side piece under the back pieces. Align the edges and pin the four layers of fabric together (picture 1 in the photo above). If you’re an experienced sewist, you can skip the pinning and align the edges as you sew.
2.2 Sew the four layers of fabric together with straight stitches on your sewing machine (picture 2).
2.3 After stitching, fold the lining and outer fabric to the front. Press the seam with your fingers or an iron. And top-stitch the seam (this was called a cord seam in the past) (picture 3 & 4). The second line of stitching helps to stabilize the seam. By the way, it helps if you tuck on the fabric pieces as you sew.
Related: Cord Seam, Welt Seam & 32 Other Types of Historical Seams
3. Sew The Side Seams
Now repeat steps 2.1 to 2.3 for the side seams. Don’t forget to stitch the front piece to the back piece at the shoulder seam.
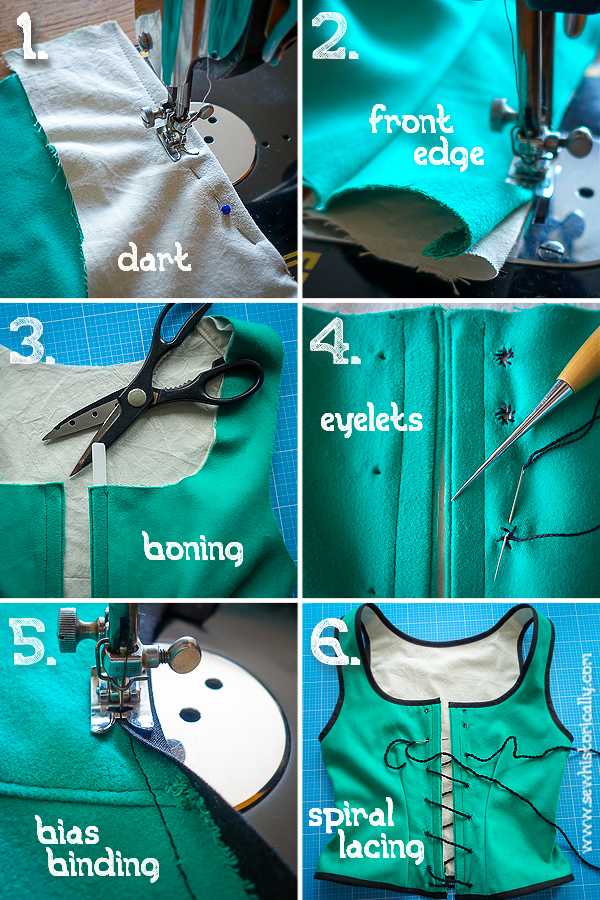
4. Sew The Darts
After stitching the cord seams at the sides and shoulders, sew the darts at the front of the stays. Treat outer fabric and lining as one layer of fabric and stitch the darts (picture 1 in the photo above).
5. Finish The Front Edge
Fold the seam allowances of the outer fabric and lining inwards so that the raw edges are sandwiched between both fabric layers. Stitch along the front edge (picture 2).
6. Add Boning
Then sew a boning channel at both front edges of the stays. The boning is necessary to reinforce the eyelets and to keep the edges straight.
Round off the German plastic boning with scissors. And insert the boning into the boning channels at the front of the historical peasant stays (picture 3).
7. Bind The Edges
Bind the raw edges of the peasant bodice with bias binding (picture 5).
8. Make The Eyelets
Now sew the eyelets for the spiral lacing by hand (picture 4). On my instagram account I shared a video of how I hand sew eyelets. Instead of handsewn eyelets, you can also use metal grommets.
Related: 18th Century Spiral Lacing
9. Lace The Peasant Stays
Now thread a lacing cord through the handsewn eyelets (picture 6). For this peasant bodice I made a twisted cotton cord. But you can also use cotton or linen tape or fingerloop braided lacing cords.