My Edwardian wool coat aka the never-ending coat is finally, finally finished! I call it the never-ending coat because everything went wrong with this coat what could possibly go wrong! 😆 That’s why it took me almost 10 years from the planning stages to drafting the pattern to actually finishing the coat.
The Never-Ending Coat!
About 10 years ago I made my Victorian paletot coat which was the first tailored coat I ever made. Since it was my first coat, it wasn’t easy but okay-ish. I even drafted my own pattern.
Related: Victorian Paletot Coat
So after finishing my Victorian coat I thought I’d make another coat. But then the problems started! 😉
1920s Coat?
At first I wanted to make a 1920s coat inspired by this beautiful 1920s Aquascutum “Raeburn” wool coat.
‘Eminently suited for Smart Town Wear, and especially attractive in the new range of Aquascutum flecked and checked Tweeds. Cut with a fitting back and fashinably flared skirt. Fur collar and cuffs to choice.’ (Aquascutum “Raeburn” Coat, 1920s)
Some 1920s coat patterns were extremely simple in cut, consisting more or less of rectangles. But there also existed more difficult coat patterns in the 1920s, such as this 1920s coat with princess seams.
I bought royal blue wool broadcloth fabric. Then I started drafting the pattern inspired by the 1920s fashion plate, made a mock-up and adjusted the pattern until I was finally satisfied with the fit except for the two-piece sleeves.
The Problem Of The Two-Piece Sleeves
So my self-drafted 1920s coat pattern was ready for sewing except for the two-piece sleeves. I’ve never drafted two-piece sleeves before and they just didn’t fit right no matter how many mock-ups I made! I even bought a sewing pattern for a coat with two-piece sleeves. I tried to adjust the armscye of my coat pattern to the shoulder seam of the commercial sewing pattern. But it just didn’t work out the way I wanted. So I put the pattern and fabric away for a few years! 😆
Edwardian Coat?
So a few years later – still without a pattern for the sleeves – I’d rather wanted to make an Edwardian coat from the blue wool fabric. I used my self-drafted 1920s coat pattern and readjusted it: I made the flaring skirt wider and longer so that the coat is longer than my short Edwardian walking skirts.
Related: Short Edwardian Walking Skirt
In the early Edwardian era, different sleeve shapes were fashionable. I could either make the two-piece tight fitting coat sleeves that I had planned. But I could also make wide bishop sleeves or pagoda sleeves. I would’ve loved to make bishop sleeves similar to the wide bishop sleeves of my Edwardian tucked shirtwaist. But I didn’t have enough wool for that! 😉
Related: Edwardian Tucked Shirtwaist
So I decided to use the pagoda sleeve pattern of my Victorian paletot coat as a basis and I adjusted the armscye to the new shoulder seam of my Edwardian coat pattern. Then I made a pattern for an Edwardian flaring standing collar. And because I liked Edwardian coats with capes at the time I also drafted a pattern for a separate cape that buttons onto the coat at the neck.
Edwardian Cape Pattern
My Edwardian cape is a circle cape. I drafted the cape pattern based on this 1908 cape pattern and this 1898 cape pattern. Like the 1898 cape pattern, my cape is longer over the arms and shorter at the front and back so that when worn the cape appears to be the same length all the way around.
I also played around with a seams or two at the shoulder for a better fit, like some Edwardian capes had. But after making a mock-up, the cape draped better without the seams at the shoulder so I omitted them. By the way, the cape is not a full circle because that would’ve been too wide: It’s more of a three quarter circle cape.

Shrinked Fabric
And then I finally pre-washed the wool fabric on a wool cycle. By the way, I always pre-wash fabrics because I want to wash the finished garment later. And even wool broadcloth coats like my Victorian paletot coat are perfectly machine-washable.
But this fabric shrinked so much that I didn’t have enough wool left for the coat! So I thought I’d just order more wool fabric. The seller still sold the same wool broadcloth fabric – way more expensive now and the royal blue was a different shade of blue now! Duh!
Faux Fur Trim To Lengthen The Coat?
So I thought I’d lengthen the coat with a white faux fur trim. To make the long story short: I ordered different white fake fur fabric swatches and decided to buy the one I liked best. But it was sold out now. When it came back in stock and my order arrived, the white fake fur was now beige! You usually can’t return a piece of fabric but the seller accepted it in this case because the color was so far off.
Then I bought another fake fur fabric from a different seller – the second best faux fur fabric. The fake fur looked good – until I pre-washed it! Then every wet rat had a prettier fur! 😉 No matter what I tried – like brushing the faux fur – it just looked terrible.
So I finally decided to omit the faux fur trim, omit the cape and to ignore the nap of the wool broadcloth fabric so that I just got all pattern pieces out of the shrinked piece of wool fabric.
More Problems …
The Problem With The Batting
Meanwhile I bought pure wool batting because I wanted to use all-natural batting and lining fabric for my coat this time. Batting made of 100% wool was difficult to find and incredibly expensive! I’ve never used wool batting before but I’ve read online that it’s just as easy to use as polyester batting. But you shouldn’t believe all that you read online! 😉
After the wool batting arrived the label said to pre-wash the batting before using but to only wash it after it’s quilted together with another fabric. So I made a small sample for the washing machine: I hand-basted my viscose lining fabric and wool batting together and then pre-washed it on a gentle cycle. But it shrinked even more than the wool broadcloth fabric of the coat! And the sample looked terrible: bumpy and all. So I bit the bullet and decided not to use the expensive wool batting for the coat.
Then I wanted to used cotton batting instead. I’ve also never used cotton batting before. And to make the long story short again: After buying the cotton batting and pre-washing it the cotton batting was so hard and thin that it wouldn’t help to keep me warm on a cold winter night. So even though I wanted to use batting made of natural fibers, I finally decided to use polyester batting again.

The Problem With The Lining
But then there was also a problem with the lining: I wanted to use lining fabric made of natural fibers such as silk, viscose (rayon) or cellulose acetate. But the first viscose taffeta lining I bought was too beige and didn’t look good with the royal blue of the coat. So I dyed the lining fabric turquoise and used it for my short Edwardian faux silk petticoat instead.
Related: Short Edwardian Faux Silk Petticoat
The second lining I bought was a beautiful black and white striped viscose taffeta fabric. But since there was the problem with the batting I couldn’t use it for the coat. So I used the beautiful natural fiber lining fabric for my Edwardian braided jacket and bought off-white pre-quilted polyester batting for the coat. And then I could finally start sewing the coat! 🤣
Sewing The Edwardian Wool Coat
Self-Drafted Edwardian Coat Pattern
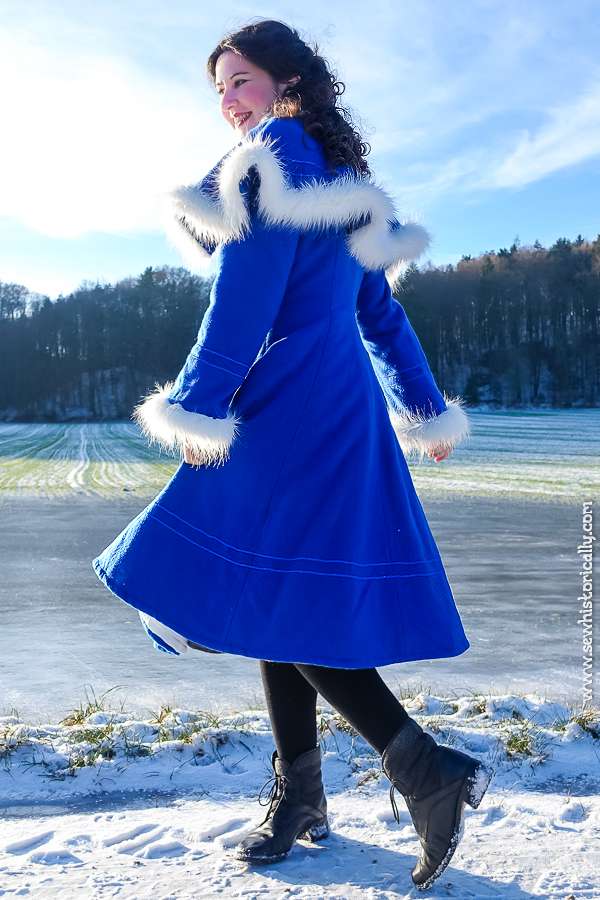
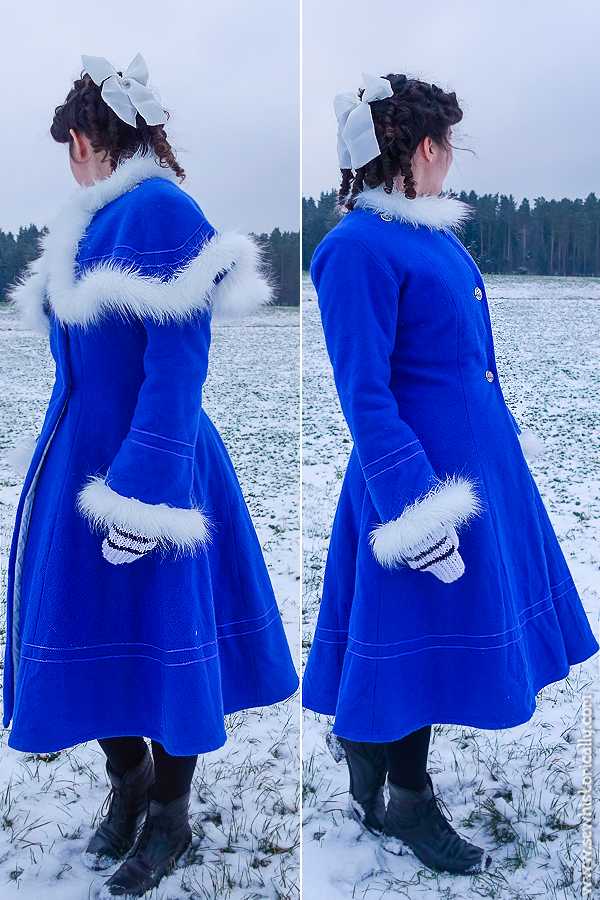
The final Edwardian coat pattern is completely self-drafted including the problem sleeves and problem cape. 😉 I drafted the pattern for my Edwardian wool coat with princess seams at the front and back and a flaring skirt part. The Edwardian coat consists of 8 panels without a horizontal seam at the waist to break the beautiful lines of the princess seams. By the way, garments with princess seams and without a waist seam are much more difficult to draft and fit, like my Edwardian princess slip.
Related: Edwardian Princess Slip
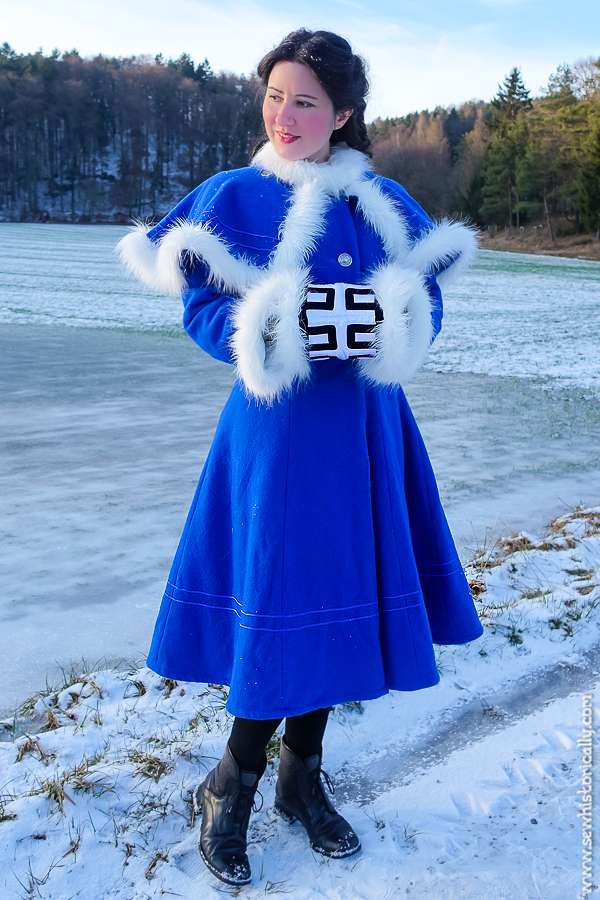
My Edwardian coat has a straight-standing collar, is double-breasted and closes off center at the front with three vintage silver metal buttons from my stash. I made the Edwardian coat fitted but also wide enough so that I can wear it without a corset underneath as historybounding outfit.
Here are two very similar free antique Edwardian coat patterns: 1897 coat pattern and 1908 coat pattern.
Detachable Edwardian Cape
After cutting out the coat, I didn’t have enough wool fabric left for the cape I drafted. So I finally decided to make the cape shorter than I had originally planned. Then I had just enough wool fabric left to make the Edwardian cape. Yay! 😀
The cape of my Edwardian coat is inspired by this 1904 photograph of a woman wearing a coat with a short cape, this 1904 fashionplate of two girls’ coats with short capes, this 1896 coat with a fur trimmed cape and this Victorian coat with a fur trimmed cape.
My Edwardian cape is detachable: it is buttoned onto the coat with three metal buttons like the detachable cape on this antique turn-of-the-century wool coat (video). The vintage silver metal buttons are also from my stash: they’re similar to the other three metal buttons, but different. The cape closes at the center front with a large hook & eye.
Soutache Embroidery
Edwardian and 1920s coats were often embellished with needle lace, embroidery or soutache braiding. I decided to embellish my Edwardian wool coat with soutache.
Related: How To Make Fabric Soutache
Soutache made of natural fibers, like silk or viscose, is almost impossible to find these days. But I was lucky to find royal blue soutache made of natural viscose (rayon) fibers. The natural fiber soutache is soft and looks like silk soutache. It also has the same shade of blue as the wool fabric of the coat.
I used the soutache to embellished the hem, pagoda sleeves and cape of my Edwardian coat inspired by this antique ca. 1925-8 wool coat. At that time I still wanted to make a 1920s coat! 😉
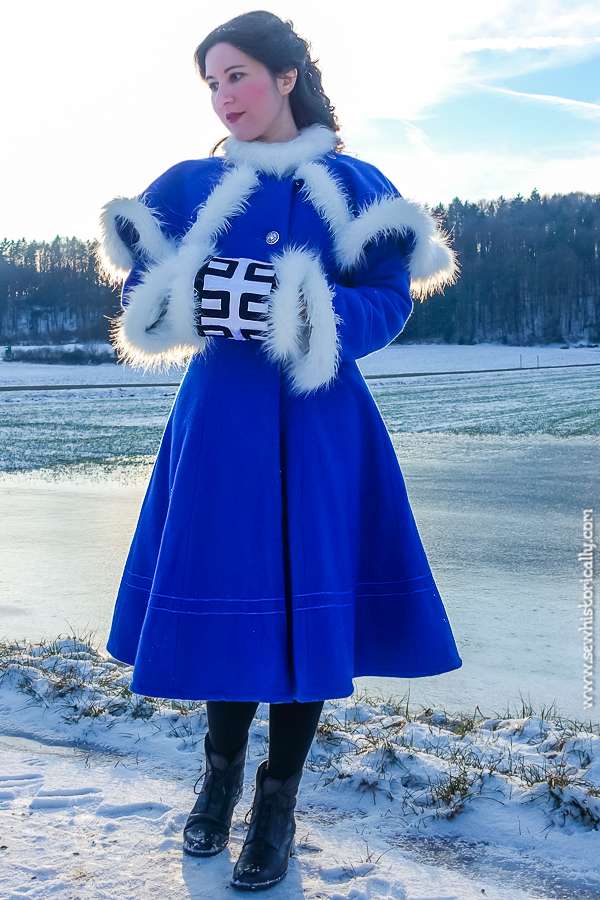
Faux Fur Collar & Cuffs
Edwardian coats often had fur collars and cuffs or were made entirely of fur. I wanted to trim my Edwardian wool coat with fur. But I didn’t want to actually use real fur. Years ago, before the debacle with the fake fur to lengthen the coat, I bought a small piece of very expensive faux fur fabric. I had only bought a small piece of the faux fur because it was way more expensive than most faux fur fabrics. But this faux fur was so worth the money: the off-white faux fur is voluminous with a long pile and very soft! 😀 And because the faux fur looks so luxurious with the long pile, you need way less than of the cheaper fake fur fabrics! 😉
So because I only had a small piece of the beautiful faux fur fabric, I cut it into very small strips.
‘The fur-trimmed dress requires great care in construction, for it must on no account be overweighted with its trimming. The fur of whatever kind used should be quite narrow […] As a rule, the narrowest border only is admissible, and an inch-wide strip of the skin, turned over an eighth of an inch on each side over a thin padding of cotton-wool, for the purpose of slightly raising the fur when sewn on, is quite wide enough for ordinary purposes. […] If an old stole of fur is available, it is quite easy to cut strips from it to use as edging.’ (Every Woman’s Encyclopaedia, 1910-2)
To reduce the bulk at the seams I cut away the long pile at the edges of the faux fur trim. This took ages! 😉 And the fake fur hairs were everywhere! Then I attached most of the faux fur fabric strips with overhand stitches by hand.
Another Problem: Cape Sticking Out
When my Edwardian-style coat was almost finished, there was another problem! Because I didn’t have enough wool fabric left for the longer cape I had originally drafted, the circle cape didn’t drape in soft folds after I hand-stitched the faux fur trim around the wool cape.
If you follow me on instagram, you probably remember when I asked for your advice on what you would do to fix the cape that was sticking out! I thought about using French tacks or reducing the width of the cape and other things. But I eventually just washed the cape and let it dry in folds over a hanger. That fixed the problem and now the cape drapes in soft folds. 🙂
So that was the story of the never-ending coat! 😆 I like how the Edwardian coat turned out but I never ever want to make such a long-term sewing project again! 😉