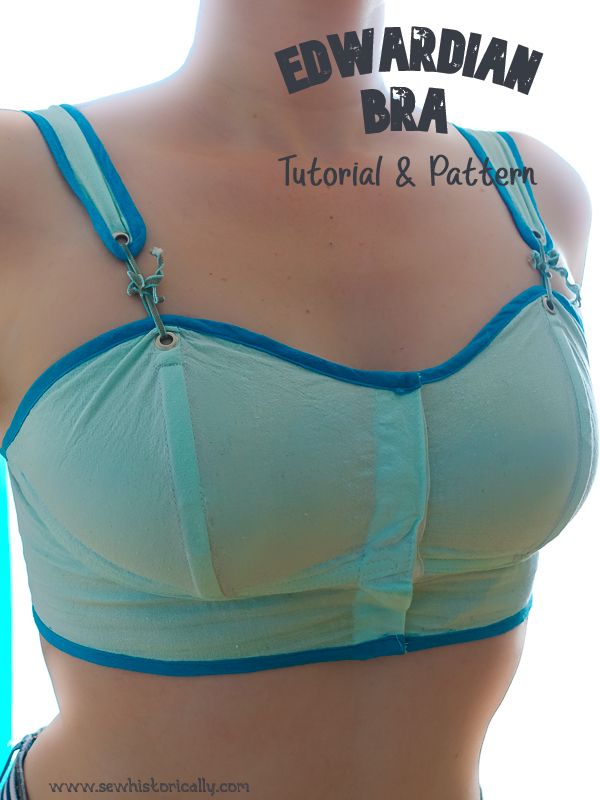
Learn how to sew an Edwardian-style bra that is so comfy you can wear it instead of a modern bra! 😀 This Edwardian bra pattern is self-drafted but is inspired by antique Edwardian brassieres and reform waists (Edwardian alternatives to traditional corset).
Related: Edwardian Cotton Net Summer Corset
The Edwardian-style bra is made of one layer of cotton fabric. And it’s lightly boned for a better fit. The bra is very comfortable to wear – more comfy than most bras in my opinion. You can wear the Edwardian-style bra next to your skin. And even under modern clothing it’s almost invisible.
Related: Modern Edwardian Bra – Historybounding
You’ll Need:
- lightweight to medium weight cotton fabric (like cretonne)
- rigilene
- German plastic boning
- hook & eye tape (or a different type of closure like buttons)
- bias binding
- cotton twill tape
- metal grommets (you can also make handsewn eyelets instead)
- elastic
- narrow cotton tape
How To Sew An Edwardian-Style Bra
1. Print out the pattern (pattern coming soon – so stay tuned!).
2. Cut the pattern pieces out of cotton fabric.
3. Sew the pieces together with plain seams. All seams will be covered with bias binding later – so there’s no need to finish the raw edges.
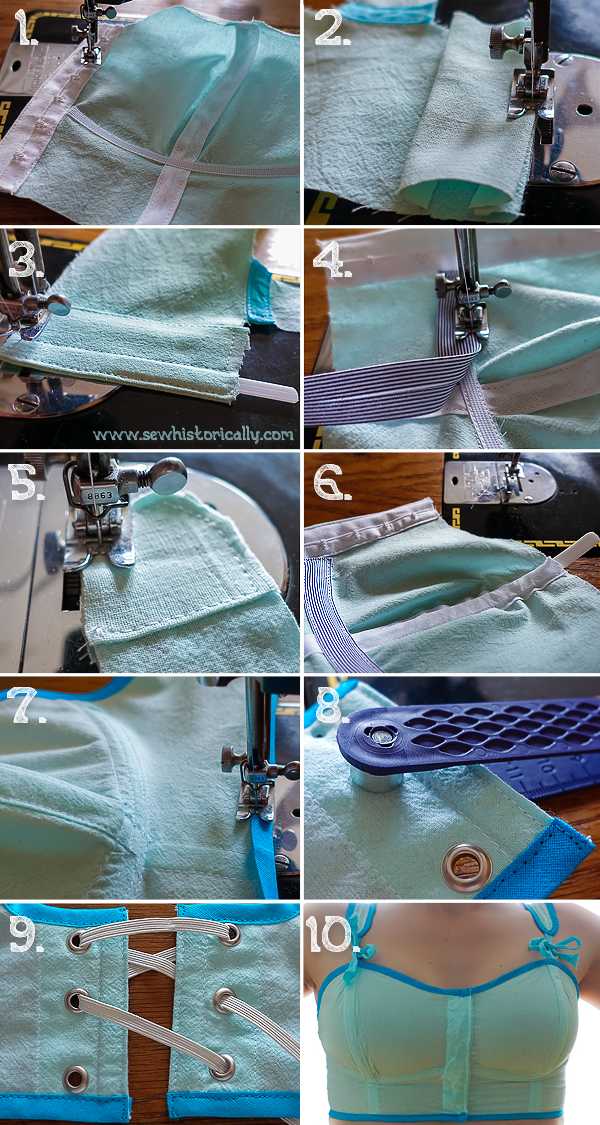
4. Finish the front of the bra with hook & eye tape (picture 1). (Or finish it with cotton tape or bias binding, make buttonholes and sew on buttons.) You can leave the top and bottom of the tape raw by now because it will be covered later.
5. Finish the back of the bra with a strip of fabric, bias binding or tape (picture 2): This must be wide enough for the boning and grommets. Sew a boning channel at the back (picture 3). The boning is necessary to reinforce the grommets and to keep the edges straight.
6. Cover the raw edges of the vertical bust seam with bias binding or tape. For this I like to use scraps that are leftover from other sewing projects.
7. Sew rigilene along the curved underbust seam (picture 1). You need rigilene because German plastic boning won’t bend enough.
Related: German Plastic Boning Vs. Rigilene – 10 Types Of Corset Boning For Historical Corsetry
8. Cover rigilene with bias binding (picture 4). You need to cover the rigilene with bias binding so that the plastic threads of the rigilene doesn’t poke your skin.
9. Round off the German plastic boning with scissors. And insert the boning into the vertical bust seam above the underbust seam (picture 6). (Optional: You can also insert a shorter piece of boning below the underbust seam).
10. Reinforce the tip (end) of the shoulder straps with a strip of fabric or bias binding (picture 5).
11. Bind the edges of the bra with bias binding (picture 7).
12. Put the grommets in at the back of the bra (picture 8). Also put the grommets in at the shoulder straps and at the top front of the bra. Instead of metal grommets, you can also sew the eyelets by hand. On my instagram account I shared a video of how I hand sew eyelets.
13. Thread elastic through the grommets at the back of the bra in crisscross fashion (picture 9).
14. Tie the shoulder strap to the top front of the bra with a piece of narrow cotton tape (picture 10).
Related: Edwardian Unboned Sports Corset


Where can I find the pattern?
Pattern coming soon – stay tuned! 🙂