Because the post about my handsewn Edwardian rayon taffeta dip waist belt is so popular, I’ve written a tutorial how you can make your own Edwardian dip waist belt! 😀
Dip waist belts were popular in the early Edwardian era:
‘A belt of ribbon closing with a fancy buckle outlines the fashionable dip.’ (The Delineator, 1901)
Related: 1900-1909 Edwardian Fashion Timeline
Belts complete your Edwardian outfit and you can even wear an Edwardian dip waist belt today with your modern clothes! 😀 All you need is some scrap fabric and a belt buckle or hooks & eyes to make your DIY Edwardian belt: So grab your fabric and make an Edwardian belt!
Fabric
Edwardian belts usually consisted of more than one fabric layer. This Edwardian belt consists of three layer: the strength layer, the lining and the outer fabric. Use sturdy cotton fabric as strength layer such as cotton twill, denim, coutil etc. And choose a thin, smooth fabric as lining fabric like cotton batiste, rayon taffeta etc. And as outer fabric you can use various cotton fabrics, silk fabrics, artificial silk fabrics like woven rayon and cellulose acetate, leather or handmade cotton eyelet lace.
By the way, you could even use a wide elastic band to make your Edwardian belt! Elastic belts already existed in the Edwardian era and were apparently very popular.
Boning
Edwardian belts were often boned with thin whalebone boning or even more commonly with featherbone. Featherbone was made of the quills of fowls. It was thin and flexible. In the 1900s it was traditionally used to stiffen belts and bodices. Because featherbone is no longer manufactured today, you can replace it with thin German synthetic whalebone boning or tripleflex plastic boning (twill covered boning). Place the boning where the belt wrinkles: usually between one and three bones at the front, one at each side and one or two at the back.
Related: German Plastic Boning, Tripleflex Boning Etc. – 10 Types Of Corset Boning
Closure
Edwardian belts either opened at the center front or center back with plain metal belt buckles, hooks & eyes or decorative silver belt buckles. Use plain metal belt buckles or hooks & eyes for everyday belts. And use decorative (silver) belt buckles or hooks & eyes for fancy belts.
Decorative Edwardian Belts
While belts for everyday wear were rather plain in the Edwardian era, Edwardian belts could also be embellished with hand embroidery, soutache, fabric rosettes or handmade eyelet lace.
Related: How To Make Eyelet Lace By Hand
Here I made an Edwardian belt with DIY fabric soutache.
Related: How To Make Fabric Soutache
How To Make An Edwardian Dip Waist Belt
1. Use a commercial pattern or draft your own pattern. I adapted one of the Edwardian belt patterns in Jean Hunnisett’s Period Costume For Stage & Screen.
2. The Edwardian belt is made of three layers: strength layer, lining and outer fabric. Cut the belt pattern out of the strength layer without seam allowances. The raw edges of the strength layer will later be encased in the lining fabric.
3. Cut the belt pattern out of the lining and outer fabric with seam allowances. You can cut the lining and outer fabric on the straight grain or on the bias. Snip the seam allowances along the curved edges.
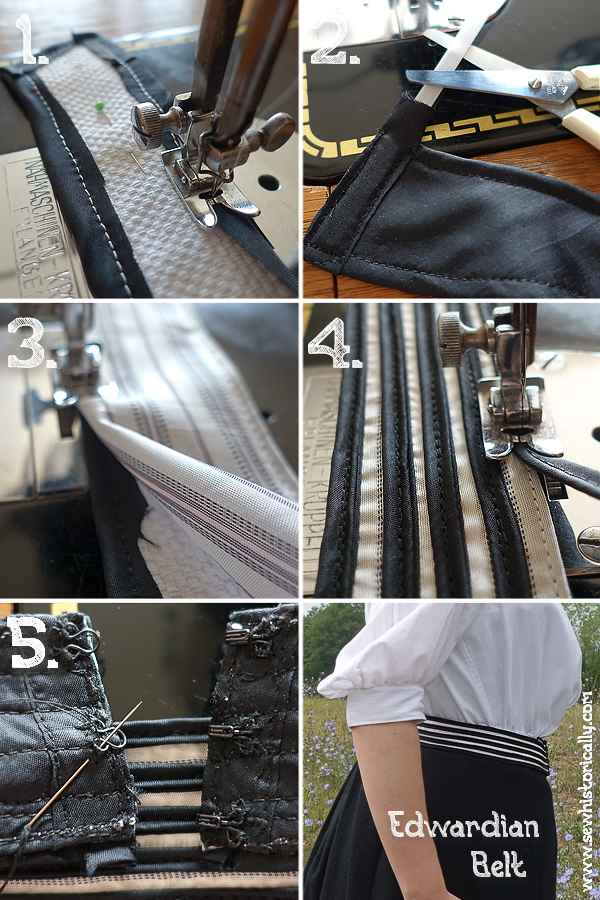
4. Pin lining and strength layer together. Fold the lining to the front of the belt so that the strength layer is encased in the lining and the raw edges of the lining are on the front of the belt. Then stitch both layer together along the edges. Fold the seam allowance towards the front as you sew. I used a contrast colored sewing thread so that you can see the stitching (picture 1).
5. If you want to reinforce your Edwardian belt with boning, stitch boning channels to the back of the belt. Round off short strips of plastic boning with scissors. And insert the boning into the boning channels (picture 2). Then finish the top and bottom of the boning channels.
6. Now place the outer fabric on top of the belt. Secure the layers with two or three pins. Then stitch along the outer edge of the belt folding the seam allowances inwards so that it’s encased between strength layer and outer fabric (picture 3).
7. Optional: Embellish your Edwardian dip waist belt. I made DIY fabric soutache with rayon taffeta fabric (picture 4).
8. Sew hooks and eyes to the edge of the belt (picture 5): ‘The hooks should be sewed to the right-hand end of the belt and on the wrong side, the bill of the hook being set 1/16 inch back from the end of the belting. The eyes should extend beyond the edge of the belting at the left-hand end the same distance that the hooks are slipped back. The two ends of the belt will exactly meet when it is hooked.’ (A Manual Of Home-Making, 1919)
9. Optional: If your Edwardian dip waist belt rides up, you can sew a hook or eye to the point at the front of the belt to connect it with your skirt. This was common in the Edwardian era to make the belt stay in place: Sew ‘one hook and straight eye or loop to fasten point of belt’ (Text-Book On Domestic Art, 1911).