Learn how to darn and mend your clothes like in the Edwardian era! 50+ tips on how to darn, mend, patch and refashion your clothes.
In the Edwardian era, clothing and household items were repaired, mended, patched, darned or refashioned into something useful rather than being thrown away as is often done today. There were tutorials on how to fix everything: Learn how to fix a ripped seam, how to mend a tear and how to sew on a patch, how to darn a hole in sweaters and socks, how to reinforce areas of stress before you even wear your new clothes, and how to upcycle and refashion your torn and worn clothing.
So join the sustainable slow fashion movement and become more sustainable and eco-friendly in your sewing: Learn how to mend your own clothes and consume less and waste less!
Mending Tips
‘Many people, to avoid having mending about at all times and seasons, devote a day to this work alone, and for busy people this is often wise, and a saving of precious minutes in the end.’ (Every Woman’s Encyclopaedia, 1910-2)
Beginner-Friendly Mending Projects
If you’re new to mending – and want to start mending your clothes but are not very enthusiastic about it 😉 – I personally find mending jeans and other denim clothes the easiest and most fun to mend: Because it doesn’t have to be perfect and you can get really creative in your mending!
The trend of visible mending is also great if you’re a mending beginner. Visible mending is a form of art. The repair is more than just a mend or darn, it’s a way to embellish clothing. Visible mending often makes a piece of clothing more interesting than it was before the mend. And what’s best, visible mending is much easier than invisible mending!
Related: 10 Tips On How To Refashion Your Clothes – Beginner’s Guide
Mend Clothes Right Now
I personally don’t like mending because it often takes longer to mend a piece of clothing than to sew something new from scratch. But I was brought up to be frugal and I try to be as sustainable in my sewing as possible: So if a piece of clothing can be fixed, then I repair it. I try to repair clothing as soon as the damage happens. Because if I don’t mend it right away, I probably never take it out of the mending pile again! 😉
So if you’re anything like me and don’t like mending, you might also find it easier to mend clothes straight away instead of stuffing them into a mending pile.
‘If possible, the day after the clothes come from the laundry should be chosen for this [mending]. All holes and thin places that require darning, broken buttonholes, undone seams, etc., should be attended to, patches added where necessary, and missing buttons and tapes replaced before the things are put back on the shelves […] certain amount of mending should be done before the articles are washed […] or the friction of washing will only make them worse.’ (Every Woman’s Encyclopaedia, 1910-2)
Create A Mending Basket
‘Keep always some tailor’s canvas for use as stiffening, buckram for millinery, white leno and fine black lining, rolls of old linen and flannel for patching, stray pieces of lace, and left over lengths of embroidery or insertions. Roll up all oddments in soft, clean muslin with tape or label attached, on which is written a list of the trifles to be found within your treasury.’ (The Cult of the Needle, 1915)
How To Mend Your Clothes
‘Patching is the art of restoring the worn parts of any garment by inserting better material.’ (Home And School Sewing, 1901)
How To: Hemmed Or Set-On Patch
‘A hemmed, or set-on, patch consists of a piece of material (with the raw edges turned under on all sides) sewed over a hole in another piece of material.’ (School Sewing Based On Home Problems, 1916) ‘The hemming stitch is then used on both the right and wrong sides of the patch to hold the edges.’ (Clothing And Health. An Elementary Textbook Of Home Making, 1916)
‘The warp of both garment and patch must run in the same direction’ (Home And School Sewing, 1901) ‘If the material is un-figured it is sometimes desirable to make the patch circular (as in a corset cover) or triangular if the hole is three-cornered. If the hole is longer than it is wide the patch should be made oblong […]
To set-on such a patch, first cut away the frayed edges, then make a small diagonal cut into each corner of the open square and turn back the edges about 1/4″ all the way round […] Place the right side of the patch on the under side of the opening […] Pin the edges of the opening to the patch in several places […] and sew with fine hemming stitches […] [or] with the sewing machine. To finish the wrong side of the patch […] turn under the raw edges […] hem neatly in place […] and press the patch.’ (School Sewing Based On Home Problems, 1916)
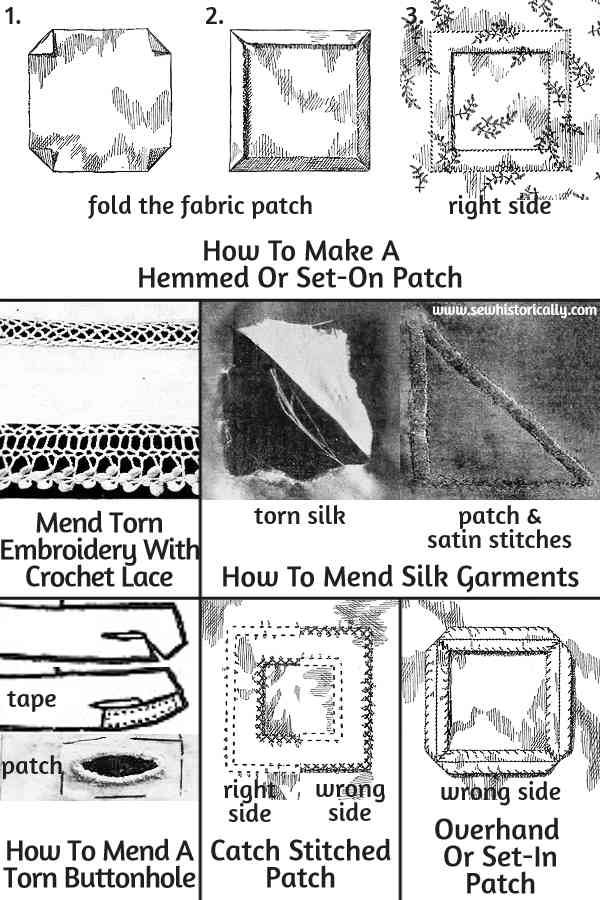
How To: Overhand Or Set-In Patch For Lightweight Fabric
‘In this patch the edges are not turned in on the wrong side, but they are overcast or have the blanket-stitch over them.’ (A Sewing Course For Teachers, 1893) ‘This patch is not as strong and serviceable as a set-on patch […] It may be used very satisfactorily, however, on thin goods like lawn, organdie, dimity or other very light materials’ (School Sewing Based On Home Problems, 1916).
‘To make this patch, cut away all of the worn material […] leaving an oblong or square opening. […] Match the design carefully, laying the patch on the wrong side of the material with the right side turned toward the right side of the material. Make small diagonal cuts in the corners of the hole and turn the edges back on a thread about 1/4″ all around the opening. Turn back the material along one edge of the patch […] where the design exactly matches the design in the torn place.
Beginning a little way from one corner, overhand the edge of the patch and the edge of the opening together with very shallow stitches […] sew well into the corner, then turning the material half way round, fold the second edge of the patch to match the figure along the second edge of the opening and overhand along this edge as you did the first. Continue folding the patch and overhanding the edges together until all four sides of the opening have been overhanded to the patch […]
The under side of the patch should be finished neatly. To do this trim the under edges of the material until they are exactly parallel and about 1/4″ wide. Overcast all the edges with neat overcasting stitches’ (School Sewing Based On Home Problems, 1916).
How To: Catch Stitched Patch For Flannel & Wool
‘This method is used in patching garments made of flannel or cloth. The fact that, owing to the thickness of the materials, the edges need not be turned, makes this in many respects the easiest of all patches […] the stitch is carried over the raw edges […]
Cut out all worn material around the hole. The piece intended for the patch must be three-fourths of an inch larger than the hole when thus prepared. Tack the patch to the wrong side of the garment […] Turn the material over with the right side up and catch-stitch [herringbone stitch] the garment to the patch […] Catch-stitch the patch to the garment on the wrong side.’ (Home And School Sewing, 1901)
How To Mend Silk Garments
‘Bad tears in fine, close-grained silk are difficult to mend invisibly, and they require much skill and patience. […] A jagged tear in silk can be mended best by inserting a triangular patch extent, it is better to repair it with a patch, especially if the silk is in the least rotten, or is torn out much at the edges. […]
having previously trimmed the edges of the tear, […] the patch should be tacked in position under the hole, and the border of the silk fastened down to it with very small running stitches worked in the finest silk thread of exactly the same shade. […] Work the sides of the triangle over with a long, flat, and even sewing stitch [like a satin stitch]. Darn the other side very neatly backwards and forwards. […]
it is possible to make the darn sufficiently substantial […] if the patch is lined with a piece of material. Something thin should be selected for the purpose, such as silk, or even net or chiffon, so that the mend will not appear clumsy […] If the silk, perhaps from hard wear, has cut through in several places […] a patch should be cut sufficiently large to cover the entire area of the weakness.’ (Every Woman’s Encyclopaedia, 1910-2)
Don’t Use New Fabric For A Patch
‘If possible, select for the patch a piece of material that has been worn as much as the garment, because a new patch set into a worn garment shows plainly. A new piece of material may be washed and hung in the sun to fade if there are no worn pieces on hand.’ (School Sewing Based On Home Problems, 1916)
Related: Update Old Clothes With Fabric Dye
How To Patch Figured & Striped Materials
‘In patching striped or figured materials, match the pattern so that, when finished, the continuity of the design is unbroken.’ (Home And School Sewing, 1901) ‘A three-cornered tear on figured material can be mended more neatly with a square patch than with a triangular one as it is usually difficult to match figures along a diagonal.’ (School Sewing Based On Home Problems, 1916)
How To Mend Torn Embroidery With Crochet Lace
‘Unfortunately, by far the larger part of our mending, nowadays, is due to the modern laundry. Where our mothers could keep their underclothing in good condition for years, ours is torn to shreds, and some of it comes home ragged and tattered most weeks from the average laundry.
Crochet a band of insertion’ and insert it with overhand stitches. ‘You will find this will wear well, and look better than patched embroidery.’ (The Cult Of The Needle, 1915)
How To Repair Embroidery
‘A jagged tear in a piece of embroidery edging […] can be mended so that the damage is invisible […] Instead of any attempt to darn up a hole, the most effective method of proceeding is to put in a fresh piece of material, which will entirely do away with the damaged section. On this may be copied the exact pattern of the embroidery. […]
Place a square of material that matches the torn fabric underneath and well outside the damaged area. Tack in position by an inner and outer line of tacking. Do not draw or pucker the work. […] it is easier to conceal a mend in an elaborate embroidery than in one which is sparsely decorated. […]
Then in the front of the embroidery all the damaged portion can be cut away, taking the scissors close to the tacking line, and right through the centre of the embroidery stitches, otherwise when the new ones are worked over they will be too thickly padded. […]
The patch must now be sewn […] on the wrong side with the 100 cotton, and in the finest buttonhole stitch. […] where the patch cannot be joined under cover of the embroidery a thread must be run in and out in a tiny darn, so as to join the edges and keep them from fraying. […]
Trace the pattern of the embroidery, by means of carbon paper, on the new material’, then embroider ‘in silk or cotton, as may be required.’ (Every Woman’s Encyclopaedia, 1910-2)
How To Repair Needle Lace
‘It is possible to mend lace almost as effectively as embroidery […] Of course, when treating tears in those varieties which are made entirely of thread, such as torchon and Irish crochet, there will be no means of providing a background to work upon in the shape of a patch. Thus it is necessary to make up the destroyed material entirely by hand-worked stitches.’
Baste the needle lace to cardboard. ‘Pin a piece of tracing-paper over the lace, and follow out the principal points with a soft pencil.’ Transfer the pattern with a pencil and intensify ‘by outlining the pattern […] with Chinese white paint or thin enamel. […]
The lines and spaces shown by the white paint are now sewn over with cotton, the stitches being taken quite loosely, and drawn in the opposite direction, either across or longways, to that in which they will run on the finished pattern.[…] The pattern is again worked over with a sort of darning stitch on the top of the tacking, and securely joined in the proper places to the rest of the lace. […]
Lace of a very large and decided design can sometimes be better repaired if the principal pieces, such as flowers and leaf are made separately. […] Only attempt lace-mending by daylight. The close matching of stitches and shading can never be accomplished satisfactorily in artificial light.’ (Every Woman’s Encyclopaedia, 1910-2)

How To Repair Tulle & Valenciennes Lace With Bobbinet Tulle
‘Decidedly the best and least conspicuous method is to fill in the hole with a carefully placed piece of net. […] The fresh net must, of course, exactly match in shade and texture that to which it is to be joined, as must also the thread for remaking any portion of the pattern which may be torn away.
First it is needful to cut a square of the net, and tack it firmly under the hole, allowing an inch or so over all the way round. Now take a piece of the finest cotton, or even a split thread of silk, and run it round the extreme edge of the damaged section, catching it in and out of the mesh, and thus uniting the two pieces of net. […] Cut away the old lace which is left within the circle of the thread, and on the new net work out an exact copy or continuation of the pattern. The mend will be practically invisible when it has been carefully pressed.’ (Every Woman’s Encyclopaedia, 1910-2)
How To Save Old Lace With New Net
‘To save a piece of very good old lace, when the pattern remains unharmed and only the net has given way, it is sometimes worth while to transfer the design to a fresh background. In order to do this, the principal pieces should be cut out and pinned in their right order on a piece of new net […] They may be tacked securely, and then fastened down, either by a fine buttonhole stitching taken through from the wrong side round the edge of each or by a tiny running of silk or cotton. […] The net under the pattern can be cut away with a sharp pair of scissors, and lastly, any of the finer sprays or connecting threads of the pattern can be worked into their proper place. The lace will then be as good as new.’ (Every Woman’s Encyclopaedia, 1910-2)
Visible Mending With Laid Work (Couching)
‘Laid work is a useful way of restoring an old and frayed background […] back the embroidery with a fresh piece of strong material, and then […] cover the background entirely with laid work, being careful to match the original shades.’ (Every Woman’s Encyclopaedia, 1910-2)
Repair A Frayed Hem Immediately
‘A chemise […] slightly frayed at the bottom […] is easily made perfect by cutting off the bottom hem, turning up and machining another. Do not tear off this hem, but cut it off, as the threads round the bottom of the chemise do not always run evenly.’ (The Cult Of The Needle, 1915)
‘To prevent an embroidery flounce from ragging out before the petticoat itself is any the worse for wear, neatly hem the edge as soon as it threatens to fray or gets torn by an accidental mis-step, and add a bordering of Valenciennes or fine Torchon lace.’ (The Cult of the Needle, 1915)
How To Mend The Sleeve Of A Chemise Or Nightgown
‘The sleeve is a part that constantly comes to grief with growing girls. Physical drill, hockey, etc., while giving good exercise to the arms, also causes much wear on the parts of the chemise round the shoulder.
Related: 20 Tips For A Healthy, Happy Life – Edwardian Beauty Routine
Patching here is very unsatisfactory, for if you patch one side one week the other will need it the next, and the top the next after, making a very unsightly and uncomfortable garment. The remedy for this is to put in an entirely new sleeve, which is very easily done.
Take an oblong piece of material, fold to form a square, place the fold over the shoulder part of sleeve, having first unpicked the neck band over the shoulder. One end of square goes into the band […] the other side of the square comes to the arm-hole of sleeve. Pin new material on to the old sleeve, cut out the curve under arm by the old pattern, make a seam and fell on that curve to correspond with the side of chemise. Sew round the right side of the patch, being particular that the seam and fell of the new sleeve come exactly on the seam and fell of the chemise. Now turn the chemise inside out and cut out the old sleeve, leaving enough material to turn in and make a neat hem all round. Sew on the part of the band that was unpicked, hem the arm-hole.’ (The Cult Of The Needle, 1915)
Related: Handkerchief To Top Refashion – Edwardian Handkerchief Camisole
Mend A Torn Buttonhole With Tape
Mend a torn buttonhole ‘with a piece of tape. […] tack a small piece of tape over the tear […] and machine it in place. This makes a perfectly neat mend, and is quite easy to do. (Needlework Economies, 1919)
How To Fix A Frayed Buttonhole
‘Buttonholes often get broken and frayed […] and to make them good again it is sometimes necessary to re-work almost all the stitches. In order to do this successfully, a small square of material can be tacked under the buttonhole, to which the broken edges may be sewn. A slit is then cut through, to correspond exactly with the buttonhole, and the two pieces of material can then be covered in with a strong buttonhole stitch, thus providing a perfectly firm rim, as strong and as good as new. The spare material at the back of the buttonhole will, of course, be cut away close to the edge of the stitches.’ (Every Woman’s Encyclopaedia, 1910-2)
Related: How To Sew Buttonholes On The Bias
Mend A Torn Placket With Tape
‘A slit down the front from the opening; this will possibly be very slight, but a darn is not a sufficient form of strengthening. Place a piece of wide tape across the slit, on the wrong side of the garment, and sew round securely. Some find a piece of tape on both sides acts well for hard wear, but this would be too clumsy for light garments.’ (The Cult Of The Needle, 1915)
How To Resole Cashmere Stockings
‘Cut off the sole […] Cut pieces […] from the leg of another stocking […] Machine this new sole to the stocking, open and press the seam. Fasten down all seams with small slip stitches. It is advisable to use mercerised cotton or silk, and to leave the tension of the machine rather slack. […] This sounds very lumpy, but the seams can be machined quite narrow (you find they don’t fray out at all), and being of wool are perfectly soft, and will not be noticed in the wearing.’ (Needlework Economies, 1919)
Related: Save Old, Holey Tights & Stockings – Refashion Tutorial
How To Darn Clothing
‘Darning is the repairing of fabric by inserting new threads into a place which has been rubbed thin or worn into a hole. It differs from patching in that the broken part is woven back, while in the latter a piece of the same cloth is inserted into the hole. Knitted and woven materials are both usually mended in this way. […] Darning and patching are often required on the same worn place.’ (A Sewing Course For Teachers, 1893) ‘Darning would not be considered such a task if it were looked upon as lace-making, which it is in a humble way.’ (Home And School Sewing, 1901)
Darning Thread For Knit Fabric
‘The aim in darning should be to mend in such a way as to hide, so far as possible, the fact that the material has required mending. The thread used should, therefore, be as like the material to be darned, both in colour and texture, as it is possible to get it.
It should be soft and yielding and rather loosely twisted, and for some darns it should be rather finer than the threads of the material.’ (Every Woman’s Encyclopaedia, 1910-2)
‘Ordinary darning cotton is used to darn lisle and all kinds of cotton stockings. A finer mercerized darning cotton is used for silk hose.’ (School Sewing Based On Home Problems, 1916) ‘Fine darning cotton doubled is more satisfactory than coarse darning cotton.’ (A Sewing Course For Teachers, 1893)
Darning Thread For Woven Fabric
‘The raveled warp threads of the same material give the most satisfactory results. Wool may be threaded by waxing it or by twisting a cotton thread in with it. If wool raveling cannot be obtained, silk (one shade darker) may be split into thirds and one-third used for the work. Silk, however, catches the light and shows more than the raveling of the material.’ (A Sewing Course For Teachers, 1893)
The Darning Needle
‘The needle should be long, as several stitches will be taken on it at one time, and no coarser than is necessary to take in the thread.’ (Every Woman’s Encyclopaedia, 1910-2)
Darning Egg Or Cardboard
‘After the ragged edges have been trimmed away as much as necessary, place the darner (an egg-shaped wooden ball or cardboard) under the hole’ (School Sewing Based On Home Problems, 1916).
For darning ‘the position is over the first two fingers of the left hand or the stockinet may be basted to a card. Egg-shaped and other darners are apt to stretch the stockinet and the darn does not lie flat.’ (A Sewing Course For Teachers, 1893)
Darning = Weaving With Running Stitches
‘In darning, the parts of a fabric that are torn or separated should be united by inserting new threads in a manner as nearly like weaving as possible. […] From its similarity to weaving, it is sometimes called hand weaving.’ (Home And School Sewing, 1901)
How To Darn A Tear In Woven Fabric
‘Woven material which has been torn may be repaired by weaving back the broken threads. […] Where there is a worn place or a slit rather than a hole a plain running darn will suffice. […] A few rows of stitches are often enough to hold a slit together in wool materials where the strain is not great, but in cottons and linens a close mass of replaced threads is necessary to sustain the strain of laundering.
If threads are severed in one direction only, such as warp threads, those alone need to be replaced. If both warp and woof threads are broken both must be reinserted. […] The stitch should show little on the right side. […] The warp threads are put in first as far beyond the slit as need be, the woof threads need not be so numerous as the warp, but should be sufficient to keep the slit from stretching in that direction’ (A Sewing Course For Teachers, 1893)
‘Begin without a knot and a little beyond the tear for strength. Fill in the missing thread with rows of [running] stitches close together. The stitches should extend far enough each side of the tear to take in the worn part also. In turning at the end of each row, leave a tiny loop […] to allow for stretching and pulling in washing.’ (Clothing And Health. An Elementary Textbook Of Home Making, 1916)

How To Darn A Tear With Baseball Or Overcast Stitches
‘Another way to darn a tear on heavy material is to overcast the raw edges closely together, on the wrong side, then rub the seam open and darn lightly. Lay a wet cloth over the darn, and press. To make a perfectly flat seam on selvedges or heavy woollen cloth, the edges may be joined’ with the old German seam, aka baseball stitches. (School Needlework. A Course of Study in Sewing designed for use in Schools, 1893)
How To Darn A Large Hole In Woven Fabric
‘A hole which is too large for ordinary darning may need repair. It is often better to place a piece of the same material underneath and darn down the raw edges on it than it is to hem or overhand a patch on the garment. The piece placed at the back must exactly match the original. […] This piece may be carefully run on to the body of the garment with an irregular running-stitch showing as little as possible on the face. Warp raveling of the material may be used for the darning which is done on the right side, the raw edges should be overcast.’ (A Sewing Course For Teachers, 1893)
Strengthening Darn
‘This darn consists merely of several rows of running stitches running with the warp of the material, and is used to strengthen weak places where a hole has not actually been worn. It may be of almost any geometrical shape, that of a diamond being the most desirable, as in this shape the strain will not come on one line of weaving.’ (Home And School Sewing, 1901)
How To Darn Patterned Fabric
‘If the tear has occurred on a patterned portion of the material, it should be arranged to make up the design as far as possible. In this way the darn will be less obvious than if left a blank space. […]
place a piece of chiffon behind the tear, and on this tack portions of the design cut from a new piece of material. The second stage consists of darning across the tear, taking in the pieces of the design. The spare chiffon is cut away from the back’ (Every Woman’s Encyclopaedia, 1910-2).
How To Darn Lace
‘Laces, especially those with a groundwork or foundation of bobbinet, are frequently mended by darning; in fact, many real laces are made by outlining or darning a pattern on some meshed material. Darning would not be considered such a task if it were looked upon as lace-making, which it is in a humble way.’ (Home And School Sewing, 1901)
Related: How To Make Darned Tulle Lace
How To Darn Socks & Stockings With Running Stitches
‘Stockings should be repaired as soon as a small hole appears in them, as a small hole is easily darned but a large one presents a difficult task.’ (School Sewing Based On Home Problems, 1916) ‘The stocking should be darned on the right side of the foot and the wrong side of the leg.’ (Home And School Sewing, 1901) ‘A worn place near a hole should be included in a darn, or where several small holes are close together, darn in one large darn.’ (Clothing And Health. An Elementary Textbook Of Home Making, 1916)
If the hole ‘is very large, strands of thread may be thrown across the hole to keep it in shape, or a thread may be inserted around the edge of the hole catching each loop and closing it without puckering it. […] The ends of the darn should be diamond-shaped or wavy, so the strain will not be along one line of loops. Beginners may stretch a thread in diamond shape about the hole and darn inside of that.’ (A Sewing Course For Teachers, 1893)
‘Begin on the wrong side without a knot, about 1/4 of an inch to the right of the hole. The stitches are the same fine running as for other darning, and the rows made close together. […] darning should run the same way as the loops, up and down the material. […]
pass the needle through the loop at the edge of the hole and extend the thread across the hole to the loop opposite, and continue with the darning stitch. […] In fine darning or when one is darning sweaters or gloves, all the loops at the edge of the hole should be carefully caught. For everyday stocking darning, one does not have time to stop for every loop at the edge of the hole.’ (Clothing And Health. An Elementary Textbook Of Home Making, 1916)
‘Insert the needle at right angles to these threads, weave under one thread, over one thread across the threads first put in, taking a few running stitches into the edge beyond. […] Continue weaving back and forth until the hole is filled with woven threads.’ (School Sewing Based On Home Problems, 1916)
How To Darn With Diagonal Running Stitches
‘A rapid means of darning stockinet, and one which is sometimes used to good effect, is to insert threads diagonally across the hole in the stockinet instead of placing them lengthwise and cross-wise of the knitting. A very elastic darn is thus made. Care must be taken to catch every loop as the stitches cross the hole.’ (A Sewing Course For Teachers, 1893)
How To Fix A Hole With Knit Stitches – AKA Duplicate Stitch Or Swiss Darning
‘This manner of darning reproduces the original knitting of the garment. It is the method employed in factories where the machinery has torn the fabric. It is much used in countries where hand-knitted garments are used. It is a more difficult process than the ordinary way of inserting warp and woof and unnecessarily tedious where the darning of ordinary stockings or sweaters is concerned.
The method is to clear away loose ends of the stockinet until the hole is square or oblong. Strands of thread are then stretched across the hole from the ascending and descending loops and the knitting stitches are built up with darning cotton on these strands. The strands are carefully removed when the knitting is completed.’ (A Sewing Course For Teachers, 1893)
How To Darn A Large Hole In Knit Fabric
‘Where a large hole is worn in a stocking or in knitted underwear a piece may be set under and patched down with the herring-bone stitch. […] Care must be taken that each loop of the stockinet is caught or the ladders will stretch into a hole.’ (A Sewing Course For Teachers, 1893)
How To Fix A Run In Stockings
‘Where a ribbed stocking has a run in it, it may be repaired by sewing over and over the run with thread to match. A silk stocking may have the dropped stitch crocheted back in place.’ (School Sewing Based On Home Problems, 1916)
How To Repair A Stocking Seam
‘Sometimes there are tiny rips in the seams of stockings. They can be overhanded carefully on the wrong side, taking up only the very edges of the seam so as not to make a ridge.’ (Clothing And Health. An Elementary Textbook Of Home Making, 1916)
How To Mend Worn Gloves Between The Fingers
‘A slit in a kid glove may be neatly darned by over-handing the broken parts together. Where a hole is worn or more room is needed, the blanket-stitch can be made close together around the hole and held together by catching the loops, or succeeding rows of the stitch may be caught one in the other to form a lace work.’ (A Sewing Course For Teachers, 1893)
‘The first part to go is, as a rule, between the fingers. This more especially is the case with washing gloves, which have a tendency to shrink, and wash-leathers, unless splice-seamed, will always do this. As the fingers shrink, the space between splits, and it cannot be sewn up because it would make the hand too tight and the fingers too short.
To remedy this, take a reel of strong thread and a small fur needle (three-sided needle) and make a fine net-work between the two fingers. Button-hole the edge of the split as you form the lattice. Insert your needle in the edge of the hole and make one button-hole stitch; then take your needle into the other side of the hole with another button-hole stitch. Then two button-hole stitches, and take your needle up to the top edge of the hole, near where you began.
This forms bars about 1/16-inch apart, and with two button-hole stitches in between. This completed, turn the glove and do the same thing across from side to side, knotting the thread each time it crosses the under-threads. By this means, a tiny net-work is made. This net-work is elastic, and will wear and wash into shape and last as long as the glove itself.’ (Needlework Economies, 1919)
Make Clothes Fit & Last Longer
‘The garments one makes for one’s self are likely to outlast three or four of the bought kind and this, too, at about one-third the cost.’ (Needlework Economies, 1919)
Add Perpendicular Tucks To Blouses & Dresses
Make dresses and blouses ‘with perpendicular tucks. These can be made extremely ornamental, and a trimming to the dress. When […] necessary […] let out the perpendicular tucks as much as is required, add a pretty plastron […] and the dress which would have been perfectly useless […] is as good as a new one.’ (Every Woman’s Encyclopaedia, 1910-2)
Add Horizontal Tucks To Skirts
Adding horizontal tucks to skirts was a popular way in the Edwardian era, to make clothes fit longer: The tuck was let out to make the skirt longer for growing kids or to cut off the frayed hem of petticoats.
If it ‘is a gored skirt, and the tucks are to be deep ones – that is, two inches or more – the under side of the tuck will be fuller than the outside. If this fulness is not properly disposed of, the tucks will not lie straight or hang well. […] turn the skirt with under side of tuck toward you and pin tuck to the desired depth, two or three times on each gore. Then in places where the material fulls up run a gathering-string on the under side of tuck just above the pins, and pull material to position. Do not pull it too tight, or the tuck will gather. […] Large tucks, such as are here described, should be carefully pressed, first on the wrong side of the tuck and then on the wrong side of the dress.’ (McCall’s Magazine, 1907)
Buy More Fabric For Future Mending
‘The good old-fashioned plan of always buying an extra half-yard of material to allow for accidents is quite worth its trifling additional expense, and is to be recommended. It is a wise precaution for those who would have their clothes well mended and wish to insure in some measure against the damage wrought by possible tears.’ (Every Woman’s Encyclopaedia, 1910-2)
Reinforce The Heel Of Hand Knitted Socks
‘To strengthen the heel and underpart of the foot when making men’s or boy’s stockings, knit stout mercerised cotton along with the wool. This does not make it so clumsy as 2 strands of wool, yet it adds considerably to the wearing quality of the stocking.’ (The Cult of the Needle, 1915)
Reinforce The Heel Of Store-Bought Socks
‘It is not generally known that these parts can be so reinforced that their durability is prolonged two or three times.’ Cotton yarn ‘matching the colour of the sock, is worked into the lines of knitted stitches, using a darning needle for the purpose. Take up one side of each st on the needle, draw the thread through, working in perpendicular rows, come back on the other side of the stitches down to where the 1st row was commenced, and so on. In this way the cotton thread is all on the outside of the woollen knitting, and receives all the friction from the shoe, while it never comes next to the skin.’ (Needlework Economies, 1919)
Knit Easy-To-Repair Socks
To make socks and stockings easier to repair, knit the leg, toe and heel part separately and join the pieces with crochet stitches. ‘This method of knitting hose renders it an easy matter to repair the heel and toe when these parts become worn. By simply undoing the end stitch of a row of crochet chain stitches, the sole, heel, or toe part can be almost instantly removed by pulling the thread and undoing the crochet. […]
When the worn part is removed, a piece exactly the same size is knitted and joined to the remainder of the sock with the row of chain stitches. In this way the leg and instep portions, which seldom wear out, may be made to serve for two or three renewals of the parts exposed to wear.’ (Needlework Economies, 1919)
Related: How To Turn Leggings Into Stockings
Make Socks Last Longer
‘Insist on frequent change of hosiery and forbid the wearing of any stocking that shows even the tiniest hole.’ (The Cult of the Needle, 1915)
Preventive Mending
‘Half an hour spent weekly in preventive mending will often save hours of darning and patching later.’ (The Cult of the Needle, 1915)
‘Mending and altering are two branches of the great art of Needle-craft which no woman can afford to despise in these days of ready-made frocks and shop-bought costumes. Turnings may be insufficient, buttons sewn on with too scant stitches, hooks and eyes trembling to fall off, but these deficiencies very easily can be put to rights.
A shop-bought costume that does not fit, however, is not cheap at any price. Learn, therefore, how to make alterations in the most commonsense and practical fashion,and take preventive measures, before the garment is worn for the first time, to overcome the little deficiencies that we may expect to discover in the “ready-mades.”‘ (The Cult of the Needle, 1915)
Reinforce Seams
‘Take the proverbial stitch that “saves nine” in very good time, even before there is any apparent need for it, and you’ll find it will work miracles. […] The “ready-mades,” […] cry out loudly for preventive mending. For instance, sleeves should be stitched in by machine, for on ready-made clothes the machine stitching is not always carefully done, and a weak place in the sleeve seam will quickly give way under strain and start an ugly tear.’ (The Cult of the Needle, 1915)
Sew On Buttons
‘Buttons should receive careful attention when any ready-made garment is bought. The trimness of effect and the general prettiness of coat or costume may be entirely spoilt if one of a set of distinctive buttons is allowed to drop off and get lost. Therefore sew on all buttons at the time of your purchase. Stitch carefully with a strong thread; when you have sewn through and through the button half a dozen times, wind your thread round and round the strands which hold the button, between the button and the cloth, making a sort of shank.’ (The Cult of the Needle, 1915)
Reinforce Sleeves & Other Areas Of Stress
‘It is a great advantage to arrange a preventive [patch] […] under the sleeves, or in any part of the dress which will have particularly hard wear, even before it shows obvious signs of wearing into holes. One cannot say too often that a “stitch in time saves nine.”‘ (Every Woman’s Encyclopaedia, 1910-2)
Reinforce Socks & Stockings
‘Stockings, for instance. The toes and heels of children’s stockings may be neatly darned before they are worn for the first time, for this purpose using crochet silk or mercerised thread, which is less bulky and clumsy than wool. […]
To prevent those long running ladders which are almost impossible to mend, sew a band of silk or cotton, or a border cut from an old stocking, round each hem of the new pair. Hose supporters (chief cause of these destructive ladders) will seldom cut through this double band. […]
In the knees of children’s stockings small shields may be placed, pieces cut from other stockings and fastened in so neatly that they are quite inconspicuous and not at all uncomfortable.’ (The Cult of the Needle, 1915)
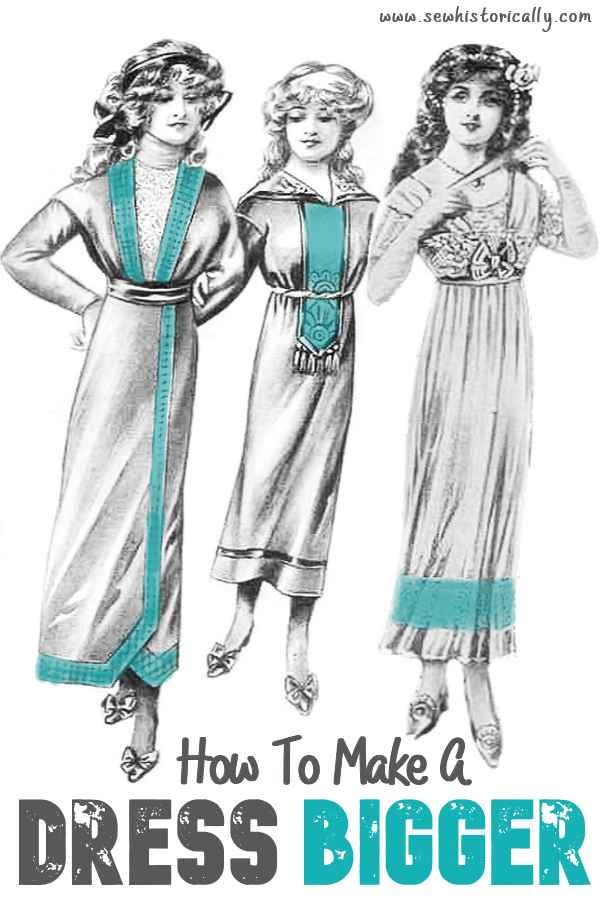
How To Refashion Clothes
How To Make A Dress Bigger
‘Cut the dress bodice down the centre, and insert embroidery […] Pieces of the same embroidery will be convenient also for lengthening the sleeves’ (Every Woman’s Encyclopaedia, 1910-2).
How To Add Lengths To A Dress With A False Hem
‘Nothing is uglier than a clumsily lengthened skirt, betraying only too plainly how the inches have been added. Perhaps the worst type of a wrongly lengthened dress is that in which a deep hem has been unsewn and a false hem put on, the marks of the stitchings showing where the old hem has been.
The disfiguring marks can quite well be hidden. Unpick the hem to be let down, very carefully damp and press on the wrong side; then, before sewing on the false hem, on the right side place a narrow braid or trimming exactly over the old stitch marks; continue this all round the skirt. If the crease of the hem shows where it was turned up before, put another row of the trimming, not forgetting to edge the collar and cuffs with the same, so that its use in hiding defects on the skirt may not be emphasised.’ (Every Woman’s Encyclopaedia, 1910-2)
Related: Lengthening A Too Short Dress
How To Lengthen A Dress With Lace Or Fabric
‘Another way to lengthen a skirt […] leave the hem alone, and do not attempt to lengthen at the bottom, but cut a strip off the skirt all round seven inches in depth. […] Then hem or roll the edge of the shortened skirt, and neaten the top edge of the detached hem portion in the same way.
Buy some silk embroidery or lace of the precise width that you wish to lengthen the skirt, seam it at the bottom of the curtailed skirt and at the top of the hem section. This pretty, ornamental entredeux will freshen up the party frock, and give it length at the same time. Sew some of the same trimming round the bodice and at the end of the short sleeves, and the frock will be ready’ (Every Woman’s Encyclopaedia, 1910-2).
How To Make A Dress Longer Without Sewing: Extender Slip
‘Sometimes it is possible […] to use it as a tunic or overdress […] A soft rose-petal satin slip would look charming under a white crepe tunic which had been used as a dress once or twice, and then laid aside as uselessly short. A white silk slip with palest blue chiffon over would suit a fair-haired girl to perfection.’ (Every Woman’s Encyclopaedia, 1910-2)
How To Freshen Up A Sweater
‘It is always the neck and wrist edges that show the first signs of wear on a knitted sports coat or jersey, and often a garment is discarded as done for just because these parts are shabby or out-of-date.
Have you ever thought of knitting an entirely fresh set of collar and cuffs to replace the soiled parts, or to be added to a collarless jersey or coat? The existing collar and cuffs can quite easily be cut away and the raw edges neatly buttonholed with wool before sewing on the new set.
You will probably not be successful in getting wool the exact colour of your jersey, so it will be best to use a striking contrast, such as purple on a pale blue jersey, or emerald green on a white one; or if you already have two colours in the jersey, or it is of a specially brightly-hued tint, black makes a pleasing contrast. And this year particularly contrasts of colour are very much in vogue, so that your re-modelled jersey will be quite fashionable. […]
Another simple way of freshening the neck of a collarless jersey coat is to work a strip of plain knitting 4 inches wide and 12 inches long, and stretch it along the neck edge. Cuffs can be worked to correspond. A pretty striped effect for this style of finish can be arrived at by using two different shades of wool, and working first four rows of one and then four rows of the other.’ (Needlework Economies, 1919)
Use The Good Parts Of Worn Clothing
‘Garments are often discarded as being of no use, just because they are worn in certain parts, whereas a little thought and careful cutting will often transform them into something quite useful. It is often possible, for instance, to make garments for the little ones by using the least worn portions of larger sized clothes.’ (Needlework Economies, 1919)
Related: Refashioned Denim Corset Top