Broderie anglaise lace, also know as eyelet lace, was very popular in the Victorian era and its popularity continued through the Edwardian era, the 1920s and 1950s until today. Broderie anglaise lace is a whitework lace which means that the lace is traditionally worked with white thread on white fabric. And it’s also a kind of cutwork lace.
‘Eyeleting is a style of embroidery quite apart from cutwork, yet in method it is really a cutwork, except when the material is very fine the eyelets may be punched with the stiletto.’ (Priscilla Hedebo And Cutwork Book, 1916)
There are many names for broderie anglaise lace, such as eyelet lace, Madeira lace, Swiss embroidery or English embroidery.
In this tutorial I’ll show you how to make broderie anglaise lace by hand. Making broderie anglaise lace by hand is really easy, it just takes time! It’s faster to make than drawn-thread work, but much slower than Edwardian lace insertion or Edwardian bermuda fagoting.
‘This season broderie Anglaise, […] Hardanger embroidery […] and Spachtel work […] are all rivals for feminine favor.’ (Los Angeles Herald, 1904)
What Is Broderie Anglaise Lace
‘It was all done most evenly with lovely flowers and scalloped edges, and all in white cotton embroidery thread.’ (Clothing And Health. An Elementary Textbook Of Home Making, 1916)
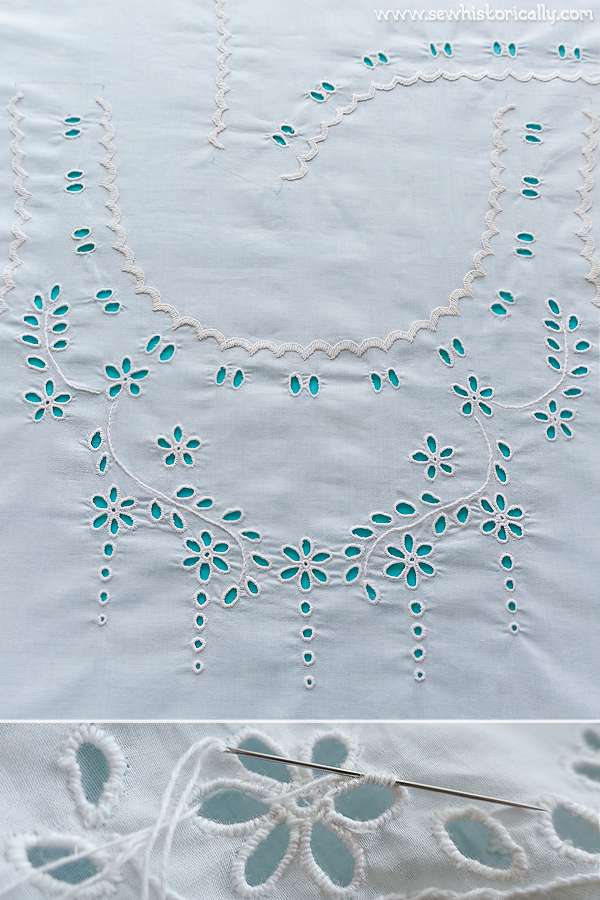
Floral embroidery patterns, large and small eyelets and scalloped edges are typical for broderie anglaise lace. Broderie anglaise is often combined with whitework satin stitch flowers.
‘Broderie Anglaise patterns are outlines of various sized holes, arranged to make floral or geometrical devices.’ (The Dictionary Of Needlework, 1885, p. 48)
‘Cut-work is a common and descriptive title for broderie l’Anglaise. It consists of cutting holes in the material, turning under the rough edge, covering it with long filling stitches and then working over it with an over and over stitch, or else an embroidery or a buttonhole stitch. The latter is much used, but does not properly belong to cut-work.’ (Los Angeles Herald, 1904)

French Lingerie With Broderie Anglaise
‘Eyelet embroidery is the simplest and most effective of all embroideries, and wears well.’ (Text-Book On Domestic Art, 1911)
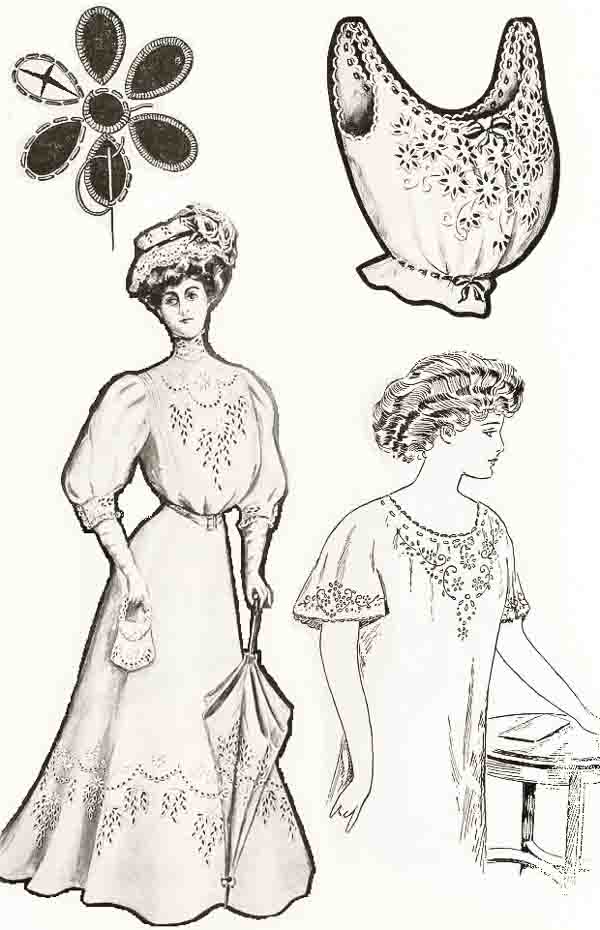
Hand-embroidered eyelet lace underwear was known as ‘French’ lingerie in the Edwardian era. Edwardian French lingerie was all hand-embroidered and didn’t have the popular Valenciennes lace insertions and yokes: It looked almost plain compared to the usual Edwardian Valenciennes lace lingerie. In this tutorial, I’m making an Edwardian French camisole or corset cover.
Related: Antique Edwardian Valenciennes Lace Petticoat
‘A great deal of the very finest of the French underwear shows little or no lace as trimming, the ornamentation consisting entirely of fine embroidery in scalloping and graceful flower designs.
Of course, if bought in the shops, such garments are very expensive, but if the work is done at home the cost is very slight, as the value of such pieces depends on the amount of time used in doing the embroidery.’ (Los Angeles Herald, 1907)
The Materials For Broderie Anglaise Lace
Embroidery Thread Thickness
Choose an embroidery thread suitable for the fabric you use. For coarse fabric use a thicker embroidery thread and for thin fabric use a thinner embroidery thread.
I actually unraveled a cotton crochet tablecloth and reused the thread as embroidery thread. The thread is a 3-ply, S-twisted, cotton thread, it’s thicker than cotton sewing thread (about three times as thick) but thinner than crochet thread, embroidery floss or pearl cotton embroidery thread.
‘The cotton thread ‘is rather coarse, but the work is in no sense coarse. So many times we make the mistake of thinking that fine threads make fine work. This is really not the case. What we might term fine work is dependable upon correct stitchery. Well placed and even stitches producing a clear-cut, good effect may be considered “fine work.” More often than not a coarse cotton is far more valuable in producing this result than fine cotton, which produces frequently no result at all.’ (Priscilla Punched Work Book, 1912)
Mercerized Or Non-Mercerized Embroidery Thread
I used non-mercerized, white cotton thread for my broderie anglaise lace. Mercerized thread has a lustrous sheen, while non-mercerized thread has no sheen. Victorian eyelet lace is always made with non-mercerized thread, even if the mercerization process was already known in the Victorian era (close-up of 1855 broderie anglaise lace). And I too prefer to use non-mercerized thread for broderie anglaise lace.
However, you can use mercerized thread as well. Since the Edwardian era, both, mercerized thread and non-mercerized thread, was used for broderie anglaise lace.
‘A design of morning glories is drawn in each section and worked with mercerized white cotton’ (Marin Journal, 1905).

The Fabric
Broderie anglaise lace is usually done on cotton or linen fabric. Here I’m using sheer white cotton fabric.
‘A great deal of the French underwear is done on nainsook [nainsook is a sheer cotton fabric], possibly because this material launders so readily, but the bride may use for her very prettiest sets handkerchief linen, which is, overall, more serviceable, and which seems a worthier material for embroidery.’ (The Modern Priscilla, 1911)
White Or Colored Fabric & Thread
In this tutorial, I used white cotton fabric. However, there’s no rule that you can’t use colored fabric or thread for broderie anglaise lace. While in the Victorian era, white broderie anglaise lace was preferred, Edwardian often used cotton and linen fabric in pastel colors or colored thread on white fabric for their blouses and dresses.
Scissors & Awl
‘Small pointed and sharp scissors are used. The end should be very sharp so that you may cut into the material with precision. […]
A styletto is necessary for eyelet work. It should be very pointed and smooth so as not to fray the material when put through.’ (How To Work Embroidery Stitches, 1909, p. 4)
Broderie Anglaise Stitches
There are two stitches used in broderie anglaise lace: the buttonhole stitch and the overcast stitch. The buttonhole stitch is like a closely spaced blanket stitch, and the overcast stitch is also known as overhand stitch and over-and-over stitch.
‘Buttonholing is worked from left to right. The thread is placed outside of the outline and held down under the left thumb. Put the needle in above the space where the work is to be done, bring it out underneath going through the loop held down under the thumb.
Then draw the stitch tightly being careful not to pucker the material. All the stitches in real buttonholing are worked alike, very evenly and as close to each other as possible.’ (How To Work Embroidery Stitches, 1909, p. 11)
‘An eyelet stitch is a close over and over stitch, pulled firm in order to keep the proper shape.’ (Text-Book On Domestic Art, 1911)

With Or Without Filling Stitches?
You can give broderie anglaise lace a raised appearance. For more texture fill the embroidery design with filling stitches, then stitch over the filling stitches with buttonhole or overcast stitches. If you’re wondering what filling stitches are: Filling stitches are nothing else than closely spaced running stitches. It’s best to use a thicker cotton thread for the filling stitches than you use for the embroidery.
‘Filling causes the embroidery to have a raised appearance, and the coarser the filling cotton the higher the pattern will be raised. The embroidery and over and over stitches are taken over this filling and edge till all are closely covered. […]
This form of needlework is exceedingly easy, and the woman who cannot embroider may use buttonhole stitch and omit filling.’ (Los Angeles Herald, 1904)
For my Edwardian camisole, I didn’t make raised broderie anglaise lace because I prefer the softer drape of eyelet lace without filling stitches.
‘Between the lines of the outlines work going one way and back, long running stitches, set alterately and repeat as often as necessary for the desired relief.’ (How To Work Embroidery Stitches, 1909, p. 6)
‘This padding may be done with the same thread used for the embroidery, or darning cotton may be used. The latter is cheaper and fills in more quickly’ (Clothing For Women: Selection, Design, Construction, 1916).
How To Start & End The Embroidery Thread
‘This is the rule in all’ whitework lace, ‘get back to the edge to fasten off the thread, but in an invisible way.’ (Priscilla Hedebo And Cutwork Book, 1916)
I usually start the embroidery with a few running stitches. Then I stitch over the running stitches to secure the thread. At the end, I take the needle to the back of the fabric and run the needle through some of the previous stitches on the wrong side of the embroidery. When you run out of thread in the middle of the design, weave the thread end through the previous stitches on the wrong side of the embroidery. And then start the new thread with a couple of running stitches.
‘Never make a knot in embroidery, a few stitches on the wrong side will be hidden by the embroidery. When the needleful is finished, work a few stitches under the work which has just been done or where the embroidery is to be continued.’ (How To Work Embroidery Stitches, 1909, p. 5)

And hiding the tail of the thread on the wrong side of the embroidery.
How To Transfer The Embroidery Pattern
I used a standard, sharpened pencil to mark the embroidery design on the fabric. Before I decided to use a pencil, I made a small sample to test if the marks would wash out. After washing, the lines of the pencil were gone, whereas the lines of a water-soluble transfer pen were still more or less visible.
‘The lawn or linen can be placed over the paper, and the design, which will show through plainly, can be traced with a hard lead pencil; or a sheet of transfer paper can be placed face down on the material and the design laid on top of this and traced with a pencil.’ (San Francisco Call, 1909)
Do I Need An Embroidery Hoop?
You can make eyelet lace with or without an embroidery hoop. I prefer to make the lace without an embroidery hoop but you have to find out what works best for you. There are four different techniques how you can prepare the fabric for the embroidery. You can either:
- stretch the fabric using an embroidery hoop
- starch the fabric with store-bought or homemade fabric starch
- use the plain (pre-washed) fabric – when you’re used to hand-sewing you should have no problem to get the tension right – this is my favorite
- stitch the fabric to a piece of paper, the embroidery pattern or a sturdy fabric with large running stitches – this technique was very popular in the Victorian era for lace making and embroidery – I used this technique for my Edwardian lace yoke and my 1920s tape lace collar
‘The work which is to be embroidered is usually drawn out on a firm lining so as not to pucker the material when working the stitches tightly. Oil-cloth has the inconvenience of sticking, not only on the fingers but on itself when it is folded while working. Glazed calico is used or more often plain white paper folded once or several times to make a thick lining.
To baste the work use according to its thickness a rather fine cotton so as not to spoil the material.’ (How To Work Embroidery Stitches, 1909, p. 4)
Antique Broderie Anglaise Lace & Free Patterns
Antique Eyelet Lace
- Edwardian hand-embroidered broderie anglaise blouse panel
- Late-Victorian hand-embroidered eyelet lace petticoat
- 1810-1840 hand-embroidered broderie anglaise lace edging
- Unfinished 1800-1840 hand-embroidered broderie anglaise edging
Free Broderie Anglaise Lace Patterns
- The Priscilla Needlework Book (1908): eyelet lace designs for doilies, dresses & accessories
- Embroidery Hints: Fall And Winter (1910): eyelet lace designs for doilies, dresses & accessories
- Entre-Deux Et Festons: broderie anglaise lace edgings
- Magasin Des Dames (1893): eyelet lace chemise yoke
- The Ladies Handbook Of Fancy And Ornamental Work (1860): broderie anglaise lace edgings
On my pinterest board ‘Antique Lace – Victorian, Edwardian & 1920s’ you’ll find more free embroidery designs.
-> My Pinterest Board ‘Antique Lace – Victorian, Edwardian & 1920s’

How To Make Broderie Anglaise Lace By Hand
‘Eyelet work very much in vogue now is very easy to do. While satin stitch has to be perfect to be effective eyelet work will have a very pretty effect in spite of its being far from perfect.’ (How To Work Embroidery Stitches, 1909, p. 29)
You’ll need:
- cotton or linen fabric
- cotton or silk thread
- sharp needle
- awl
- sharp scissors
Broderie Anglaise Eyelets
‘Eyelets are punched with a stiletto or sharp point, and are worked like a buttonhole, only perfectly round.’ (Clothing And Health. An Elementary Textbook Of Home Making, 1916)
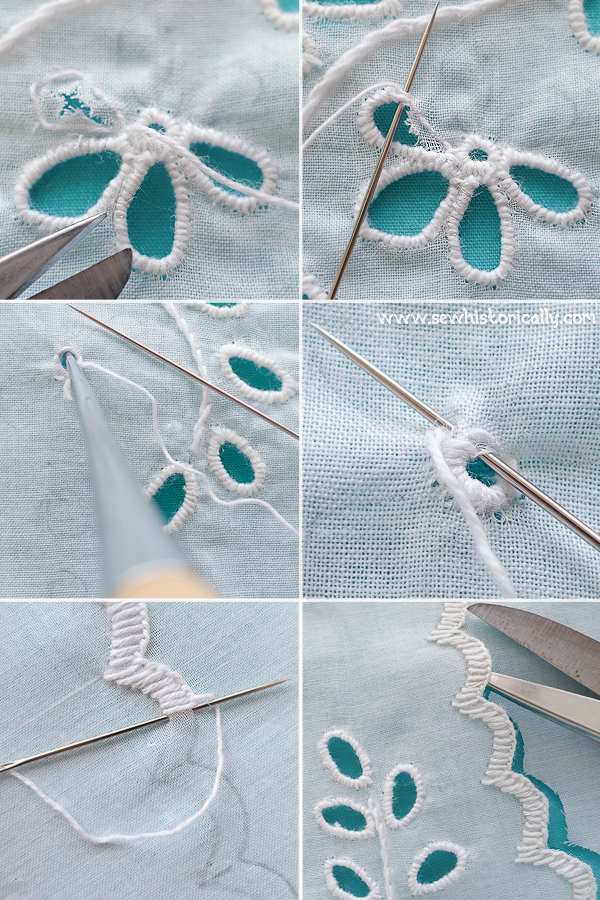
To make small broderie anglaise eyelets, use an awl (stiletto) and pierce the fabric without damaging the threads. If you don’t have an awl, use a big sewing needle, knitting needle or an opening spike for cans.
Then stitch round the hole with closely spaced overcast stitches.
Large Broderie Anglaise Eyelets
‘Very large eyelets should be cut in the centre to form a cross, then put the material underneath all round using the needle. All that is to be done is to top sew the edge.’ (How To Work Embroidery Stitches, 1909, p. 29)
‘With a soft sewing cotton run around on the line of leaves, petals or large holes. Make slits in leaves or petals with sharp-pointed scissors […] now roll the cloth back underneath, and work in Over and Over Stitch. […] Make all the stitches even and of the same length.’ (Embroidery Hints: Fall And Winter, 1910, p. 43)
To make large broderie anglaise eyelet holes, mark the design on the fabric and stitch tiny running stitches along the design. Then cut the fabric crosswise up to the outline.
Using the needle, turn the fabric under and stitch round the hole with closely spaced overcast stitches.
Related: How To Make Italian Cutwork
Broderie Anglaise Scallops
‘The scalloped edge is finished last in either buttonhole or embroidery stitch, then the rough edge is cut away.’ (Los Angeles Herald, 1904)
For broderie anglaise scallops, draw a scalloped line on the fabric. To make the stitching easier, mark another parallel line to indicate the depth of the scallops. Then stitch closely spaced buttonhole stitches along the scalloped line.
‘Hold the lower edge of the scallop toward you, begin at the left-hand end of it, and work towards the right hand, do not use a knot, but run thread through center of scallop for a few stitches, and bring the needle through on the lower edge of the scallop,
let the thread fall naturally toward the right hand, or hold down with the left thumb, put the needle in on the upper edge of scallop and bring through on outer edge exactly beside first stitch, pull thread into place and repeat, being careful that each stitch is perpendicular and very close to the preceding one.’ (Clothing For Women: Selection, Design, Construction, 1916)
After stitching carefully cut along the scallop edge.
Satin Stitch Flower
‘Satin stitch is used in working the petals of very small flowers, such as forget-me-nots, and is produced by taking the needle back each time almost to the point from which it started, so that the wrong side of the work is like the right.
Evenly made, it produces a surface like satin, thus deriving its name. It is largely used in white embroidery.’ (A Treatise On Embroidery, Crochet And Knitting, 1899, p. 9) ‘All stitches must be the same slant and even.’ (Embroidery Hints: Fall And Winter, 1910, p. 43)
Even though whitework satin stitch flowers don’t belong to broderie anglaise lace, they’re often combined.
Related: How To Make Hedebo Embroidery
Please Pin It!

Thank you for this tutorial! 🙂
You’re welcome! 🙂
Thanks for this, im very excited to try 🙂
You’re welcome. Have you already tried it? 🙂
Thanks most helpful. ?
Thanks, Jenni!
Lina, This is amazing. I didn’t realise broderie anglaise could be sewn by hand. I’ve featured your tutorial today.
Thanks for featuring me! 😀
Hi I have a medium weight cotton fabric plain color, do u think this type of hand embroidery will work with it? Also let me know what embroidery thread must be used for medium weight fabrics.. I intend only to embroider the hemline .. Your work looks lovely thanks for sharing..
Thanks for stopping by, Diya! 🙂 You can use everything from sheer muslin to heavy linen fabric for broderie anglaise. And as embroidery thread you can use ordinary sewing thread, cotton embroidery floss or yarn. Make a small sample to decide which you like best.
Are there any links to patterns to draw on the cotton — such as the scallop, et cetera?
Hi, Paula! You can find some Victorian and Edwardian broderie anglaise patterns on my pinterest board “Antique Lace”.
I was delighted to find your tutorial on Broderie Anglaise. My older sister (I am 72) tells me our grandma used to make using a special set of delicate tools. She was a sewing maid in service to an earl’s family and made dresses for the children. Finding you online was a link to her too. Thank you.
How wonderful! 🙂 I’m glad it brought back happy memories!
Ooooh this looks so fun! Thank you for the tutorial! My mam told me one of my aunts used to do this while on night shifts as a nurse and thought it would suit a dress I’m making but neither of us knew how to make it XD I’m gonna try this soon 🙂
Thanks! Glad you found it helpful! 😀