Bermuda fagoting – also know as three-sided stitch and Point Turc – is a decorative embroidery stitch which was popular in the Edwardian era. It looks a bit like hemstitching or drawn-thread work. But it’s quicker to make and can also be stitched on curved lines.
Difference Between Bermuda Fagoting & Fagoting
And even though the name is similar, Bermuda fagoting shouldn’t be confused with the fagoting stitch, aka bridging. The faggoting stitch is used to join two pieces of fabric together with decorative, open seams. Bermuda fagoting, on the other hand, is made differently and looks more like hemstitching. To make Bermuda fagoting, the fabric is pierced with a thick needle without removing any threads as in hemstitching. So, unlike fagoting or hemstitching, Bermuda fagoting can be worked on curved lines. Bermuda fagoting is also easier and faster to make than hemstitching or drawn-thread work.
Related: How To Make Drawn Thread Work
‘Bermuda Fagoting, a form of open work used on sheer materials; it is very easily made without the drawing of threads, and therefore it can be made to follow a line in any direction or curve without reference to the thread of the material.’ (Clothing For Women, 1916)
Uses of Bermuda Fagoting
You can use Bermuda fagoting as a decorative openwork embroidery to embellish fabric and clothing: Edwardian Bermuda fagoting almost looks like lace insertion! It takes longer but it’s cheaper than real lace insertion.
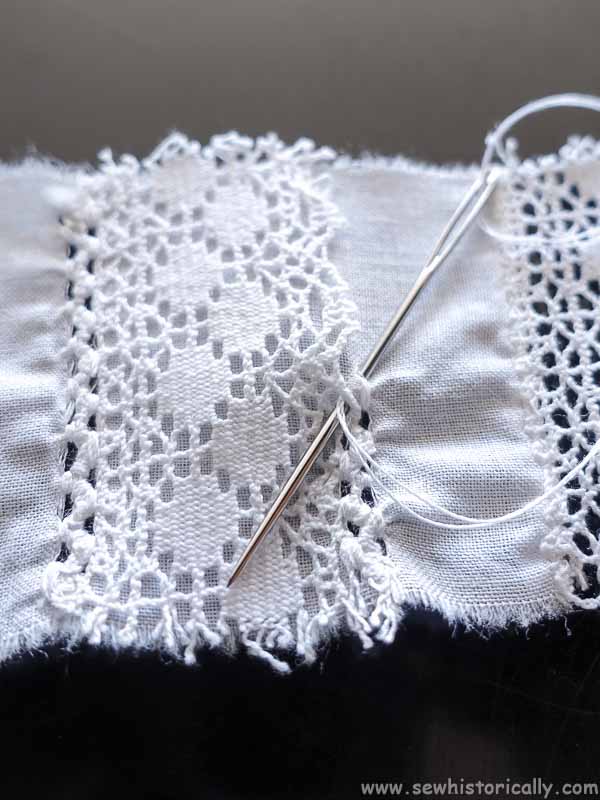
And like fagoting, Bermuda fagoting can also be used to insert lace.
Related: How To Insert Lace With Fagoting, Bermuda Fagoting & 4 Other Ways
‘Lace edging or insertion may be applied to material with Bermuda fagotting by basting the lace to place and working the stitch so that every other straight stitch is taken through the lace and material; afterwards the raw edge of the material behind the lace may be cut off close to the fagotting.’ (Clothing For Women, 1916)
In the Edwardian era, Bermuda fagoting was mainly used to embellish clothes like dresses and blouses. And it was only occasionally used for underwear like camisoles and nightgowns and to embroider monograms.
‘Bermuda fagoting may be used to follow any design or to outline any unit, initial or monogram.’ (Clothing For Women, 1916)
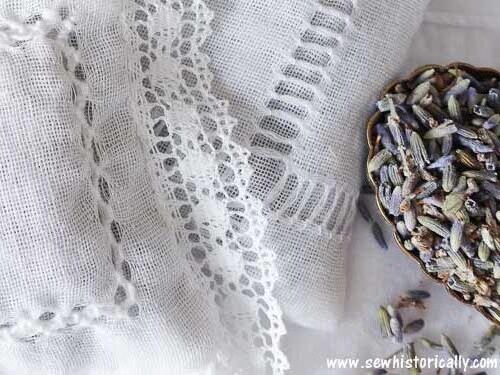
I used Edwardian Bermuda fagoting for my lace lavender sachets:
Related: Edwardian Lace Lavender Sachets With Bermuda Fagoting
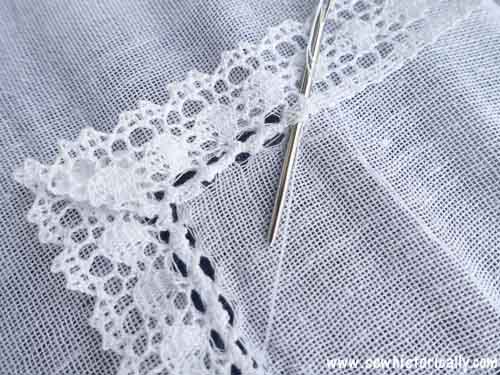
And I also used it to sew two bobbin lace trims together for the cuffs on my Edwardian shirtwaist with lace inserts:
Related: Edwardian Shirtwaist Blouse With Tucks & Lace Inserts
Tools & Materials You Need For Bermuda Fagoting
You don’t need a lot of materials for Edwardian Bermuda fagoting. For Bermuda fagoting you need:
- thick hand sewing needle
- thin & strong cotton thread – like cotton sewing thread
- cotton fabric – thin & loosely woven works best
- scissors
- optional: embroidery hoop
The Needle
A thick hand sewing needle with a sharp point is the most important tool for Edwardian Bermuda fagoting.
‘A very large needle, No. 1 or 2, or a carpet needle, must be used, and very fine cotton [thread], No. 150 or 200’ (Clothing For Women, 1916).
Embroidery Thread & Fabric
In the 1900s, Bermuda fagoting was traditionally a whitework embroidery which means that it was worked with white on white. Thin, white cotton thread on thin, white cotton fabric was usually used. But today, you can also use colored fabric and thread.
Embroidery Hoop
You can use an embroidery hoop to prevent fabric puckering. But Bermuda fagoting can also be worked without an embroidery hoop. When you’re embroidering very large or very small pieces of fabric with Bermuda fagoting, it’s sometimes easier not to use an embroidery hoop.
Bermuda Fagoting & Fabric Puckering
Because with Bermuda fagoting, you have to pull the thread tight to create holes, the fabric can pucker depending on the type of fabric. I find that loosely woven, thin cotton fabrics, like UK muslin, pucker less than tightly woven cotton fabrics, like batiste.
Related: 4 Edwardian Camisoles Made With Lace & Fabric Scraps
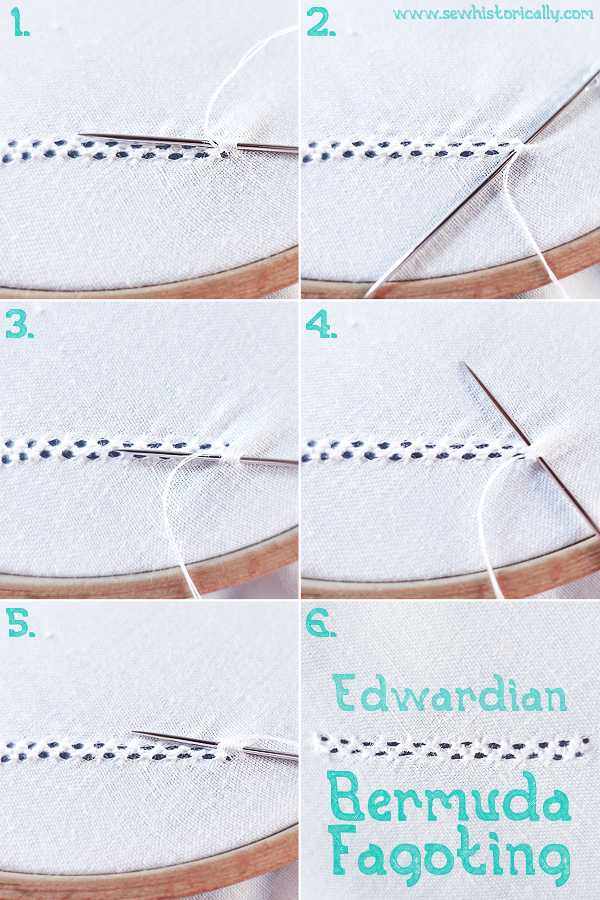
How To Make Edwardian Bermuda Fagoting
‘To work: Tie one end of the thread into the eye of the needle; the stitch proceeds toward the worker. Take a short stitch diagonally from right to left, tie the end of thread in this first stitch, put the needle into the first hole and take a stitch straight toward worker, bind with two more stitches in same holes,
then put needle into second hole and bind it to the third with two stitches, put it again into the second hole and make a stitch straight toward the worker, bind second and fourth holes, then third and fourth holes, and make next straight stitch from third hole, repeat as before.’ (Clothing For Women, 1916).
You’ll need:
- cotton fabric
- cotton sewing thread
- thick needle
Step 1
Thread the needle with a single or double thread. To prevent the thread from slipping out of the needle eye when embroidering, you can tie the thread to the needle. Here I work Bermuda fagoting from left to right. But it can also be worked from right to left or top to bottom.
Take some threads of the fabric on the needle – the needle is in line with the Bermuda fagoting. Draw the needle through to make the first stitch.
Then repeat the stitch, and draw the thread tight. Now you’ve made the first two holes.
Tip
There should be at least two stitches between the holes to tie the fabric threads together. However, some fabrics – such as tightly woven or thicker fabrics – need more than two stitches to bind the fabric threads together to create clean holes. So just repeat the stitches, bringing the needle up in the first hole and down in the second, on so on until the holes are clearly visible.
Related: How To Join Lace – Invisible Seam
Step 2
Now pierce the needle through the fabric in a slanting line. Draw the needle through to make the first stitch.
Then repeat the stitch, and draw the thread tight. Now there are three holes.
Step 3
Pierce the needle through the fabric, again in a straight line but now at the bottom of the Bermuda fagoting line.
Repeat the stitch and draw the thread tight. There are four holes now.
Related: How To Make Hedebo Embroidery
Step 4
Now end the first series of stitches by bringing the needle up in the first hole. Repeat the stitch and draw the thread tight.
Step 5
Repeat step 1 to step 4. Work Bermuda fagoting on a straight or curved line and as long as you want.
Step 6
Press the bermuda fagoting embroidery to remove puckering.
Related: How To Make Edwardian Lace Applique
Thanks so much for this great tutorial. I’ve never worked this stitch before.
And thanks too for linking up to last week’s Stitchery Link Party. Aloha hugs!
I’ve also pinned it to my Embroidery Stitch Tutorial board on Pinterest. 🙂
Thank you! 😀
Hi Lina,
Beautiful work and thank you for sharing the tutorial. We used to own a cross stitch shop, but to be honest I haven’t done any extensive work or cutwork since it closed. You inspire me to get back into soon. ~smile~ Roseanne
I’m glad it inspired you! 🙂 I love Bermuda fagoting – it’s so easy to make and looks so pretty.
As I mentioned in my previous comment… this is a really great tutorial and I loved reading it again as I reminded me that this is something I’ve been meaning to try to incorporate into an embroidery project.
Thanks so much for linking up to last week’s Stitchery Link Party. Aloha hugs!
This looks like a technique I could use on the hem line to create a base to crochet a lace border from. Does that sound like it would work?
I think it should work. 🙂
i must be dumb because I don’t understand how this stitch is started. every pic already has a long line made and the drawing of the stitch is what step first? then what? sorry but as a beginner I’m stumped!
It doesn’t matter where you start the stitch (on the right or left side of the holes). The stitch (holes) evolves as you continue to stitch it. When you stitch a small sample it should become clearer. And if you have any further questions, don’t hesitate to ask. 🙂