Learn 6 different vintage ways to insert lace and improve your heirloom sewing skills! So if you’re wondering how to add lace trim like in earlier times, read on.
Today, lace is usually inserted with zigzag stitches by machine. But in past, lace was either inserted by hand or with a straight-stitch sewing machine. In this tutorial I’ll show you 6 ways how to insert lace by hand or with straight stitches by machine. Let me know in the comments what’s your favorite way to insert lace! 😀
What Type Of Lace Should I Use?
For lace insertion you can use all kinds of lace trim, not only real insertion lace with straight edges. I’ve often used edging lace instead of insertion lace for my historical sewing projects. Edging lace has one straight edge and one scalloped edge. Because vintage cotton edging lace is often easier to find today than vintage cotton insertion lace. And I always use cotton lace – especially cotton Valenciennes and Mechlin lace – I never use synthetic lace for my historical costumes.
How To Prepare The Lace Trim & Fabric
Always prewash and iron the lace trim and fabric to prevent shrinkage. And if you want, you can stiffen the lace trim and fabric with homemade fabric starch.
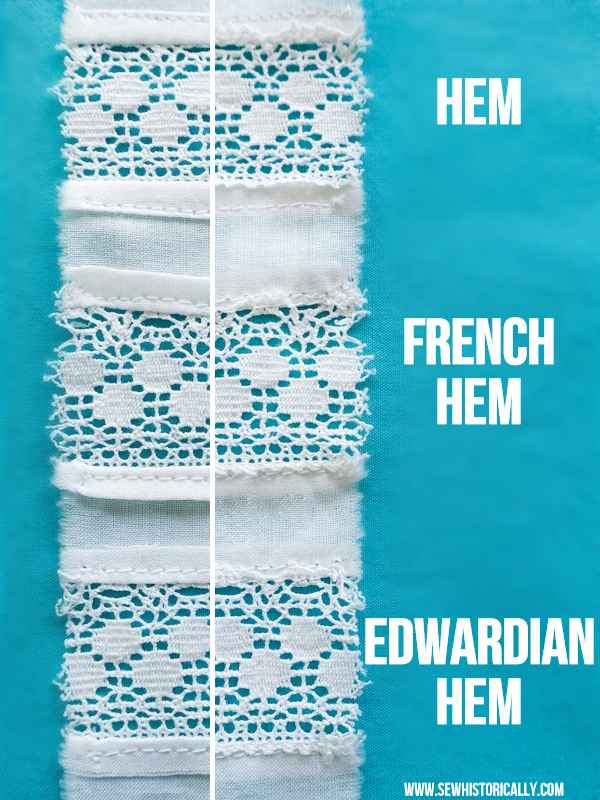
Lace Insertion 1: Hem
This technique to insert lace stiffens the fabric, just like pintucks or cording. So this method is perfect if you need stiffened fabric – e.g. for the hem of a petticoat – but it’s unsuitable if your fabric should drape softly. Moreover, you can use this technique to insert lace only for straight insertions but not for curved insertions. I’ve used this technique for my Edwardian lace petticoat and for some lace insertions on my Edwardian lingerie dress.
Lace Insertion 1 In A Nutshell
-
stiffens fabric
-
for straight insertions only
-
no raw edges
-
second row of stitching visible on right side of fabric
-
hem visible on right side of fabric
How To Insert Lace With A Hem
Plan your lace insertion design. I usually don’t mark the design on the fabric. Instead I simply measure where the lace should be (or judge by the eye) and pin the lace in place: If you look at antique lace dresses, you’ll notice that lace inserts, pintucks and embroidery are anything but perfectly symmetrical, and yet these lace dresses are incredibly beautiful. But feel free to use a pencil to mark the design on the fabric. My grandma, a dressmaker, would scold me for not marking the fabric! 😉
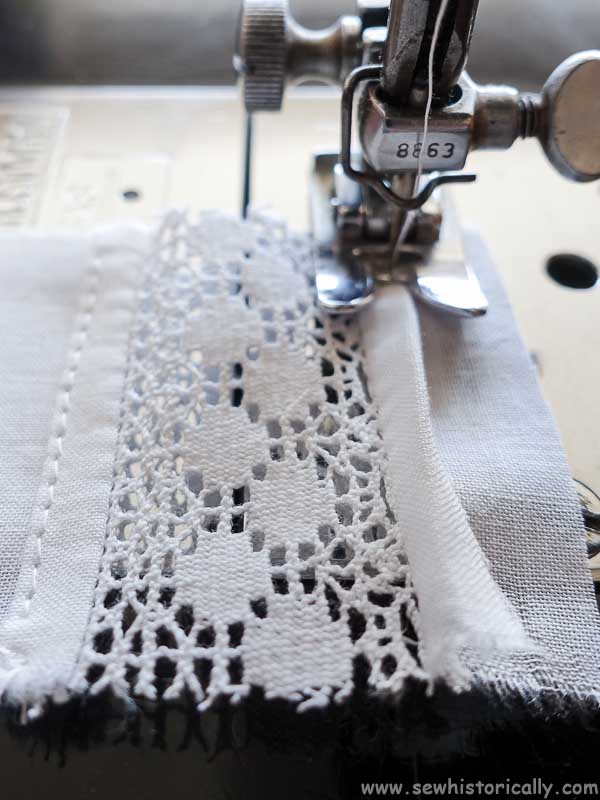
Now place your lace right side up on the right side of the fabric and pin in place. Instead of pinning, you can also baste the lace in place with a contrasting thread. For a curved insertion, pull the thread at the edge of the lace to gather parts of the lace until it matches your design.
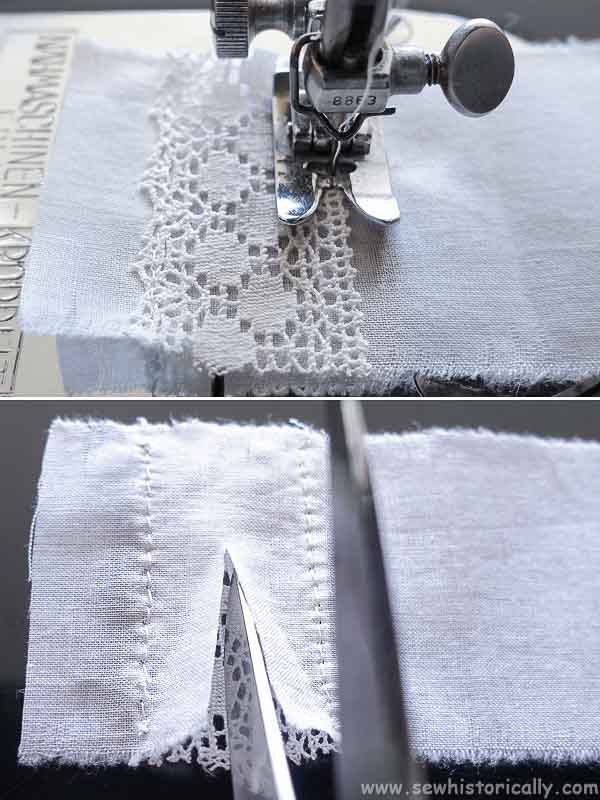
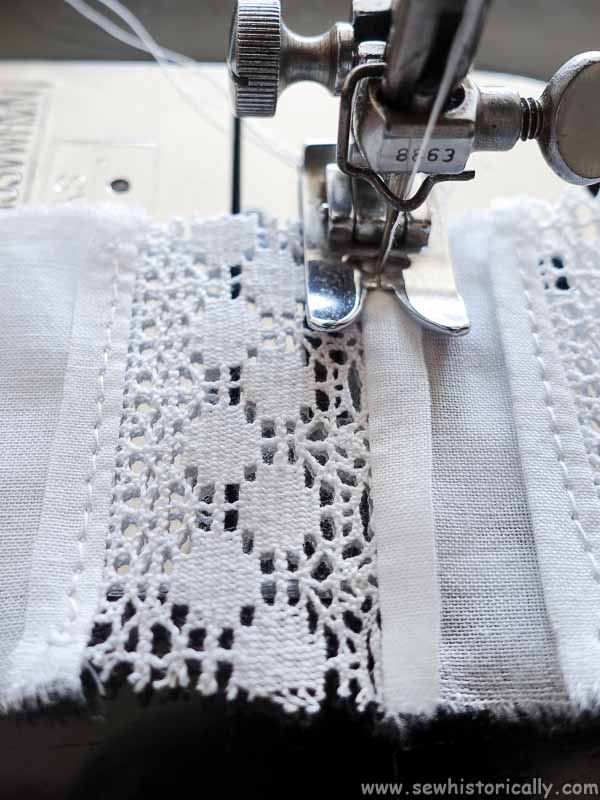
Then stitch close to the edge of the lace down both sides with straight stitches. It’s best to to stitch in the same direction each time to prevent the lace trim from distorting. Remove the pins or basting threads.
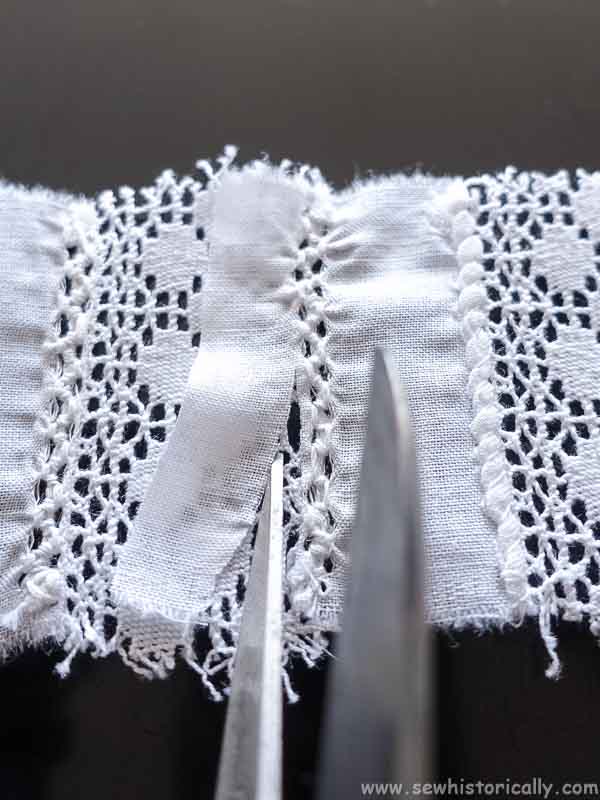
Now turn the fabric to the wrong side and cut down the center of the fabric between the two stitching lines. Be careful not to cut the lace.
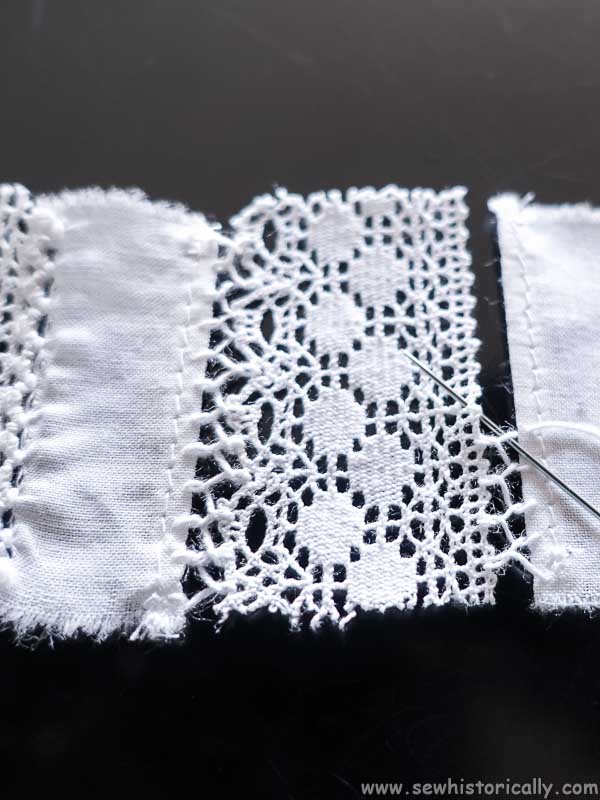
Then fold the fabric back twice. And stitch the hem down on the wrong side of the fabric with straight stitches.
Vintage Tips For Lace Inserts With Hem
‘Put the right side of the lace to the right side of the garment with the selvage of the lace toward the raw edge. […] Stitch the lace to the garment, stitching very close to the edge of the lace. […]
Fold the lace back over the seam you have just stitched and crease the material firmly. […] Turn the garment inside out. At the edge of the lace, turn as narrow a hem as possible (1/8″ if the material will allow it). Cut away any surplus material. […] Stitch very close to the edge of the turn.’ (Garments For Girls, 1919)
‘A hem is a fold turned down twice, used to strengthen and finish the material on which it is placed.’ (Home And School Sewing, 1901)
Lace Insertion 2: French Hem
The lace insertion with a French hem stiffens the fabric a little less than lace insertion 1. But it still stiffens the fabric! And it can also be used for straight insertions only. But the second seam is less noticeable than in lace insertion 1. I’m not a fan of French seams and French hems so I haven’t used this technique on my historical costumes yet.
Lace Insertion 2 In A Nutshell
-
stiffens fabric (but less than lace insertion 1 – hem)
-
for straight insertions only
-
no raw edges
-
second row of stitching less noticeable
-
hem visible on right side of fabric

How To Insert Lace With A French Hem
After adding the lace trim like in the first method, fold the fabric away from the lace. Then fold a hem towards the fabric. In the Edwardian era, it was recommended to sew the French hem with overhand stitches by hand. But instead you can simply stitch over the previous stitching lines with straight stitches with the sewing machine again.
Vintage Tips For Lace Inserts With French Hem
‘Turn a very narrow hem toward right side of garment, then fold hem back to wrong side, and crease. Where the fold of the hem meets the fold of the cloth, sew with overhanding stitch.
When sewed, hem remains on wrong side of garment […] Used on neck of corset covers, etc.’ (Clothing For Women: Selection, Design, Construction, 1916)
Lace Insertion 3: Edwardian Hem
I call this third lace insertion technique “Edwardian hem” because it was very popular in the Edwardian era. This way to insert lace is easy to make on a straight-stitch machine and drapes beautifully: It drapes so much better than the ordinary hem and the French hem above!
At first, I feared that it’s not a very secure way to insert lace: I thought the raw edges would fray and the lace come loose. But I tried it and now after frequent washing and wearing the lace is still securely attached. Yay! Now it’s my favorite way to insert lace!
And what’s more, you can use this method not only for straight insertions but also for curved insertions. I’ve already used this technique for the curved insertions on my Edwardian bed jacket.
Lace Insertion 3 In A Nutshell
-
drapes softly
-
for straight and curved insertions
-
raw edges (but don’t fray much)
-
second row of stitching less noticeable
-
hem almost invisible on right side of fabric
How To Insert Lace With An Edwardian Hem
Stitch the lace to the right side of the fabric like in method 1. Then trim the raw edge of the fabric to about a 1/4″ (6mm) and fold it away once from the lace. Stitch the hem down on the wrong side of the fabric 1/16″ (1 1/2mm) from the previous stitching lines with straight stitches. Even if the picture may look similar to the photo above, it’s different because here the edge is only folded once and the edge is left raw.
Vintage Tips For Lace Inserts With Edwardian Hem
‘If limited in time […] instead of hemming the lace by hand on the right side, it may be stitched by machine, the raw edge turned back and stitched again; then cut close to the stitching.
Let the first stitching fall one-sixteenth inch inside the edge of the insertion or lace, the second stitching directly on the edge, so that greater strength is added to the raw seam.’ (Clothing For Women: Selection, Design, Construction, 1916)
Lace Insertion 4: Hand-Rolled Hem
Like the two following lace insertion techniques, lace insertion with a rolled hem requires hand sewing but it’s worth it because it drapes softly and the hem is almost invisible! After the Edwardian hem, the lace insertion with a rolled hem is my second favorite way to add lace trim! I’ve used this technique for the lace insertion on the sleeves of my Edwardian lingerie dress and to attach the lace yoke of my Edwardian lace camisole.
Lace Insertion 4 In A Nutshell
-
drapes softly (but stiffer than lace insertion 3 – Edwardian hem)
-
for straight and curved insertions
-
no raw edges
-
hem & stitching lines almost invisible on right side of fabric
How To Insert Lace With A Hand-Rolled Hem
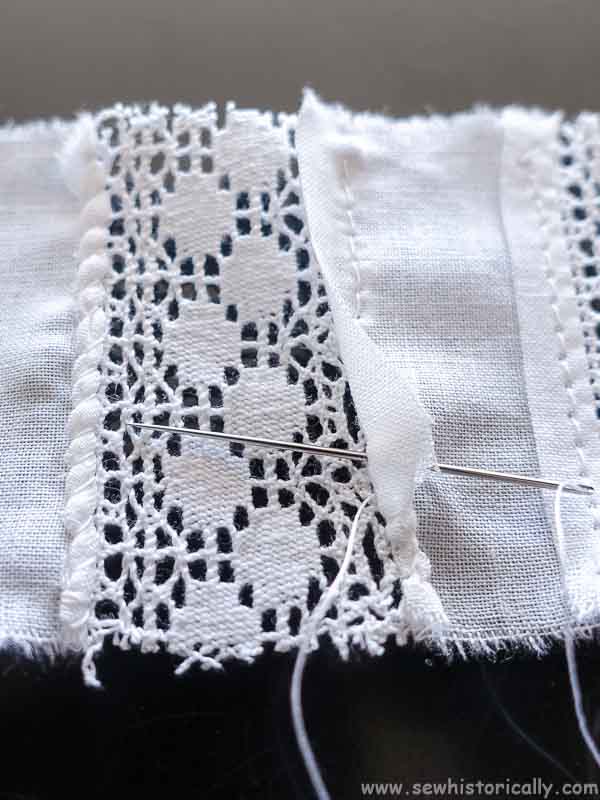
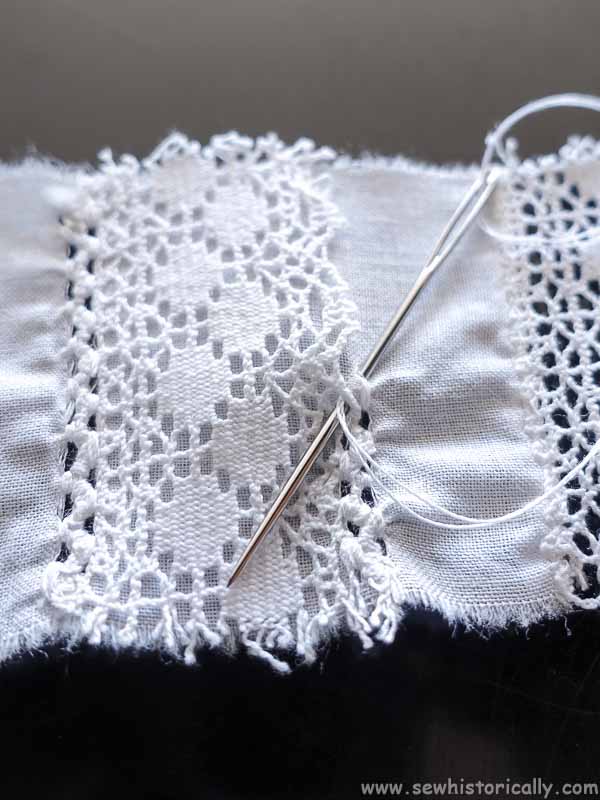
After stitching the lace to the fabric like in method 1, trim the fabric to about 1/4″ (6mm). Then sew over the raw edge with overcast stitches by hand.
Vintage Tips For Lace Inserts With Rolled Hem
Stitch the lace ‘on both edges. Cut out the material under the insertion leaving about 1/4″ of the cloth extending under the insertion […] sew it into a tiny roll with tightly drawn overcasting stitches.’ (School Sewing Based On Home Problems, 1916)
‘The edge has the appearance of being rolled.’ (Clothing For Women: Selection, Design, Construction, 1916)
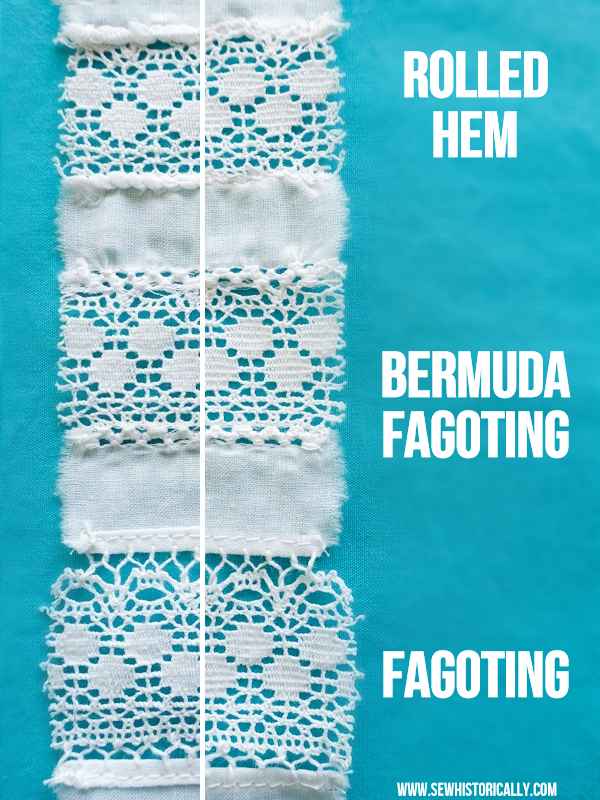
Lace Insertion 5: Bermuda Fagoting
Bermuda fagoting is a beautiful lace-like stitch that resembles hemstitching. Basically, the fabric is pierced with a coarse needle and then the thread is drawn tight. However, the stitch is worked without removing any threads as in hemstitching, therefore it’s faster to embroider and it can follow curved lines. Bermuda fagoting stiffens the fabric a little but less than a hem. Some fabrics also pucker a little. I’ve used bermuda fagoting to insert the lace on my Edwardian lavender sachets.
Lace Insertion 5 In A Nutshell
-
decorative, lace-like stitch
-
stiffens fabric (but less than lace insertion 1 – hem)
-
for straight and curved insertions
-
fabric puckers
-
no visible stitching lines & hem
How To Insert Lace With Bermuda Fagoting
Pin or baste the lace in place. Then stitch the lace to the fabric with bermuda fagoting. If you don’t know how to make bermuda fagoting, click on the link below for my tutorial about bermuda fagoting.
Then turn the fabric to the wrong side and carefully cut away the fabric close to the bermuda fagoting stitches.
Vintage Tips For Lace Inserts With Bermuda Fagoting
‘Lace edging or insertion may be applied to material with Bermuda fagotting by basting the lace to place and working the stitch so that every other straight stitch is taken through the lace and material; afterwards the raw edge of the material behind the lace may be cut off close to the fagotting.’ (Clothing For Women: Selection, Design, Construction, 1916)
Lace Insertion 6: Fagoting
Fagoting is so beautiful and fast to make! It’s much faster to make than bermuda fagoting and it can drape softly: Depending on how you finish the fabric, it either stiffens the fabric (hem) or not (Edwardian hem). Fagoting was very popular in the Edwardian era and the 1920s. This Edwardian lace dress at the MET features fagoting. I’ve used fagoting for my 1920s lace dress.
Lace Insertion 6 In A Nutshell
-
decorative, lace-like stitch
-
drapes softly
-
for straight and curved insertions
-
hem & stitching lines visible on right side of fabric
How To Insert Lace With Fagoting
Finish both edges of the fabric with a hem. Here I used a plain hem like in method 1. Then attach the lace to the fabric with fagoting stitches by hand.
Vintage Tips For Lace Inserts With Fagoting
‘Fagoting makes a very effective seam finish. The edges may be finished with tiny hems, folded but not sewed, rolled and whipped, or in some cases, simply turned once, the fagoting worked from one rolled edge or hem to the other.’ (Clothing For Women: Selection, Design, Construction, 1916)
Thank you for this! The links are so helpful to see how it’s used in a garment as well.
Thank you! I’m glad you find it helpful! 😀
Excelente, mil gracias.
I like these tips.
Thank you! 🙂