The Edwardian shirtwaist costume was the most practical everyday attire. A shirtwaist costume consisted of a tailored skirt and a separate shirtwaist blouse.
‘With a good black skirt and two or three well made, neat and stylish shirt waists we can always manage to look well dressed.’ (San Francisco Call, 1905)
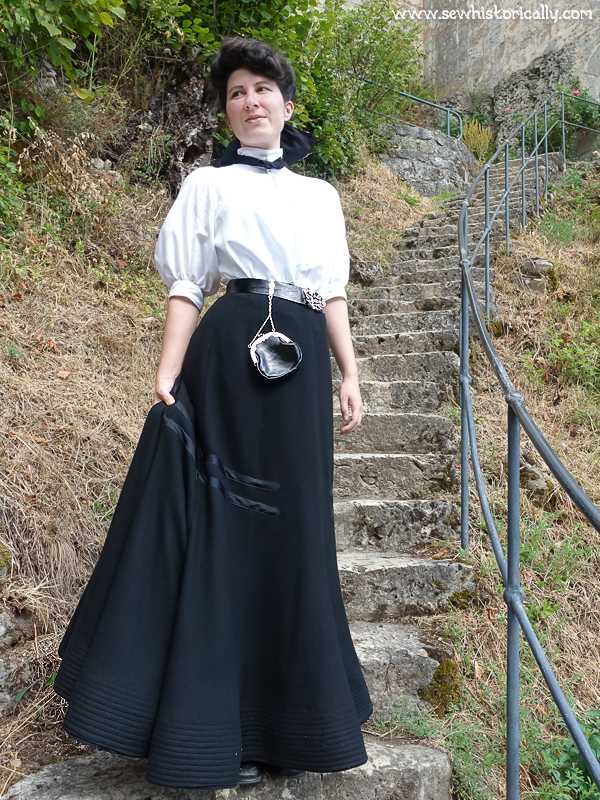
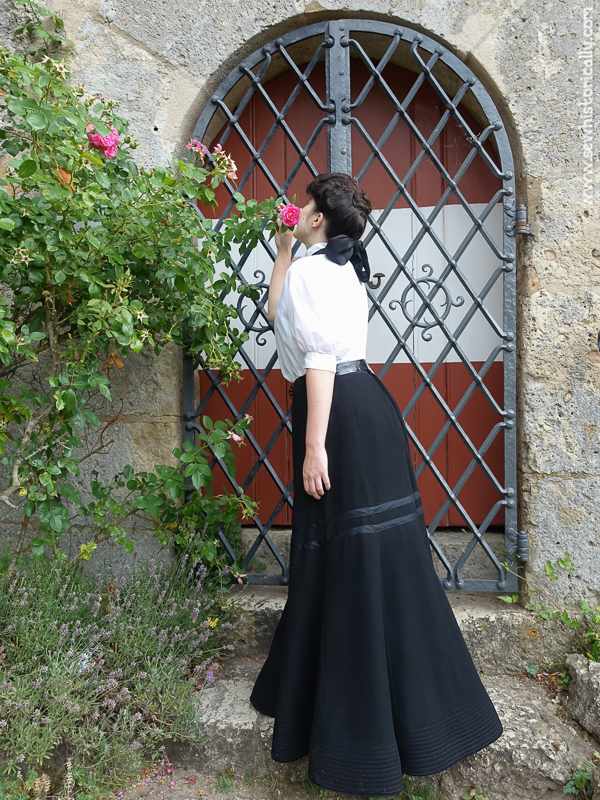
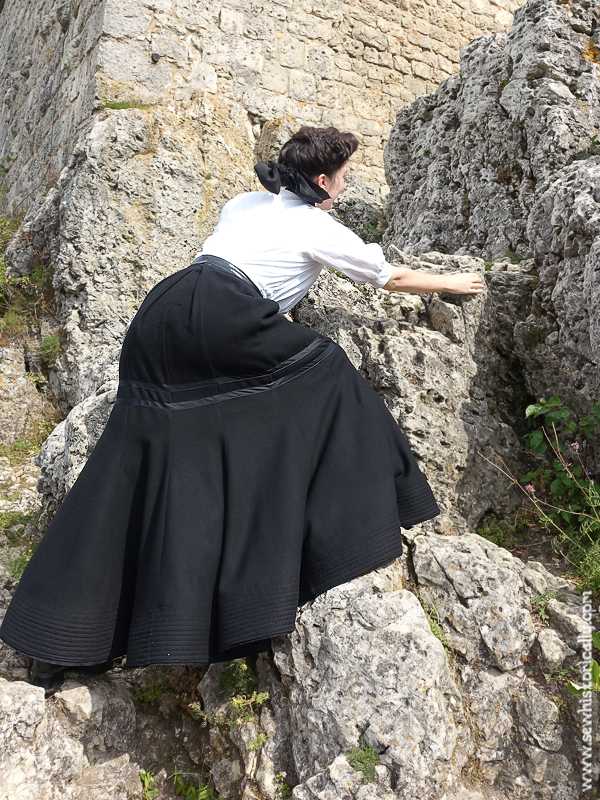
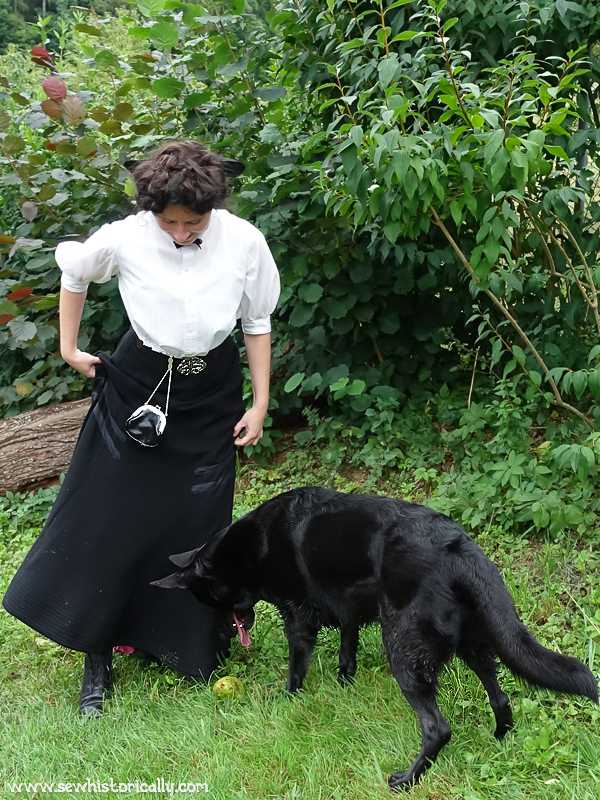
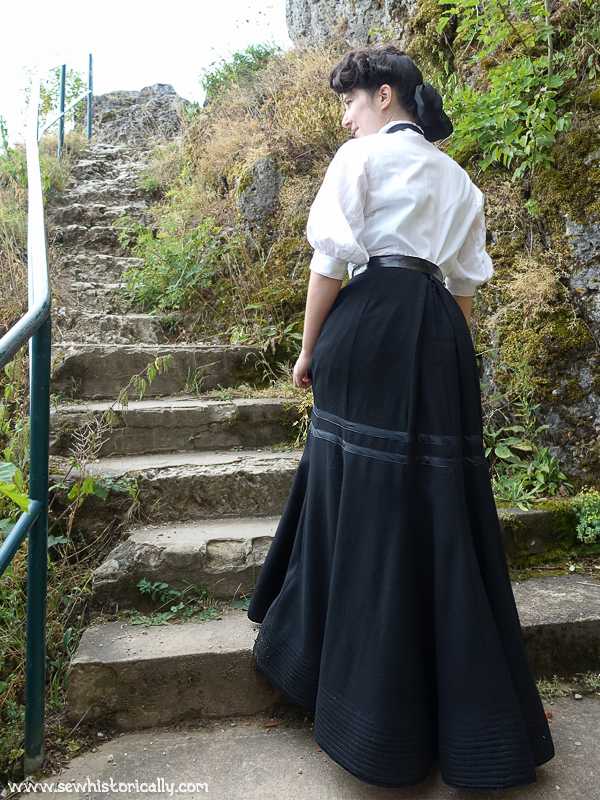
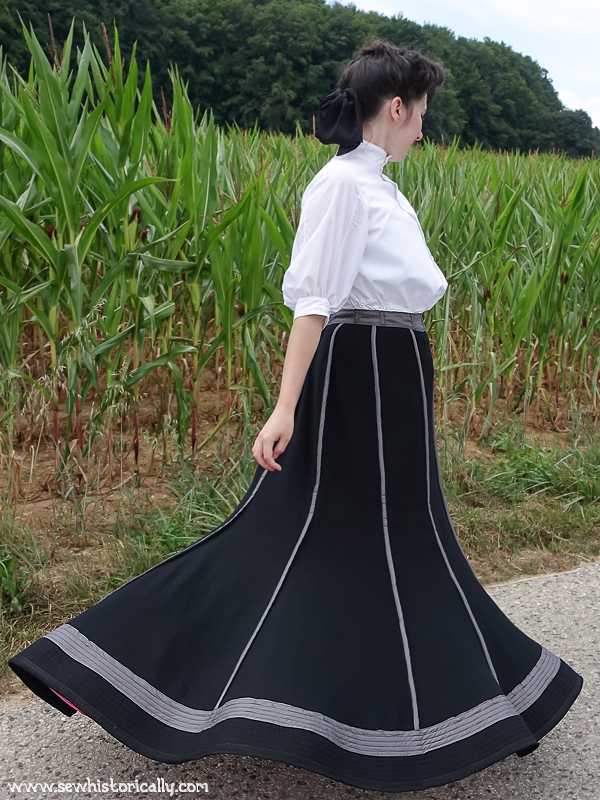
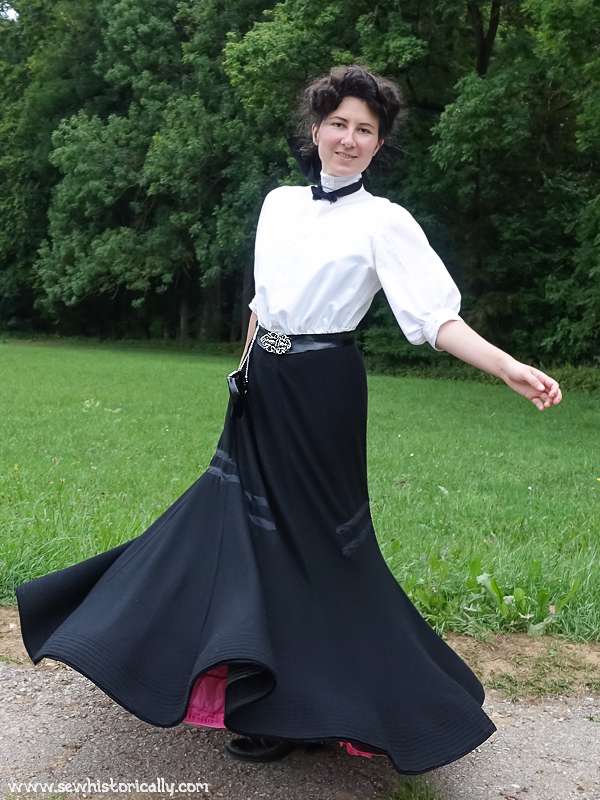
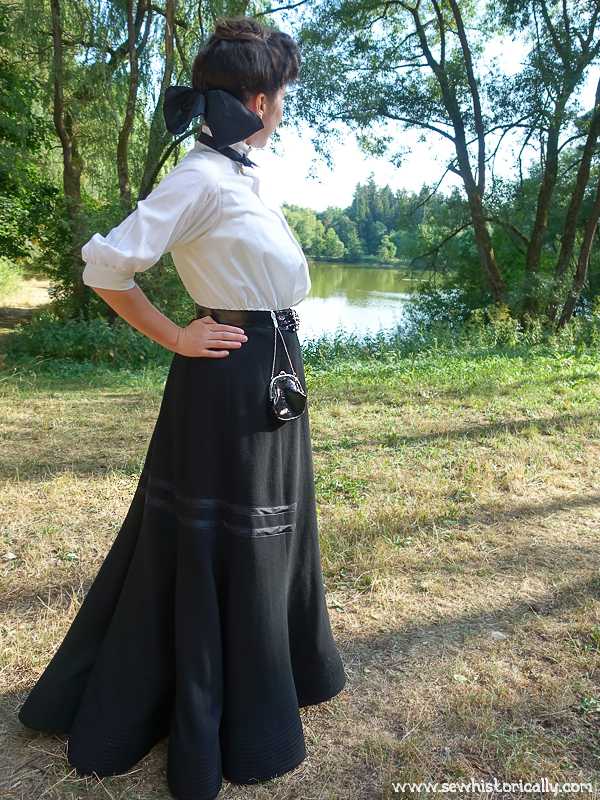
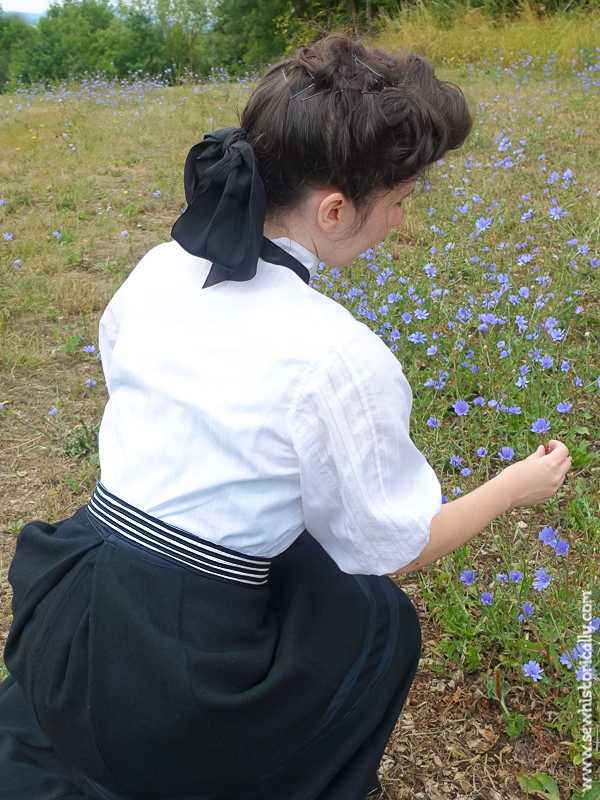
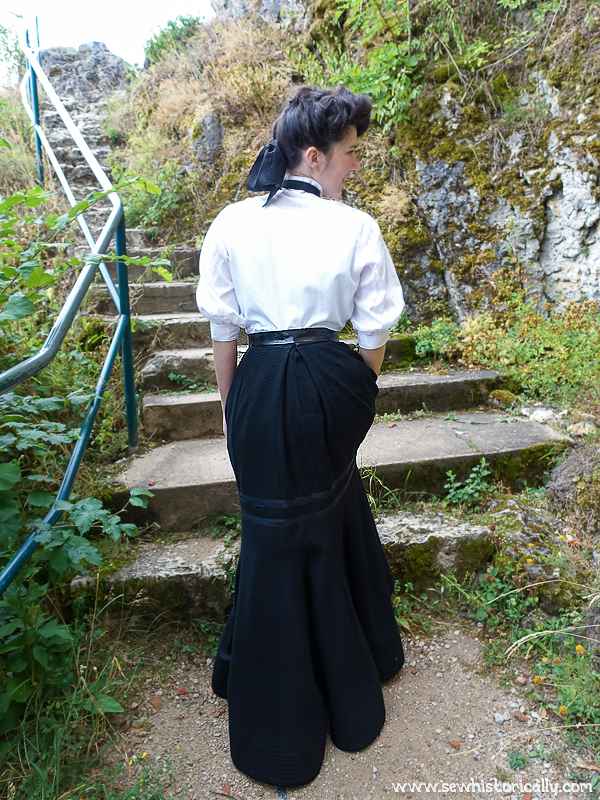
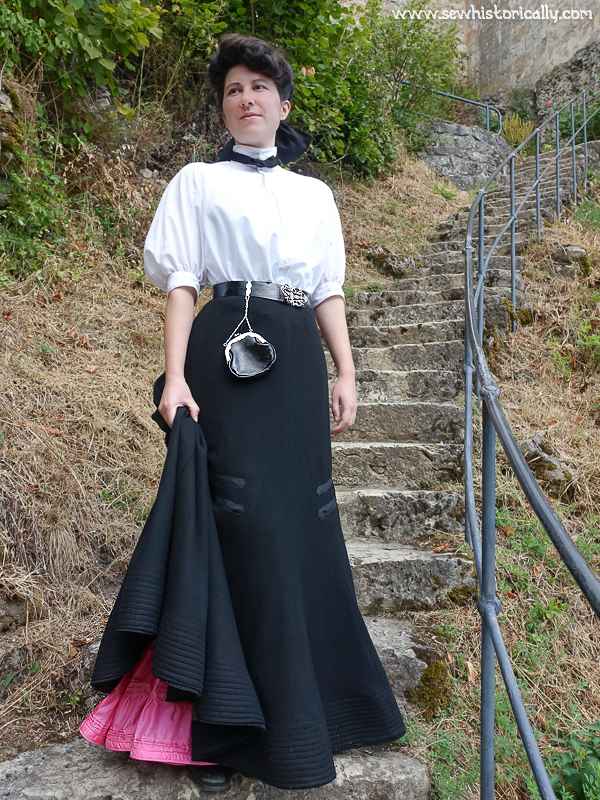
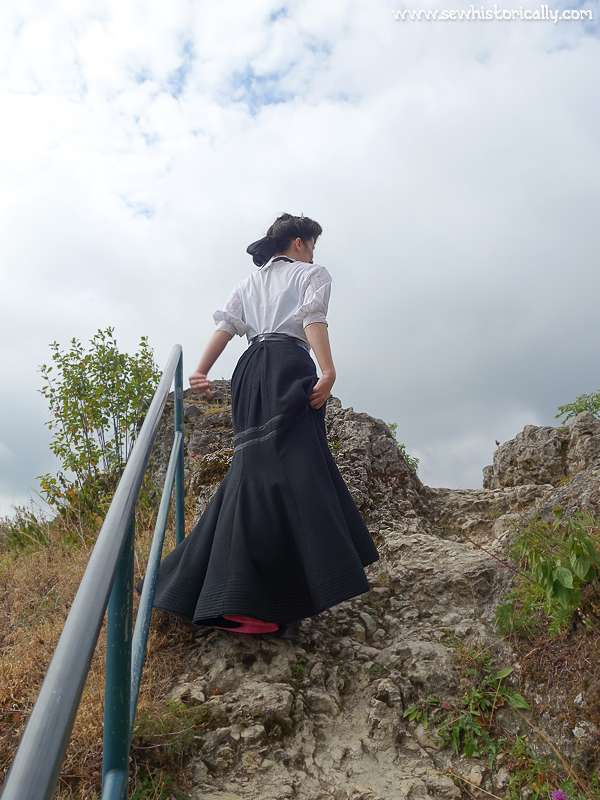
Shirtwaist costumes were basics in every Edwardian woman’s wardrobe: She could wear it every day for almost any occasion! My version of an Edwardian shirtwaist costume consist of a tailored black wool trumpet skirt, a white cotton shirtwaist (blouse), a patent leather belt with metal belt buckle, a leather chatelaine bag with metal chatelaine hook, a black tie and hair ribbon and a pink rayon taffeta petticoat – all parts of the outfit are made by me. 🙂
I planned my Edwardian shirtwaist costume over five years ago and now it’s finally finished – yay! 😀 But even if shirtwaist costumes were a basic everyday outfit back then, this is one of the most expensive historical costumes I’ve made so far: Because I had to buy wool serge for the skirt – which is expensive – and patent leather for the belt and bag – which is expensive – and metal hardware – which is also expensive! 😉
What Is An Edwardian Shirtwaist Costume?
‘A very serviceable garment for every day wear […] for business, travel, and general wear’ (Advertisement, 1904).
An Edwardian shirtwaist costume consisted of a tailored wool, silk or linen skirt and a separate cotton or silk shirtwaist. By the way, an Edwardian shirtwaist is a plainer and more tailored version of a blouse, with pleats rather than flimsy lace. The most popular variation of the shirtwaist costume was a dark wool skirt – black, navy blue, brown, gray or dark green were popular colors in the 1900s – and a white or striped cotton shirtwaist.
Shirtwaist costumes were quite a new idea! Edwardian women usually wore dresses consisting of a skirt and separate bodice made of the same fabric as the skirt. So making the bodice out of a different fabric than the skirt was new!
And even though blouse-skirt-combinations such as the Garibaldi blouse already existed in the Victorian era there is a difference: The Garibaldi blouse was only worn at home, while Edwardian women wore the shirtwaist costume also in public: on the street and to work!
‘A well-cut shirt, with collar and tie, and a tailor-made skirt of tweed or serge is an ideal morning costume, for an Englishwoman, at all events.’ (Every Woman’s Encyclopaedia, 1910-2).
There were many advantages of a skirt with a separate shirtwaist: An Edwardian working woman with little time to do laundry now just had to wash and iron the shirtwaist – while the wool skirt was just brushed to remove dust and dirt. She also had to buy less fabric: one skirt could be worn with many different shirtwaists.
Almost all Edwardian working women wore variations of the shirtwaist costume, like this video from 1904 shows – Girls Taking Time Checks In 1904 (here‘s a colorized version of the video):
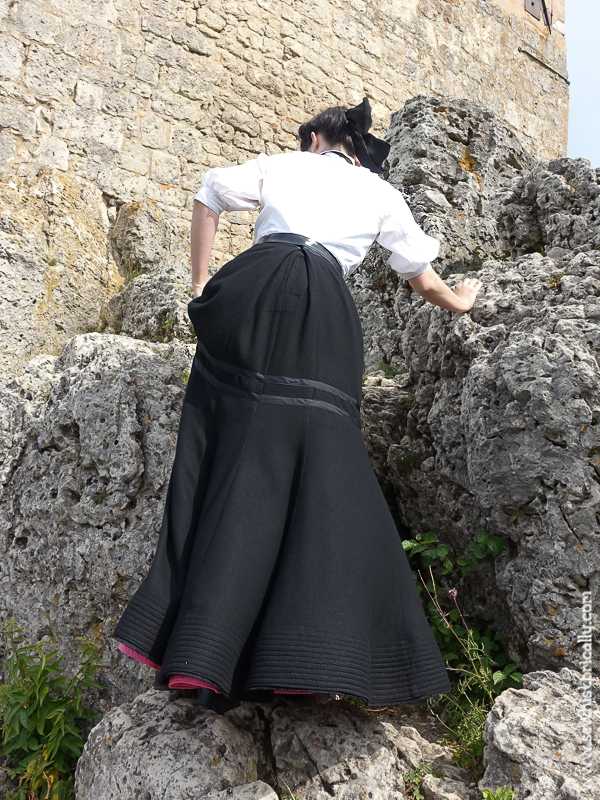
And the Edwardian shirtwaist costume was also worn for traveling, hiking in the country, outings, climbing over a tree, at the seaside and for sports, such as bowling, hockey and even fishing! Click on the links for Edwardian photographs of active women.
‘The shirt-waist costume is quite as essential in winter as in summer’ (The Delineator, 1902). The ‘general businesslike appearance […] marks the summer girl of today, who wears a shirt waist and sack coat and does not believe in flounces and furbelows.’ (Los Angeles Herald, 1901)
Related: The Edwardian Summer Girl
Materials
For my Edwardian shirtwaist costume I only used natural fibers and materials as they would’ve been used in the Edwardian era: There’s no polyester or other non-natural fibers in the fabrics and accessories.
- 4m black wool serge fabric for the Edwardian trumpet skirt
- 1-2m gray rayon* taffeta fabric for the DIY bias binding to finish the skirt seams, for the waistband and for the bias facing at the skirt hem
- 1m black rayon taffeta fabric for the neck tie, bias-cut skirt trimming and striped belt
- 1m white rayon taffeta fabric for the striped belt
- 5m black wool brush braid for the skirt hem
- scraps of heavy black wool broadcloth fabric – leftover from my short Edwardian wool walking skirt – to stiffen the hem of the skirt
- some black cotton ribbon
- 2 vintage red rayon taffeta ribbons for the hair bow
- black fabric dye to dye the hair ribbons and black rayon fabric (because it was a different black than the wool fabric for the skirt)
- some white cotton fabric to stiffen the waistband and belt
- some synthetic whalebone boning also to stiffen the waistband and belt
- black patent leather for the leather belt and chatelaine bag
- aluminum sheet metal for the chatelaine hook
- 1 metal purse frame
- 1 old men’s shirt refashioned into an Edwardian shirtwaist
- 3m pink rayon taffeta fabric for the petticoat
- natural-colored cotton webbing to stiffen the hem of the petticoat
- other sewing notions: black, white & gray cotton sewing thread, black metal hooks & eyes, black metal snaps
* Rayon (viscose) is a man-made natural fabric made from cellulose fibers. Similar artificial silk fabrics – marketed as heatherbloom, nearsilk and under various other brand names – already existed in the Edwardian era and were a popular alternative to real silk fabrics because they were cheaper, more colorfast and washable (most silk fabric weren’t washable in the Edwardian era).
The Skirt
The Style
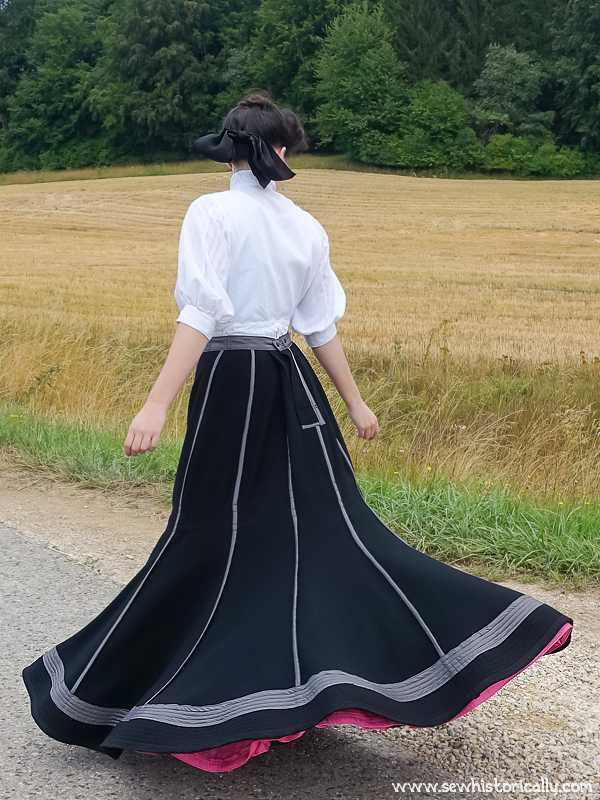
Unlike my late Edwardian circular skirt, this is a gored skirt with 10 panels with a wide flaring hem which was popular in the early Edwardian era. This style was known as tulip skirt or trumpet skirt in the Edwardian era, and today it’s also called a fishtail or mermaid skirt.
Related: 1900-1909 Edwardian Fashion Timeline
‘A seven gored skirt pattern is excellent to use, making the plain part come a little above the knees […] There is a reason for saying the plain part should stop above the knees […] the skirt wears better’ (San Francisco Call, 1908).
Because tailored wool dresses and skirts were expensive, they were worn for many years: Therefore they were sometimes outdated like this 1901 wool jacket with outdated leg-o-mutton sleeves – leg-o-mutton sleeves were fashionable in the 1890s, whereas in 1901 tight-fitting and bishop sleeves were fashionable. Therefore, when making a new tailored dress, Edwardian fashion magazine recommended to omit fashionable details, so as to not look outdated in some years.
Edwardian Skirt Pattern
I used this antique free skirt pattern from 1901 – the skirt Victoria – as basis and adapted the pattern: I eliminated the front panel – turning the 9-panel skirt into a 10-panel skirt – shortened the skirt at the back, reshaped the waist, added a belt and added an inverted box pleat at the back. I also reshaped each of the panels: I especially reduced the fullness around the knees which created a curvier silhouette which was fashionable in the early Edwardian era.
My Inspirations
My main inspirations were various fashion plates, photographs, videos and extant garments from the early Edwardian era. I pinned all my inspirations to my pinterest board ‘Edwardian Shirtwaist Costumes’:
If you want to see more Edwardian shirtwaist costumes in motion, here are two videos from the early Edwardian era featuring different shirtwaist costumes: Congregation leaving church in 1902 and ride on a tramcar through Belfast in 1901.

The Fabric & Color
‘If there is any one command […] [that] contribute most to the health and happiness of mankind, it would be this – “Wear woollens!” Light, thin, and soft in summer, warm and comfortable in winter.’ (Talk Upon Practical Subjects, 1895)
The material of Edwardian wool skirts was usually serge. Serge is a twill-weave wool fabric (with diagonal lines like denim), it’s a strong and durable fabric but not stiff: it drapes well and has a sheen. Here’s a picture of an Edwardian black serge skirt.
‘Serge is a material that has generally been associated with the idea of cold weather, the winter season and practical hard wear generally;
but there are now so many different weaves and weights, not to mention variety of colors, that the material has assumed a place of its own among the fabrics for summer as well as winter, and no outfit is complete without at least one serge costume.’ (Los Angeles Herald, 1909)
‘Serges and tweeds should be employed for coats and skirts for hard wear’ (Every Woman’s Encyclopaedia, 1910-2). ‘English storm serge […] will wear for years; has a beautiful finish […] French cheviot serge […] will hold its color, unshrinkable and will give extra wear. The weight makes it particularly adapted for ladies’ tailored suits and skirts. […] waterproof […] dustproof’ (Sears & Roebucks Catalogue, 1900s)
I chose black serge for my Edwardian wool skirt because a tailored black wool skirt together with a white shirtwaist could be worn on almost any occasion in the Edwardian era!
‘Black and blue have been and are the favorite colors for general wear’ (Los Angeles Herald, August 1909).
The Trimming
Dark wool skirts may be ‘trimmed with taffetas of the same color’ (The Delineator, September 1902).
Edwardian wool skirts were often trimmed with satin or taffeta bands in the same color, like this beautiful Edwardian wool skirt. Here’s another photograph of a gored wool skirt with taffeta bands at the hips. Sometimes the fabric bands were applied in crazy patterns, like here. And here’s an extant garment: a late Edwardian black wool skirt trimmed with black satin bands and fabric-covered buttons.
‘The design for the skirt should be chosen with regard to simplicity of line. It should have no decoration aside from braid, buttons, or a girdle of satin, silk, or material of the skirt.’ (Clothing For Women: Selection, Design, Construction, 1916)
‘Folds of self-colored taffeta or satin may be used as trimming.’ (The Delineator, September 1902) ‘Strappings of the serge and silk and machine-stitching provide pretty decoration.’ (The Delineator, 1900) ‘Dress skirts, made of fine quality all wool black cheviot, flounce prettily trimmed with bias bands of stitched taffeta’ (The Minneapolis Journal, 1901).
I used bias binding made from black rayon taffeta fabric to trim my Edwardian wool skirt. I applied the bands to mimic the popular Edwardian ‘Spanish flounce effect’ which means that the band is higher at the back and lower at the front. The trimming is inspired by this 1904 skirt ad, this antique Edwardian black wool serge skirt with black satin bands, this 1903 fashion plate and this 1900s skirt ad.
And I followed the following instructions from 1908 on how to apply skirt bands:
‘There are two details in making and applying bands that are most important – one in cutting, the other in stitching. […] Naturally, the material will not be wide enough to cut the entire band, so when cutting, be careful that the piecing comes well back from the center-front. […] narrow bands are not shaped, but are cut from a direct bias piece. […] These narrow bands must be stitched on both edges to the skirt, and it is very important that both sides be stitched the same way – that is, do not run one row of stitching from right to left and the other from left to right.’ (McCalls, 1908)

The Seams
‘Avoid a seam with two bias edges coming together in heavy twills, unless there is an inverted plait to cover the seam. The twills meet at right angles almost, giving a displeasing effect […] Extreme care must be taken to avoid stretching the bias edges of woolen materials.’ (Clothing For Women: Selection, Design, Construction, 1916)
‘When stitching up inside skirt seams […] be sure the stitching is quite straight. In the case of dark materials a rule may be laid down the seam, and a chalk or crayon pencil line marked close to the rule before stitching’ (The Cult Of The Needle, 1915).
The raw edges of Edwardian wool skirts seams were either bound with silk or cotton bias binding – together or separately – finished with overcast or catch stitches by hand, pinked with pinking shears, or folded and stitch on the machine similar to a flat felled seam.
‘Seams of fine serge […] are bound; when finished in this way, use strips of bias silk. To use the bias binding first cut the strips one inch wide, fold the edges over one-quarter inch, using the bias folder. Baste this binding over the raw edge of the seam and stitch by machine.
Ribbon seam binding is sometimes used, but is not satisfactory for two reasons: it does not wear well, and being straight, holds the seam too tight, making it pucker the outside of the skirt unless carefully handled.’ (Clothing For Women: Selection, Design, Construction, 1916)
‘French seams are not used when stitching woolens, but the seams are finished with bias binding of percaline, cambric, etc., the two pieces joined and bound together, except on the back’ (Text-Book On Domestic Art, 1911).
I bound all seams of the skirt with DIY bias binding because it’s historically accurate and store-bought rayon taffeta bias binding would’ve cost more than one meter of the expensive wool fabric. So I made 26m DIY bias binding with gray rayon taffeta from my stash. And yep, it doesn‘t sound like fun to make and sew 26m of DIY bias binding! And it was no fun! 😉
I tried different methods to make DIY bias binding for skirt seams: Making double-folded bias binding with the help of pins and an iron before attaching it; or stitching unfolded bias binding to the skirt seams first, then pressing, then folding, then pressing again and then stitching the other side of the bias binding. And all didn‘t work with this slippery rayon taffeta fabric. I even bought an expensive bias binding sewing machine foot. But the foot only works with cotton bias binding and not with thin silk-like fabric such as rayon taffeta. It‘s probably easier to starch the fabric first and then make DIY bias binding or to bind the raw edges before sewing the skirt seams together.
And I actually wanted to bind both raw edges of each seam separately: not with the Hong Kong seam finish but real bias bound seams. But because the skirt was still unfinished after months I finally decided to bind both sides of each seams together like here! This still took many hours – and nerves – but at least the skirt seams were finished! Yay! After it took me three hours to bind the first seam with all the pressing involved between the sewing – and then the bound seam didn‘t even look good! – I finally skipped all the pressing steps and only folded the bias binding by hand while stitching. This cut down the time to only 15 minutes per seam and the bound seam looked almost perfect! So you don‘t have to always press between sewing like books and sewist are trying to tell you – sometimes it‘s even better to skip it! In the 1920s, it was even recommended to home sewist to skip the pressing and pinning steps to save time and to get better at sewing!
Waist Band
‘The top of a tailored skirt is usually finished so it can be worn outside of a shirt waist.’ (School Sewing Based On Home Problems, 1916) ‘The skirt may have the conventional or a decided dip at the top in front, according to preference.’ (The Delineator, 1900)
My skirt has a rayon taffeta skirt band like this antique Edwardian wool skirt so that I can wear the skirt over the shirtwaist. I made the waistband V-shaped because dip waist skirts were popular in the early Edwardian era.
‘There are two methods of placing to belt, either of which has its advantage. For both, have belt prepared, correct waist measure, with hooks and eyes. (1) Use ribbed cotton belting, which, if shrunk, is better starched to give it firmness, (2) or percaline belt with featherbone extenders. The latter shrinks little and does not soften up.’ (Clothing For Women: Selection, Design, Construction, 1916)
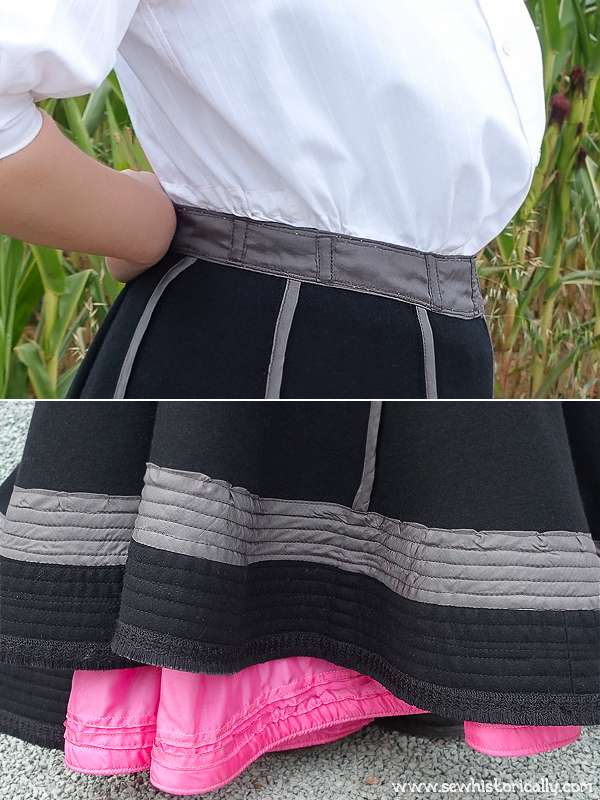
The waistband of my skirt consists of three layers: the outer fabric is black rayon taffeta, the middle layer is ordinary white cotton fabric and the lining is gray rayon taffeta fabric – the same that I used to bind the seams. To keep the waistband from wrinkling, I stiffened it with synthetic whalebone boning. In the Edwardian era, belts and waistbands were stiffened with featherbone. However, since featherbone is no longer manufactured, I used thin, flexible boning as substitute.
The waistband is stiffened with 9 bones: 2 at the center front, 1 at each side front, 2 at each sides and 1 at the center back. For the boning channels I used the same gray rayon taffeta that I also used for the lining.
Related: Edwardian Taffeta Belt
‘When the belt is of silk it should be cut on the straight goods, usually two and one-quarter inches longer than the size of the waist. This allows for seams and the lap […] Stitch one edge to outside of skirt, taking three-eights inch seam off; then turn remaining edge over the top of the skirt, turn over another three-eights inch seam and stitch down by hand or machine.’ (Evening Star, 1907)
Corset Hook To Keep The Skirt In Place
Because this skirt has a dip waist – a V-shaped waistband – like most Edwardian skirts, something is needed to keep the waistband in place. Edwardian women knew different devices for this problem, such as skirt retainers made of metal and cotton webbing. But a simple solution to keep the dip waist down was a hook on the front of the corset. Therefore I stitched a large hook to the front of my unboned Edwardian sports corset which I’m wearing underneath.
Related: Edwardian Sports Corset
‘A good many women have trouble in preventing their skirts from sagging at the waist band in the back. A flat corset hook should be sewed on one side of the middle front of the corset one inch below the waist, and if chemise are worn for corset covers work an eyelet hole in the chemise and slip over the corset hook, first hemming down the wrong side an inch square piece of cambric and punching the hole through the two thicknesses.
All petticoats and separate drop skirts should be cut down in the middle of the front so they will slip under the hook and lie smoothly. Put a facing instead of a standing band on the skirt. If the skirt fits perfectly about the waist this slipping under the corset hook will keep it in place, up in the back and down in the front.’ (San Francisco Call, 1908)
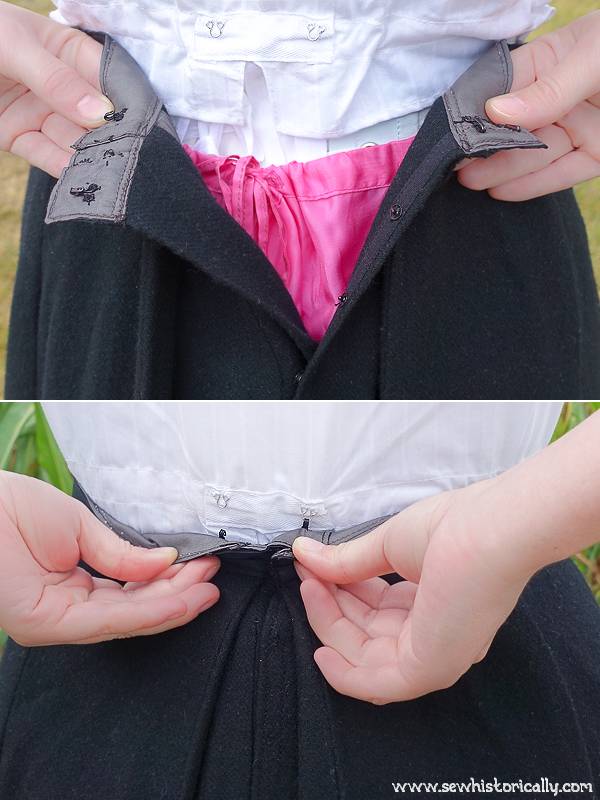
Edwardian Trick To Keep The Shirt Tucked In
The Edwardians knew a trick to keep their shirts from riding up and to keep it neatly tucked in the skirt: They added two or three eyes or eyelets to the back of the shirtwaist like on this antique Edwardian shirtwaist. Then they stitched the corresponding hooks to the inside of the skirt waistband. The hooks on the skirt hooked into the eyes or eyelets at the shirtwaist connecting both separate garments and keeping the shirt tucked in all day! 😀
‘For fastening skirt belt use a large hook and eye in the back of the belt, sew on three eyes to fasten to waist’ (Margaret Blair System Of Garment Drafting, 1897).
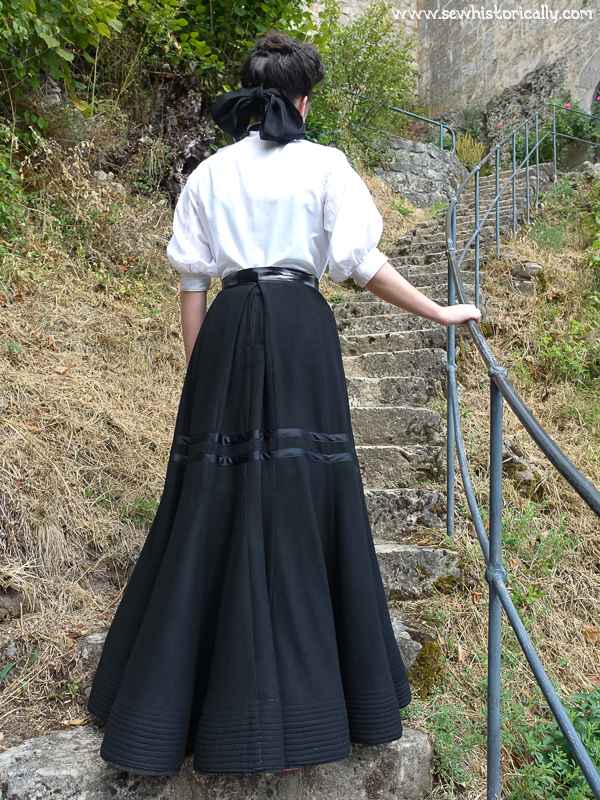
Inverted Box Pleat
Almost all Edwardian skirts had an inverted box pleat at the back, as you can see on this Edwardian photograph. The inverted box pleat was favored by Edwardian women because it brought the hips into prominence and gave extra width to the hem of the skirt.
‘This plait is frequently added to a skirt having bias seam in center back. Add two to three inches at top of skirt, in center back, and twice that amount at the bottom. Fold plait to place and then cut top like top of skirt, to prevent its falling short at the top when garment is being made.’ (Clothing For Women: Selection, Design, Construction, 1916)
‘The adjustment at the top produces the fashionable close effect, and extra width allowed at the lower part of each side seam for inverted box-plaits gives the stylish dare at the bottom which is a feature of’ the newest modes. (The Delineator, 1900)
The box pleat could be left free and be only caught into the waistband of the skirt or it could be stitched down. If it was stitched down, it was called ‘habit back’ in the Edwardian era. This 1900 drawing shows how a skirt with a habit back looked. At first, I wanted to make a habit back but then I decided to leave the inverted box pleat as is.
‘The fullness at the back is arranged in a box-plait that may be left free or stitched down, as preferred’ (The Delineator, 1902)
The Closure
Edwardian wool skirts were either closed with snaps or hook and eyes or a combination of both. The waistband of my skirt is closed with two hooks and eyes, while the placket is closed with snaps. The closure is at the center back under the inverted box pleat like here. I used the following three antique Edwardian sewing instructions on how to sew plackets as reference: Clothing For Women: Selection, Design, Construction from 1916, School Sewing Based On Home Problems from 1916 and 1908 instructions.
‘The snap buttons which were originally introduced on gloves have reached such popularity […] They are far ahead of the hooks and eyes, even the sorts with “bumps” inside. […]
They are already used for fastening the skirt bands together, fastening waists down to the skirt bands, closing the placket holes, fastening the flaps of pockets down to the jacket […] Bicycle suits are already made and provided with these fastenings in all parts of the garments.’ (Chicago Tribune, 1897)
The Length
‘If you be a walking woman and a working woman you should have your skirts to clear the ground, studying the essentially useful and disregarding the merely decorative’ (Wanganui Chronicle, 1901). ‘The practical woman recognizes the benefits to be obtained from wearing the slightly shortened skirt’ (The Delineator, 1900).
Even though long skirts that trailed on the ground were fashionable in the early Edwardian era, there were also shorter walking length skirts.
Related: Edwardian Walking Dresses
‘The skirt that extends only to the instep or is of shorter length is now receiving considerable attention. For shopping, touring, golfing, ice skating, stormy weather, etc., it is practical, neat, and stylish and is almost universally adopted.’ (The Delineator, 1900)
‘The tailor and walking skirts are now made to barely sweep the ground, and the long trains have passed away’ (San Francisco Call, 1900). The skirt ‘was made of a good quality of serge […] clearing the ground by fully three inches.’ (San Francisco Call, 1908)
My skirt is about 5cm off the ground and doesn’t have a train but it still sometimes drags on the ground while walking so I often have to hold it up that I don’t trip on it. Depending on the year, my floor-length Edwardian skirt would’ve been considered short by Edwardian standards! 😉
‘The new skirts are shorter – much shorter than last season […] The proper length this year is two inches from the ground.’ (San Francisco Call, May 1902) ‘The swing-clear skirt no more resembles the short skirt of a few years ago […] The skirts of this season, those that are made on the new art lines, all swing clear. If they touch they are of the round length – that is, the length which just touches the floor all the way round; the length that is so delightful for piazza, and house wear.’ (San Francisco Call, 1904)
By the way, Edwardian skirts need to be longer in the back than in the front to look good. Measuring the skirt length – this is, in my opinion, the most stressful part of making Edwardian skirts!
‘Turn up the material all round to the correct length, remembering that skirts showing the feet are not worn, even for walking.’ (Walking Skirt, 1899) ‘After the belt is adjusted, the skirt should be evened around the bottom, using the skirt gauge or a yard stick as a guide.’ (School Sewing Based On Home Problems, 1916)
‘When allowing for the length of a skirt, it is best to take the measurements from the waist to the ground at the front, back, and the hips. Then turn up the skirt to the length you require it off the ground.’ (The Cult Of The Needle, 1915)
‘Length of front: From the waist-line to the floor, exactly at the center front. Length of side: From the waist-line to the floor, directly over the fullest part of the hip. The tapeline should fall at right angles to the waist-line. Length of back: From the waist-line to the floor, exactly at the center back.’ (A Manual Of Home-Making, 1919)
Hem Circumference
‘The skirt falls in an outline of about three and one-half yards in the medium sizes.’ (The Delineator, 1900) ‘In the medium sizes the entire lower edge measures about four yards and three-fourths.’ (The Delineator, 1902)
The hem circumference of Edwardian skirts, particularly of early Edwardian gored skirts, was always very large. The hem circumference of my black wool skirt is 460cm (180″) all around at the bottom.
Edwardian Hem Stiffening
‘Women’s gowns are wide flaring at the bottom and spread even farther than the natural stiffness of the goods by the use of crinoline or some other stiff material […] The woman whose gown does not measure eight yards about the hem of her skirt is out of style – dowdy.’ (Los Angeles Herald, 1904)
Because skirts were wide flaring in the early Edwardian era, it was necessary to stiffen the hem. In the Edwardian era, hems of wool skirt were stiffened with various materials like haircloth, stiff linen or nettle fabric, leather, wire or featherbone skirt braid.
‘A band of princess haircloth cut to suit the curve of the drop skirt or petticoat, or a tiny cording of featherbone incased in linen crinoline and run into the hem of the dress skirt itself. Either of these devices will afford quite the correct and adequate support at the hem.’ (The St. Louis Republic, 1904)
The skirt ‘should be interlined with a thin hair-cloth or the featherbone that comes for the purpose, otherwise the outer skirt will fall in around the feet.’ (Evening Star, 1907)
Haircloth (horsehair crinoline fabric) was one of the most popular choices. You could even buy a ready-made haircloth flounce to put in wool skirts. I would’ve loved to just buy this Lily Haircloth Flounce and add it to the inside of my skirt! 😀 But pure horsehair crinoline is difficult to find today because it often contains a few percent of polyester or other non-natural fibers. And I didn’t want to use that! 😉 And of top of that pure horsehair crinoline is very expensive. Because the wide hem circumference of my Edwardian wool skirt, the horsehair facing would’ve have cost more than the already very expensive wool fabric!
‘Herringbone and French hair cloths. The very best material for a permanent stiffening for the better grades of silk and wool dress skirts.’ (Sears & Roebucks Catalogue, 1900s)
I thought about using leather as hem facing but then my wool skirt wouldn’t be washable. By the way, Edwardian wool skirts weren’t washed: they were brushed with a boar bristle brush to clean them. But I wanted my skirt to be washable.
‘For serviceable skirts it is not a bad plan to have the hem lined up inside with leather about four inches deep. It helps to weight the skirt and keep it down, and in wet weather if the hem gets muddy it can be easily sponged and dried.’ (Every Woman’s Encyclopaedia, 1910-2)
And of course, featherbone skirt braid (made from the quills of fowls) is no longer manufactured. I thought about adding synthetic whalebone boning to the hem: the same that I use for my corsets except I’d have chosen a thinner, more flexible boning. If I think the skirt hem needs more stiffening I can still add that later.
‘The flounce is fashioned upon a circular foundation, and a rod or two of featherbone will add to its graceful swing – a special kind comes for just this purpose – and will go through the laundry just as successfully as the skirt itself.’ (The Humboldt Times, 1905)
‘Some skirts have a narrow and very flexible steel sewed all around the bottom; but better than this to secure the slight stiffness is a thick cord of candle-wicking covered with velvet or satin to harmonize with the gown.’ (Demorest’s Magazine, 1894)
Apart from leather, horsehair and featherbone, hems of Edwardian wool skirts were also stiffened with stiff linen or nettle fabric (known as ‘grass linen’ in the 1900s).
‘Women who like the stiff appearance given by an interlining should choose for their gowns stiff, firm fabrics; these, when properly cut and hung, will stay in place without interlining, wires, or tacking’ (Demorest’s Magazine, 1895).
‘Linen canvas […] the best lining for bottoms of dresses; it retains its stiffness longer than any other lining; no dress can set well without it. Colors white, natural linen, brown, gray or black.’ (Sears & Roebucks Catalogue, 1900s)
I finally decided to use a shaped wool hem facing like here because it’s one of the best hem stiffenings for wool skirts in my opinion: it drapes well, adds weight and doesn’t shrink like a cotton facing in the washing machine.
‘It may be lined up with leather for a few inches, or faced with its own material – this latter plan is perhaps the best’ (Every Woman’s Encyclopaedia, 1910-2).
‘An interlining may be used in the hem or facing if it is desirable to add weight at the lower edge of the skirt. The material used for the purpose may be strips of lining, or, according to the texture of the skirt material, any substantial material such as heavy flannel or broadcloth.’ (The Dressmaker, 1916)
What I Used As Hem Stiffening
Hems of Edwardian skirt were always more or less stiffened: This is necessary for the skirt to drape well. And especially the hem of Edwardian tailored wool skirt can never be stiff enough! 😉 That’s why I used three layer for the hem of my Edwardian wool skirt: For the first layer I used the same wool serge that I used for the skirt. However, I felted the wool scraps in the washer and dryer before I used them as hem facing. Sadly, the wool fabric didn’t felt as much as I would’ve liked but it made it at least a little stiffer.
The next layer are scraps of black wool broadcloth fabric that were leftover from my Edwardian short tailored wool skirt. By the way, the wool scraps were rather small – too small to use them for another project – so I stitched them together with a small overlap.
And the last layer is gray rayon taffeta bias facing – I used the same fabric that I used to bind the seams. Like it was done in the 1900s like here, I used the facing to bind the raw edges of the wool facing. And it also stiffens the hem a little more. And then there’s also the wool brush braid at the bottom of the hem which also stiffens the hem.
There are 11 pieces in total in the hem facing. I quilted all fabric layers and the brush braid together with 4 rows of stitching before I attached the hem facing to the skirt. Then I decorated and stiffened the hem further with tailor stitching.
Edwardian Tailor Stitching
Tailor stitching was a popular hem finish for tailored wool skirts in the Edwardian era. Tailor stitching are closely spaced rows of stitching along the hem. This decorated and stiffened the hem by quilting all fabric layers together.
‘A handsome and appropriate finish for a tailor-made gown of cheviot, tweed or any other material that is alike on both sides is effected by turning up the hem of the skirt on the outside and securing it with several rows of machine-stitching done with silk in self colors.’ (The Delineator, 1890)
‘There is an immense amount of raised stitching on the new tailor-made gowns. Some of them have as many as twenty-five rows on the bottom of the skirt’ (San Francisco Call, 1900). ‘Walking or pedestrian skirts […] flounce effect, flounce neatly tailor stitched with fifteen rows of tailor stitching’ (The Minneapolis Journal, 1901).
I used 12 rows of machine stitching to secure all fabric layers together at the hem. And I used vintage thick cotton handsewing thread to make the stitching more visible.
At the MET museum you can see a 1900 grey wool walking dress with several rows of machine stitching at the hem. Look how it stiffens the flaring hem of the skirt! And here’s a close-up of an Edwardian wool skirt with four rows of machine-stitching at the hem.
‘If possible, always run them on the machine in the same direction, no matter how many rows of stitching are to be used. This applies not only to bands, but to anything that has more than one row of stitching. The reason for this is that all machines push the top piece of material a little; some push more than others, and it looks better for both sides of a band to be pushed in the same direction than for one side to push to the right and the other to the left.’ (McCalls, 1908)
Edwardian Brush Braid
‘The regulation round skirts, that which clears the ground all around […] is finished with a tailored binding of braid or velveteen’ (Los Angeles Herald, 1904).
As I mentioned before, I finished my Edwardian wool skirt with brush braid at the bottom. Brush braid as well as velvet fabric was used in the Edwardian era to protect the skirt from fraying.
‘When woolen skirts are cut very long and full, the lower edges need to be protected from the wear and tear of brushing stairs and floors. Use skirt braid for this purpose.’ (Clothing For Women: Selection, Design, Construction, 1916)
I was so happy when I actually found Edwardian-style brush braid made of mohair wool like it was made in the Edwardian era! Yay! 😀 Brush braid is crazy expensive and I could only find brush braid with a fiber content of 70% mohair wool and 30% cotton but that’s alright. At least there’s no non-natural fiber in it!
‘The bottom of a skirt may be finished in various ways. Binding with braid or velveteen is the general usage. If the former is used it should be a strong mohair braid and not the ordinary skirt braids which soon wear out […]
Skirt braids and velveteens are better sewed on by hand than by machine, as the dust is less apt to catch in the stitches and wear them out. […] Allow the edge of the braid to extend about 1/16 of an inch below the hem. The upper edge of the braid may be fastened to the hem by a running or hemming stitch. If greater strength is needed put a second row of stitches at the lower edge also, being careful not to take them through to the right side.’ (A Sewing Course For Teachers, 1893)
Here’s an antique Edwardian black wool skirt with brush braid, close-up of the inside of the hem with brush braid, close-up of interlining and brush braid, another skirt with brush braid, close-up brush braid and another close-up of Edwardian brush braid. And here’s a 1900s purple tailored skirt finished with black velvet and cotton dust ruffles at the hem; and another Edwardian wool skirt with a velvet brush edge. Besides protecting the hem, brush braid also stiffened the hem so that the skirt drapes better.
Should You Wear Grandma’s Hoop Skirt?
‘The Parisiennes have been attempting what they term “la jupe baleine” – that is, a whalebone skirt – but it must be confessed that even the title, not to mention the resulting appearance, suggests the old-time hoopskirt too vividly.’ (The St. Louis Republic, 1904)
Because early Edwardian skirts were so wide at the hem, it was even joked if women would be wearing hoop skirts again soon!
‘It does not take more than a glance at the shop windows of Los Angeles to see that the day of the hoopskirt is close at hand. […] I honestly think that our grandmothers did more for the advancement of women by discarding hoops than has ever been done before […] No woman can wear hoops and hope to compete with man in the race of life […]
Just imagine an office filled with women clerks and each wearing hoops that take up sixty-four square feet floor space! How long would they hold their position under such conditions? Not a minute!’ (Los Angeles Herald, 1904)

Accessories For The Edwardian Shirtwaist Costume
The Shirtwaist
Here I’m wearing my tailored black wool skirt with my Edwardian shirtwaist that I refashioned from a men’s shirt!
The refashioned Edwardian shirtwaist has elbow-length sleeves similar to the shirtwaist this Edwardian woman is wearing in a zoo!
Edwardian Bow Tie
‘A woman’s neck hardly seems well dressed unless some one of the dainty bows or jabots are worn.’ (San Francisco Call, 1908) ‘Very narrow, stiff little ties of silk, usually in black, […] are worn, tied in a prim little bow. […] The simpler these bows are the better their air’ (Evening Star, 1907).
Shirtwaist were usually worn with silk or lace jabots, bow ties or neckties: These 1905 women at the Miami University wear different jabots and silk bows with their shirtwaist costumes. And this Edwardian photograph shows a woman wearing a shirtwaist with a black silk tie and here’s an antique black silk tie.
Related: Edwardian Neckwear: Collars, Jabots & Fichus
‘With the simplest of runabout and traveling mohair, serge and linen costumes, […] ties are worn in connection with the stiff linen collar. Many young girls […] fashion for themselves tiny bows of narrow velvet, satin or taffeta ribbon. These look coquettish’ (Los Angeles Herald, 1908).
I used black rayon taffeta to make my Edwardian bow tie: I cut the fabric into a long strip, folded it so that the raw edges are sandwiched between the two layers of fabric and sewed along the edge.
Edwardian Hair Bow
Edwardian women often wore silk bows in the hair matching the neck ties. Here are three photographs of Edwardian women wearing large silk bows in their pompadour: woman wearing two silk bows, woman with silk bow at the nape of the neck and another 1900s woman with silk bow at the top of the head.
‘The hair is nearly always decorated in some way. For day-time, with two big bows of ribbon, one at the crown and the other across the loop at the back. […] for ordinary days the ribbons are black, no matter what the color of the frock. Black taffeta or satin’ (The Washington Times, 1904).
Even though the hair bow is such a small detail of the outfit, it was very difficult to make! First, I made a hair bow out of the black rayon taffeta fabric. But it turned out too thick and heavy. Then I tried to find a wide silk ribbon or rayon or cellulose acetate ribbon. But I could only find polyester ribbons and I didn’t want to use that. So finally I used two vintage rayon taffeta ribbons from my grandma. They were red so I dyed them black with black fabric dye.
Related: How To Dye Cotton Fabric Black Naturally
‘The taffeta ribbons tie well and come with plan and with corded edges. They are very good for the bows’ (San Francisco Call, 1902).
And they were also too small for a typical Edwardian hair bow. So I sewed two ribbons together with overhand stitches by hand. Now the ribbon looked like a proper Edwardian hair bow. But it was too floppy! So I had to starch it.
According to different sources, you shouldn’t use starch on silk or artificial silk: You should use gelatin instead. This was the first time – and probably the last time – 😉 that I starched something with gelatin. It was a mess and I had to use about 10 gelatin sheets to make the large hair bow stiff enough so that it would hold its shape! The dye bled, it was difficult to iron and there were some visible gelatin spots after drying – but at least I finally had an Edwardian-style hair bow! 😉
Edwardian Pompadour Hairstyle
I tried to recreate the beautiful pompadour hairstyle of this Edwardian woman using only period hair-styling techniques: First I made Edwardian pin curls which take some hours to dry on my hair.
Related: Edwardian Pin Curl Tutorial – No-Heat Zig-Zag Waves
Then I styled my hair into an authentic Edwardian pompadour inspired by the antique Edwardian photograph. Since it took four days to shoot my Edwardian shirtwaist costume, I had to create a similar looking pompadour for all photoshoots! 😉
On my instagram account I shared a side-by-side comparison of my Edwardian pompadour next to the antique photograph. And if you want to know more about Edwardian hairstyles, click on the link below for my longest blog post about the different variations of Edwardian pompadour hairstyles! 😀
Leather Belt & Steel Belt Buckle
Leather and patent leather belts were often worn with shirtwaist costumes in the Edwardian era:
With the shirtwaist costume ‘a patent-leather belt is worn.’ (The Delineator, 1903) ‘Kid belts, too, come in every shade, with attractive buckles in gold or oxidized silver.’ (Los Angeles Herald, 1904)
For my leather belt, I bought patent calfskin leather. Patent leather is leather with a high-gloss finish: This Edwardian woman and this golfer seem to be wearing patent leather belts. Today, patent leather is usually plastic but I bought real patent leather hide. This was expensive too – as I said before, this is a very expensive outfit! 😉
‘Ladies’ shaped patent leather belt. Stitched on both sides, with ooze leather back, giving it three-fold strength as well as fine finish. […] With fancy dip buckle’ (Sears & Roebuck Catalog, 1900s).
‘Finest quality genuine patent leather. 2 inches wide. […] Colors black or red. […] Children’s and misses’ imitation patent leather novelty belt. With each belt comes a collapsible sanitary drinking cup which fits in the pocket in front. Very popular with school children.’ (Sears & Roebuck Catalog, 1912)
‘There is the long, wide, soft strip [leather] for the belt. It is not finished upon either edge, but is plain and neat.’ (San Francisco Call, 1904) ‘Some new patent leather belts are perforated invisibly in the back to admit of ventilation, which is very desirable, especially when the belts are worn with golf or other outing dress.’ (The Billings Gazette, 1903)
Click on the link below for the tutorial on how I made my Edwardian patent leather dip waist belt with an Edwardian-style vintage metal belt buckle:
Related: How To Make An Edwardian Leather Belt
‘Nearly every belt must have its large buckle. This important part of the girdle is sometimes four inches in width. Some are highly polished’ (Hanford Journal, 1909).
‘Fancy belt buckles were never more fashionable than at present, and the range in size includes everything, from a small, broochlike fastening to an enormous rectangle of metal. Some of these ornaments are studded with gems; others are beautifully inlaid with transparent enamel, while the plain ones – those that are so merely by comparison – display beautiful etching and carving done on the metal.’ (The Salt Lake Tribune, 1904)
Here are some Edwardian metal belt buckles: 1902 ad for cut steel belt buckles, woman wearing a belt buckle, photograph of a woman with dog, antique sterling silver belt buckle, Edwardian leather belt with metal ornaments and antique black belt with metal belt claps.
And if you’re wondering how patent leather was made in the late Victorian era, I found the following great source. Making patent leather was obviously a very lengthy process. And because I recently read a lot about restoring antique furniture, I know that the process is similar to how varnish for furniture and even railroad cars was made back then!
‘Patent leather […] is made of calfskin […] split and skived down to the proper thickness. The leather, after tanning […] coated with a composition of linseed oil and umber, in the proportion of eighteen gallons of the former to five ounces of the latter, boiled till nearly solid, and then mixed with spirits of turpentine to the proper consistency.
From three to four coats of this are necessary to form a surface to receive the varnish. The coats are laid on with a sort of knife or scraper. To render the leather soft and pliant, each coat must be very light and thoroughly dried in between each application.
Related: 20 Historical Natural Glue Recipes
A thin coat is afterwards applied of the same composition, of the proper consistency to put on with a brush, and with sufficient lamp-black boiled into it to produce a perfect black.
Related: Homemade Edwardian Eyeliner With Lampblack
When thoroughly dry it is ready to varnish. The principal varnish is made from linseed oil and Prussian blue, boiled to the thickness of printers’ ink. This is then reduced with spirits of turpentine to suitable thickness to work with a brush and is applied in two or three separate coats, which are scraped and pumiced until the leather is perfectly filled and smooth.
The finishing coat is laid on with especial care in a room with the door kept closed and with the floor wet to prevent dust from settling on the leather until it is dry.’ (A Complete Dictionary of Dry Goods , 1892)
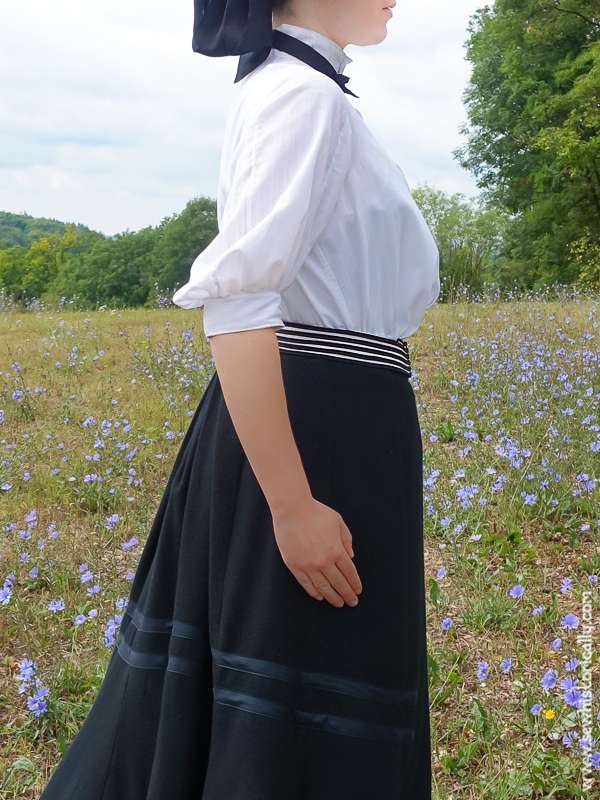
Striped Belt
Inspired by this beautiful 1903 ‘belt made of alternate rows of black and white braid’, I made another belt that I can wear with my Edwardian shirtwaist costume. I used black and white rayon taffeta fabric and embellished the belt with DIY fabric soutache. Click on the link below for my tutorial on how I made my striped Edwardian dip waist belt.
Petticoat
In the Edwardian era, tailored wool skirts were usually worn with colored silk petticoats.
‘White cotton petticoats, either plain or trimmed, are not in keeping with the dark wool, silk, or linen dresses. These bespeak colored silk or cotton petticoats.’ (Clothing For Women: Selection, Design, Construction, 1916) ‘Silk is very generally used for petticoats to be worn with tailored suits and dresses of wool, silk and linen.’ (Clothing For Women: Selection, Design, Construction, 1916)
This 1902 fashion plate shows a dark wool skirt worn with an orange silk petticoat underneath. Inspired by the fashion plate I made a special pink faux silk petticoat for my Edwardian shirtwaist costume.
Related: Edwardian Pink Faux Silk Petticoat
Chatelaine Bag
‘One of the favorite chatelaine ornaments of the moment is the wee coin purse […] These cases are just large enough to hold the modest coins required for car fare.’ (Los Angeles Herald, 1904)
Because Edwardian skirts usually had no pockets, Edwardian women often wore chatelaine bags: Almost all working women in the video above wore chatelaine bags. And here’s another video from 1905 of school teachers wearing chatelaine bags. Chatelaine bags were made of leather or metal and were attached to the skirt waistband with a hook. Here are two Edwardian photographs of women wearing chatelaine bags: woman wearing a shirtwaist costume with chatelaine bag and close-up photo of chatelaine bag.
Ladies’ chatelaine purse ‘with fancy metal frame, ball catch, chain and attachment for belt […] A substantial wearing as well as elegant bag. Black only’ (Sears & Roebuck Catalog, 1900s).
For my chatelaine bag, I bought an ornamental silver-colored metal purse frame. Even though the purse frame was so small it was so expensive! And when the frame finally arrived, it was brass-colored instead of silver-colored so I had to use a more modern looking purse frame instead. For my leather chatelaine bag I used the same leather that I used for my belt. Here’s a tutorial from 1913 about how to make a ladies’ embossed leather handbag.
‘Buy a skin for 75 cents or $1. Select one that will not fight with every frock you possess or ever expect to have. Cut it any size you please, but the smaller the better, as they are generally a receptacle for a little of everything. […] Not over two inches in diameter at the most.’ (San Francisco Call, 1903)
My main inspirations were this 1896 leather chatelaine bag and this Art Nouveau sterling and leather chatelaine purse.
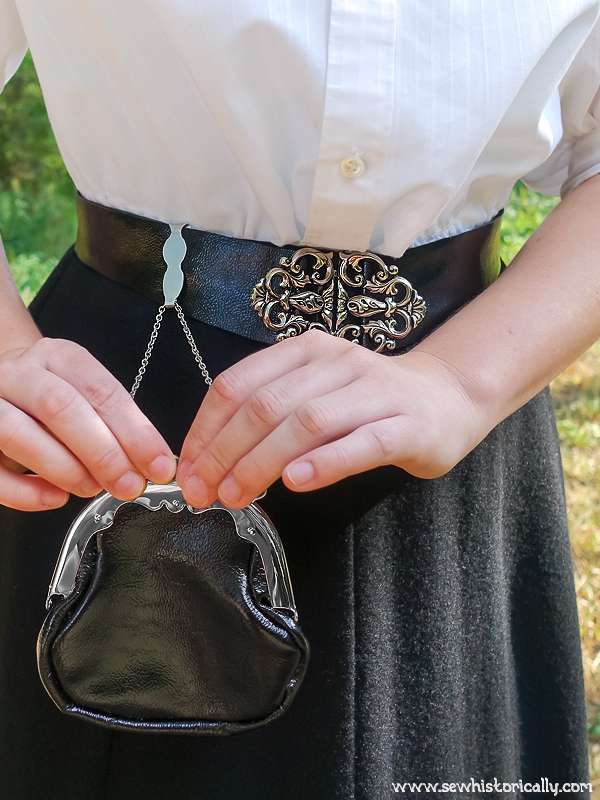
Chatelaine Hook
Finding a suitable chatelaine hook for my chatelaine bag also wasn’t easy. After buying several ornamental large skirt hooks which all didn’t match the metal of my belt buckle, I finally bought aluminum sheet metal. I cut the metal into shape and made a belt hook inspired by these two antique Edwardian belt hooks: plain belt hook and shamrock belt hook. I used the same techniques that I used to make my metal hair cuff and dog tag from sheet metal.
Related: How To Make A Metal Hair Cuff
‘The purse has become all important. Without it every woman feels lost, and of a truth she is rather helpless and forlorn. The belted affair that comes and goes with one without calling is the most used of all now. And what a blessing it is! […]
These purses, by the way, have a safety clasp. The steel piece which slips over the belt has a claw-shaped piece which can be fastened into the band [of the skirt], and unless the cloth is torn into strips no one can possibly get it off and it is absolutely safe, although all you have to do is to stop on any corner and listen to the private opinion of one man telling another how absurd it is for women to invite pickpockets in such a reckless fashion.’ (San Francisco Call, 1903)
Hat
Edwardian shirtwaist costumes could be worn with or without a hat. I’m thinking about making a matching black wool hat, probably a tricorne hat, for my Edwardian shirtwaist costume.
‘The sailor or tricorne may be donned with any and every outing costume.’ (Stockton Independent, 1907)
Edwardian Underwear
Underneath my Edwardian shirtwaist costume I’m wearing an Edwardian cotton chemise, my unboned Edwardian sports corset, my pink petticoat and black cotton stockings. In these photos, I don’t wear an Edwardian corset cover over my corset because my unboned sports corset is almost like a fitted corset cover.
I’m also wearing vintage black leather lace-up boots.
Hi!
Can I ask where you bought your brush braid from? I feel like I’ve hunted in every corner of the internet
Very many thanks,
Hi!
I bought the brush braid here.
What a wonderful skirt you have made! May I ask where you found the brush braid? I’ve been searching all over (it feels like…), but have yet to find it.
Thank you so much! 😀 I found the brush braid in this shop.
Hi there! I just wanted to say wow what a magnificent skirt you’ve made, it looks just like the Edwardian fashion plates I’ve long admired!
I just have a question if you have a minute. I’ve been working out a skirt pattern similar to yours for a while now but was confused how you got your skirt complete with just 8 panels as looking at the seams on your skirt, there looks to be 10 panels? The back pleat panel looks to fully overlap such that it adds 0 to the waist measurement. And if that’s so, to complete the look with only 8 panels, the back side panels would need to each cover half the back waist measurement. Which doesn’t seem to line up with your seams so I don’t know what I’m missing.
Thank you so much! 😀 And you’re right: it is a 10-panel skirt. I wrote the wrong number. 😉 I’ve changed it in the post now.