If you sew a lot, especially if you sew historical costumes, you’ll have to sew a placket sooner or later. Most plackets aren’t difficult to make but there are some things to keep in mind.
Learn what placket to use for what purpose and to sew six types of historical plackets: hemmed placket, bound placket, extension placket, continuous bound placket, faced placket and a placket in a flat felled seams.
What Is A Placket?
‘A placket is an opening left in a garment for convenience in putting it on, the raw edges being finished to keep it from tearing or raveling. Plackets are made in skirts, in the bottom of men’s shirt sleeves and in the sleeves of ladies’ tailored waists, for convenience in laundering.’ (School Sewing Based On Home Problems, 1916)
Placket Sewing Tips
‘A skirt placket should be sufficiently long to allow the skirt to slip easily over the head. As a rule, 9″ to 12″ are allowed, depending on the size of the person wearing the skirt and the fullness of the skirt, that is, the smaller the person or the narrower the skirt, the shorter the placket may be.
Generally in a skirt, the upper end of a seam or pleat is left open for the placket, although in a gathered skirt or the bottom of a sleeve the opening is usually cut in the material. When the placket finishes the opening at the top of a seam, or pleat, it should appear to be a continuation of the same.
A placket should open from right to left. It is usually held together with hooks and eyes, or snaps, the hooks and small parts of the snaps being sewed on the right side, the eyes and large parts of the snaps on the left, or under side.’ (School Sewing Based On Home Problems, 1916)
6 Ways How To Sew A Placket
How To Sew A Hemmed Placket
Hemmed placket
‘The hemmed placket consists of a lengthwise opening finished with a wide hem on the right edge lapped over the left edge which is finished with a narrow hem.’ (School Sewing Based On Home Problems, 1916)
The hemmed placket is one of the easiest plackets to make. In the Edwardian era, it was often used on petticoat.
‘1. Leave one of the seams of the skirt open the desired length, or
2. If the seam is not in proper place for the placket, cut a vent the proper length; cutting the vent with a thread of the muslin.
3. Turn the skirt wrong side out.
4. On the right-hand side of the vent, make a hem one-fourth of an inch wide, narrowing it to a point and rolling it at the bottom.
5. On the left-hand side, make a hem three-fourths of an inch wide, keeping it the same width all the way down.
6. Turn the skirt right side out; the wide hem is now on the right-hand side and the narrow one on the left.
7. Lap the three-fourths-of-an-inch hem over the narrow one on the left-hand side at the bottom of the vent, and secure it by two horizontal rows of stitching, about one-fourth of an inch apart.’ (Home And School Sewing, 1901)
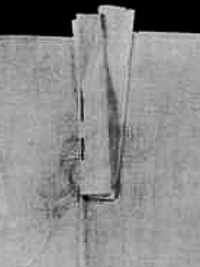
How To Sew A Bound Placket
Bound placket
‘The bound placket consists of one strip of material the same as the garment, which is sewed on the placket opening double, in such a way as to bind the raw edges.
To make it, cut a strip of material like the garment 2″ wide and a trifle longer than twice the length of the opening left at the top of the seam. Lay the right side of the strip on the right side of the material with the long edge even with the edge of the opening. If the placket is made at the end of a French seam, cut almost across the top of the seam, being very careful not to cut too far. Baste the edge of the strip to the edge of the opening making the end of the stitching in the seam just touch the line on which the placket is to be stitched. […] On an overcast or plain seam it is often necessary to drop the edge of the binding strip below the edge of the placket opening, beginning about 1″ each side of the seam in order to keep the stitching even on the strip and still catch in the end of the seam. If too much of the cloth at the seam is sewed into the binding strip, the bottom of the placket will pucker. […]
Stitch in place or sew on by hand with the combination stitch. Turn the edge of the strip over about 1/8″ toward the wrong side, then fold it over again until the edge lies just over the line of stitching. Hem neatly in place, or stitch on the sewing machine. As it is difficult to stitch this edge so that both sides will look equally well, when the last turning of the binding strip is stitched in place by machine, instead of by hand, the seams are generally turned toward the right side. Trim the top of the strip even with the top of the skirt.’ (School Sewing Based On Home Problems, 1916)
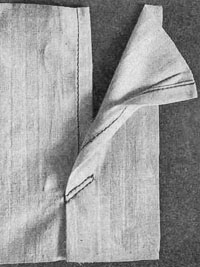
How To Sew An Extension Placket
Extension placket, wrong side
‘The extension placket consists of two narrow strips of material of the same goods as the garment in which the placket is to be made. One strip which is twice as wide as the first, is used to face the upper edge of the opening; the other is used to make an extension on the under edge of the placket.
The seam should be left unsewed the desired distance at the top of the garment. To make the placket, first cut one lengthwise strip 7/8″ wide, about 1″ longer than the opening, to face the upper edge. Cut the second lengthwise strip 1 1/2″ wide, the same length as the opening plus 1″ for the extension under the edge of the opening.
To put on the upper facing, lay the right side of the 7/8″ strip on the right side of the skirt, with the edge even with the edge of the opening, allowing the top to extend slightly above it. […] stitch in place with 1/4″ seam, being careful to have this seam in an exact line with the stitching in the seam of the skirt. Turn the long edge of the facing under 1/8″ and turn under the bottom as much as is necessary to make it even with the top of the seam. […] if the placket is made on an under garment, it may be stitched on the sewing machine. […]
To set on the extension piece, lay the right side of the 1 1/2″ strip on the right side of the material allowing it to extend slightly above the top with the edge even with the long edge of the opening. Turn up the bottom end until it is exactly even with the facing on the upper edge of the opening. Sew the two edges together (with machine stitching or the running stitch), with a 1/4″ seam, which should continue the line of stitching in the seam of the skirt. Turn the extension piece back even with the stitching on the wrong side, first turning the lower edge in about 1/4″. […] hem down by hand, or stitch on the right side, with the sewing machine if the skirt is an undergarment. Overhand the bottom edge of the extension piece to the bottom edge of the facing, and trim the top even with the skirt. Turn the garment right side out and stitch across the bottom of the placket pieces with two parallel rows of machine stitching, or backstitching’ (School Sewing Based On Home Problems, 1916).
The continuous bound placket is a variation of the extension placket. Instead of the two separate strips of fabric of the extension placket, you cut only one strip of fabric that is twice as long as the placket. In the Edwardian era, the ‘continuous bound placket’ was also known as ‘placket with a continuous binding’, ‘continuous placket’ and ‘invisible closing’ because an continuous bound placket is almost invisible on the right side. The continuous bound placket is one of my favorite plackets because it’s easy and fast to sew. I use for Edwardian petticoats:
‘Cut the facing with the warp a little more than twice the length of the opening and twice the desired width when finished, plus one-fourth inch, or more, allowed for seams. […]
a. Fold the cloth, right sides together, in a line with the opening.
b. Double the facing across the warp, through the center, wrong sides together.
c. Slip this between the folds of the cloth so that the fold of the facing will just come to the end of the opening. This will bring the right side of facing to the right side of the cloth.
d. Baste the facing to the cloth down one side and up the other side of the opening.
e. Stitch with an eighth of an inch seam, which will render unavoidable a small pleat at the end of the opening the width of the seam.
f. Crease the facing back over the opening exactly in the seam.
g. Turn an eighth of an inch fold the length of the facing down the other side.
h. Fold this over the seam to the stitching, baste, and hem.
i. At the top of the opening fold the right-hand facing back and stitch along the edge to hold in place.’ (Sewing – Handicraft For Girls, 1918)
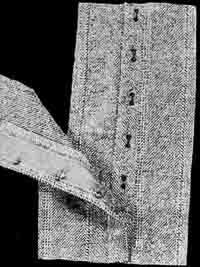
Faced plackets were often used on tailored wool skirts in the Edwardian era. My Edwardian tailored black wool skirt has a faced placket under the inverted box pleat at the back:
‘The faced placket is a combination of the hemmed and extension plackets, the upper, or right edge of the opening being turned under in a hem, or faced back with silk or percaline, while the under, or left edge is finished with a double or faced strip extending under the upper edge. […]
finish the upper or right edge first by folding under the material along its edge so it forms an exact line with the edge of the material in the remainder of the seam, and continue any stitching that appears in the seam. […] trim it down to 1″ in width and if the material is light weight, finish the raw edge by turning it under, basting and hemming it in place, using very fine hemming stitches […] (the stitches should scarcely show on the right side of the material); or if the material is of heavier weight, the edge may be finished with overcasting, blanket stitching, bias tape or binding ribbon. When the placket is completed, the hooks are sewed on about 1/4″ from the edge. […]
To finish the left or under side of the placket, put on an extension piece the same as in the extension placket […] or cut a piece of material and a strip of lining or silk with which to face it, making each 1 1/2″ wide and at least 1/4″ longer than the opening. Lay the right side of the strip of material on the right side of the skirt, baste and sew to the edge of the opening with a 1/4″ seam, making this seam come in direct line with the skirt seam […] Press open the seam with the fingers and face this strip with the lining by stitching the edges together, turning the facing under and hemming it to the under side of the material where the extension piece is stitched on.
If the placket comes under a pleat it is necessary to allow this facing to extend beyond this stitching to make it come under the eyes when they are sewed on. Then turn in the edges at the bottom, baste them together and stitch around the bottom and the other edges with machine stitching. Sew on the eyes opposite the hooks.’ (School Sewing Based On Home Problems, 1916)
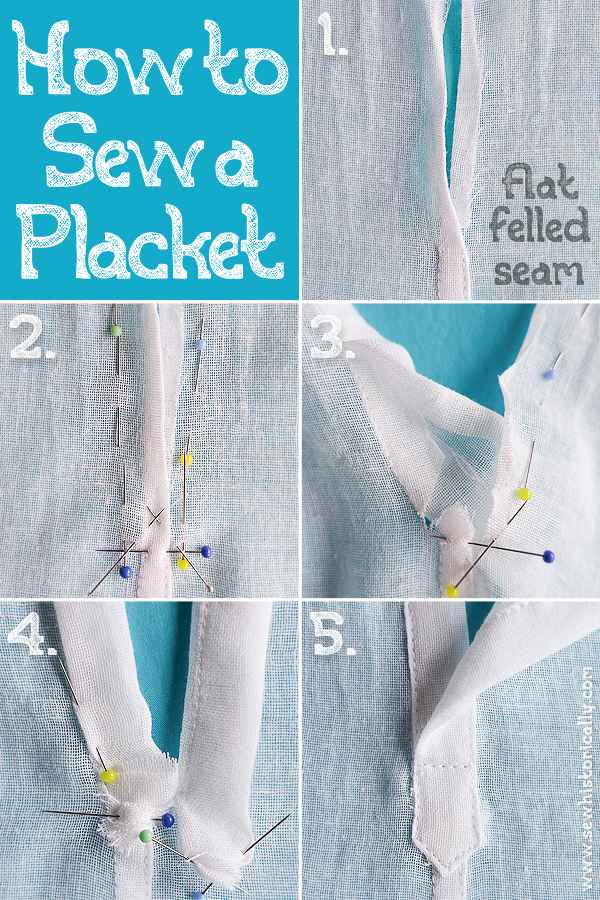
Placket in a flat felled seam (placket in the center)
How To Sew A Placket In A Flat Felled Seam
If you sew historical, especially Edwardian, costumes you often have to add a placket into a flat felled seam. Sewing a placket into a flat felled seam is one of the most difficult plackets, in my opinion, and I couldn’t find a modern tutorial for this.
Most of my Edwardian lingerie, like my Edwardian chemises, (princess) slips and combination suits, have plackets in a flat felled seam.
If you want to add a placket in a flat felled seam, you have to decide beforehand if the center line is at one side of the flat felled seam or in the middle of the flat felled seam. In the first case, the placket is off-center. While in the second case, the placket is in the center. In the Edwardian era, the first way (off-center) was the typical way to add a placket in a flat felled seam because skirt plackets were often hidden under an inverted pleat. And if you want to hide the placket under an inverted box pleat, the placket must be off-center.
1. Cut two strips of fabric slightly longer than the placket and four times as wide as you want the finished placket.
2. Fold the seams allowances of the fabric strips inwards and sew the fabric strips along the vertical pin lines (see picture 2 & 3 above).
3. Cut a small triangle into the fabric at the bottom of the opening (picture 2).
4. Fold the bottom of the fabric strips in an arrow shape so that the fabric strips cover the bottom of the opening (the left fabric strip covers the raw edges on the inside, while the right fabric strip covers the raw edges on the right side). Then stitch it in place (picture 4 & 5).


I have needed this article. I always struggle with packets. For some reason my brain struggles with it.
Thank you! 😀 Glad you like it!