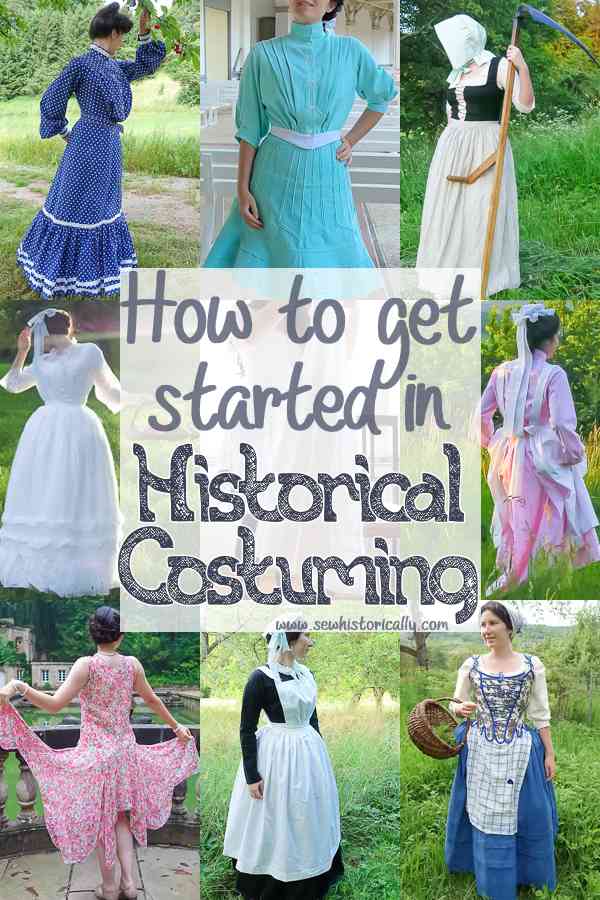
Do you want to make your own historical costumes and don’t know where to start? Or are you wondering how to start with historical costuming on a budget? These are my 8 tips on how to get started in historical costuming! 😀
Choose A Historical Costume That You Love!
Even though it’s your first historical costume, choose a historical costume from an era that you’re really excited about. Don’t choose an easy costume if it doesn’t really interest you. Historical costuming beginners are often advised to make an empire dress (1795-1820) first because it’s considered fairly easy to make.
But my advice is that you choose a historical costume that you really love and are excited to make. Even though it might be difficult for a beginner. But if you’re not excited about the historical dress, you’ll get bored, you won’t enjoy making it and you’ll probably not even finish the dress. So choose a historical costume that you love even if others tell you it’s too difficult to make as your first historical costume.
My first historical costume was from the late 1840s/ early 1850s because this was the era I was most interested in at that time.
Related: 11 Tips On How To Dress Vintage & Historical Without Looking Too Costumey
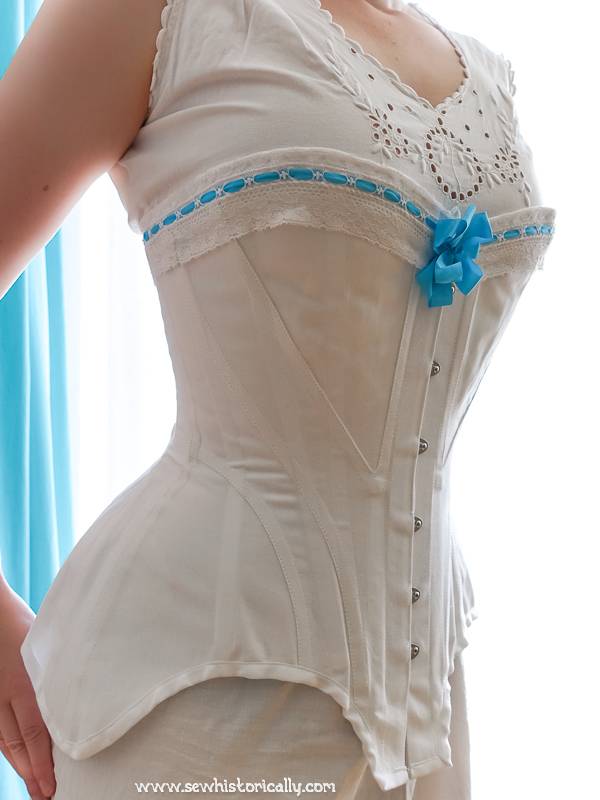
Make A Piece Of Underwear Or Accessory First
If you don’t want to waste too much time on your first piece of historical clothing, you can make a small item first like a cap or collar. Or you can make something where mistakes are less noticeable like a chemise or petticoat. Also, it’s best to make the underwear first and fit the dress over the underwear.
Related: How To Make A 1920s Slip
However, if you’re not excited about making a piece of underwear or accessory first, then don’t do it. And start with something that you’re really excited about like a dress. Because, like I already mentioned, your first piece of historical clothing should be something that you really want to make. Otherwise you’ll get bored and probably don’t make another historical garment. You can always add accessories and undergarments later to make your historical costume complete.
Historically Accurate Or Not?
Decide whether historical accuracy is important to you or not. There’s no right or wrong way. If it’s your first historical costume you’ll probably find it easier not to try to make it as historically accurate as possible. For an easier start in historical costuming you can use modern seam finishes (like zig zag stitches or serged seams) instead of historical seam finishes and use a sewing machine instead of where hand sewing would’ve been used.
Related: 34 Types of Seams
However, if you want to make your first historical costume as historically accurate as possible, there’s no reason why you shouldn’t. Like I said, there’s no right or wrong way to do it. Just do what feels right for you. 😀
My first historical costumes weren’t historically accurate. Because this wasn’t important to me when I started with historical costuming. But now, many years later, historical accuracy is really important to me. And I don’t like my earlier costumes anymore that are not historically correct. So I either sell them or refashion them to make them historically accurate. But this is just my personal story in historical sewing so you can see that your interest in historical accuracy can change over time. However, just do what feels right to you: If you want to make historically accurate costumes from the start, that’s o.k. And if you always want to make costumes without focusing on historical correctness, that’s o.k. too!

Use Cheaper Fabric
Chances are that your first historical costume doesn’t turn out perfect – mine certainly didn’t! 😉 So, especially if you’re on a tight budget or don’t want to waste money, you can use cheaper fabrics.
Historically, natural fiber fabrics were used such as linen, wool, silk (not silk dupioni, however), cotton and since the 1900s/1920s also artificial silk – like viscose (rayon) and cellulose acetate. Many different types of weaves and fabric weights existed and were used for different purposes: from heavy wool broadcloth fabric for winter wear to sheer wool barege fabric for summer dresses. Here‘s a great resource of historical fabrics: “A Complete Dictionary of Dry Goods” from 1892.
However, for your first historical costume you can use cheaper, not historically accurate fabrics, e.g. polyester taffeta instead of silk taffeta. And when you get more experienced, you can switch to more expensive materials. Or you can make a historically correct cotton dress. Cotton has been popular in many historical eras. In addition, cotton fabric is usually cheaper than other types of fabrics. You can make an 1820s or 1880s cotton print dress, an 1850s or 1900s sheer cotton lawn dress, a 1920s cotton house dress or a Victorian lower class peasant dress. There are so many ways to use different types of cotton fabric!
Related: 4 Tips When You Don’t Have Enough Fabric For Your Sewing Project
For my first historical costumes, I often used leftover not historically correct fabrics made of non-natural fibers from my grandma’s stash. I used a non-natural fiber upholstery fabric for an 1840s dress, a polyester taffeta curtain fabric for an 1860s dress and polyester lace curtain fabrics for a 1920s dress. Like my interest in historical accuracy, this has also changed and now I always use historically correct fabrics. But for my first costumes – because I was still learning how to make historical costumes – cheaper fabrics made of non-natural fibers, leftover fabrics or old bedsheets were just right to save money.
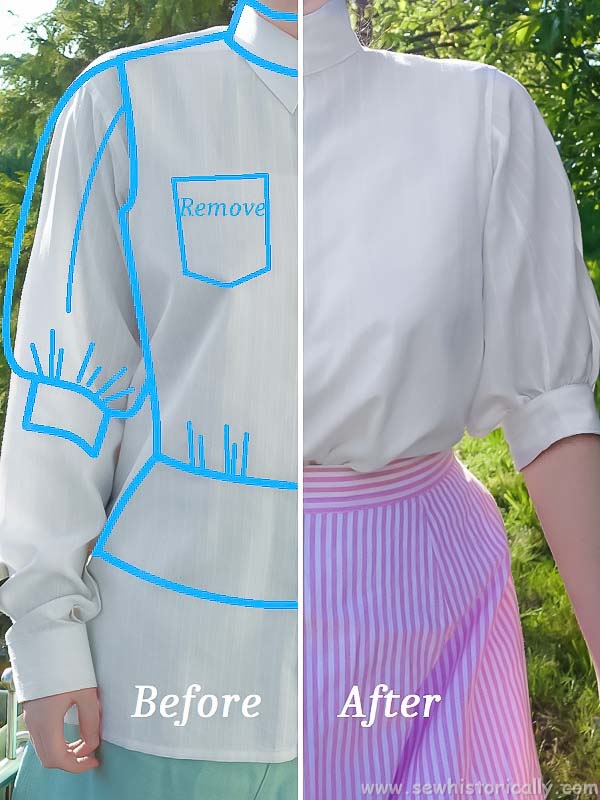
Use Old Clothes Instead Of Fabric
Instead of cheap fabric, you can also use old clothes as fabric. This is something I often do: I choose old clothes that are made of the right type of fabric and treat them as fabric. I cut the old clothes open along the seams and use the fabric pieces as fabric. If you’re using small fabric pieces instead of a large piece of fabric, it may be necessary to piece the fabric together. But fabric piecing is historically accurate! 😉
Related: How To Make An Edwardian Camisole From Handkerchiefs
Using old clothes instead of new fabric is good for the environment. And you’ll also learn how clothes are made – or rather how poorly store-bought clothes are made today! 😉 But at least you can learn how to do it better.
Related: 10 Tips On How To Refashion Your Clothes – Beginner’s Guide
Always Make A Mock-Up First!
As boring and as time-consuming as it may sound, your historical costume will fit so much better if you make one or more mock-ups first. Also, you can learn a lot from making a mock-up: where to make adjustments, what’s the best order to sew the pieces together, where the seams should be etc.
Personally, I don’t like making mock-ups but I always make one or more mock-ups before I make a new historical costume. And when you made adjustments to your mock-up and your pattern fits, you can use the pattern again and again knowing that it fits!
Don’t Buy Expensive, Unnecessary Sewing Tools
To get started in (historical) sewing, you only need some basic sewing tools. To start sewing, you only need:
- strong and sharp fabric scissors
- measuring tape
- pencil – I always use a pencil to mark fabric for sewing and embroidery because I find it washes out better than tailor’s chalk and other temporary fabric markers
- pins – steel head pins are best because you can also use them to press fabric
- hand-sewing needles – to get started you need at least three different hand-sewing needles: two with sharp points, one thin and one thick needle, and a thick needle with a large eye and blunt point
- optional: basic sewing machine including universal sewing machine needles – if you want to use a sewing machine, you can buy one. But if a sewing machine is out of your budget right now, you can start making historical costumes by sewing them by hand
- a long ruler or long, straight stick – you need this to draw long, straight lines for historical skirt and coat patterns. Rulers are often not long enough, so I use a long, straight aluminum stick from a hardware store instead
These are the sewing tools I personally used when I started with historical costuming – and I still don’t need many more sewing tools than these! Don’t let anyone tell you that you need a French curve or flexible ruler, a bias tape maker, a seam gauge or some other special sewing tool to get started. Only buy a sewing tool if you constantly feel that you need that special sewing tool! 😉
Related: 11 Tips On How To Sew Faster
Use Packing Paper As Pattern Paper
Instead of buying pattern paper to draft your patterns, you can use brown packing paper (kraft paper) that comes free with your packages or wrapping paper leftover from Christmas.
I sort out packing paper that is too crumpled or torn. But I often reuse packing paper to draft my patterns. Because the paper is strong and doesn’t tear easily.
Please Pin It!