If you read my blog regularly, you know that this is already my third hand-painted 1920s dress! 😀 I made my 1920s dress inspired by an antique 1920s floral chiffon dress. And I also made the DIY tape lace yoke with cotton Valenciennes lace scraps from my stash.
Antique 1920s Dress Inspirations
My hand-painted 1920s floral dress is mainly inspired by this beautiful antique 1920s blue & green floral chiffon dress and this 1920s photograph of a floral painted silk dress. And the main inspiration for my DIY tape lace yoke came from this antique 1920s floral chiffon dress with a tape lace yoke: here’s the front & the back of the tape lace yoke. You’ll find more inspirations for my hand-painted dress on my pinterest board: 1920s Fashion & Accessories.
Natural-Fiber Crepe Fabric & Fagotting Stitches
I used natural-fiber viscose (rayon) crepe fabric for my hand-painted 1920s dress. But since I’d already used most of the fabric for other 1920s dresses, I only had small pieces left. And I didn’t want to join the fabric pieces with a simple hem. So I decided to use decorative fagotting stitches to join the fabric pieces. By the way, fagotting stitches were very popular in the 1920s.
Related: 34 Types of Historical Seams

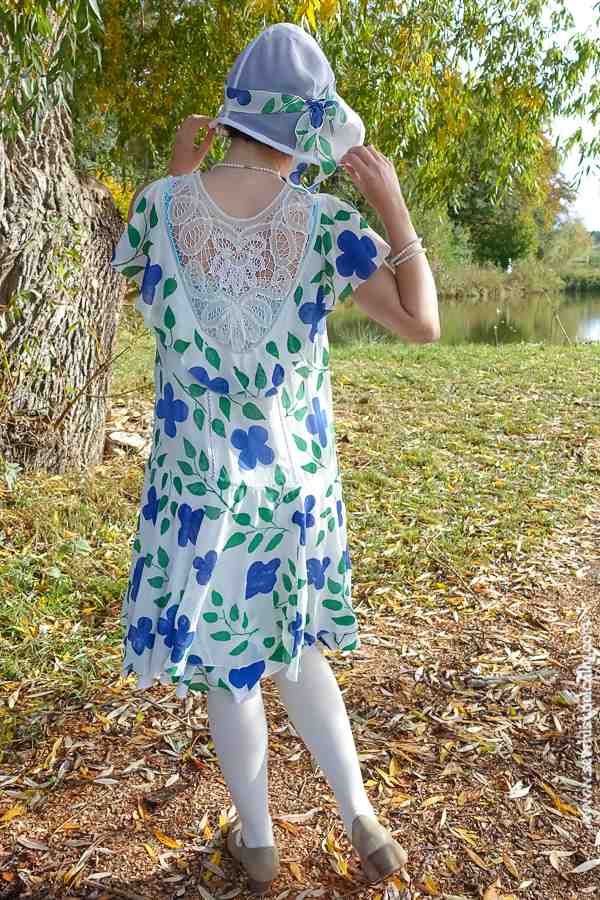
DIY Tape Lace Yoke
I often make Edwardian DIY lace yokes and sometimes I also make 1920s-style lace yokes. This time I made a tape lace yoke because tape lace – aka Battenburg or Battenberg lace – was very popular in the 1920s, especially for yokes, collars and cuffs. I used scrap pieces of cotton Valenciennes and bobbin lace for my 1920s tape lace yoke.
To make the DIY tape lace yoke, I basted the lace in the pattern I wanted to a piece of paper like in The Priscilla Battenberg And Point Lace Book from 1912.
After basting the lace to paper, I joined the lace with fagotting stitches using cotton crochet thread. Then I removed the tape lace yoke from the paper and sewed it to the dress.
The tape lace yoke is closed with 3 pearl buttons and thread button loops at the left shoulder.
Related: How To Make An Edwardian Lace Yoke
How I Hand-Painted The 1920s Dress
I left the dress white with only the tape lace yoke as embellishment for a couple of years. But I almost never wore the dress because I found it too plain and boring. So I finally decided to paint my 1920s dress. And it would’ve been much easier to paint the fabric first and then sew the dress. But since I had already sewn the dress, there was no alternative but to paint the entire dress.
Inspired by the antique 1920s dress, I used blue and green fabric paints to paint my 1920s dress. I put several layers of paper between the front and back of the dress and painted a section of the dress. Then I let that section dry for a couple of hours or days. And then I painted the next section. Because of the drying times between the painting, it took a couple of weeks to paint the entire dress! And the hardest part was not to get any paint on the fagotting stitches or the tape lace yoke!
New Fabric Paint = Problem!
This is now the point at which I would’ve liked to show you my finished 1920s floral hand-painted dress. But the problems have just begun! 😉
I usually use fabric paints to paint or print my clothes that have to be heat set with an iron. But this heat setting always takes a lot of time. So this time to speed up the painting process I thought I’d try a new type of fabric paint that doesn’t need to be set with an iron. According to the instructions, the fabric paints bonds to the fabric by letting it air dry for at least two days – no need to heat set with an iron. However, after painting my dress there was a sticky residue on the wrong side of the dress. And this made especially the skirt part stick together which looked terrible!
Even letting the dress air dry for weeks or months didn’t fix the problem of the sticky residue! So I washed my hand-painted dress two times on a not very gentle cycle in the washing machine hoping that this would remove the sticky residue. But all it did was fray all hems and most of the seams! At least, the tape lace yoke and the fagotting stitches were still intact. But the sticky residue was still there too!
So there was no alternative than to rub off the sticky residue by hand. This took ages – way longer than heat setting the dress would’ve taken! And my hands hurt badly afterwards! So I learned my lesson and never use this type of fabric paint again. But at least the sticky residue was gone now. So I washed the dress again – now on a gentle cycle – to remove all the leftover crumbly bits of the fabric paint residue. And then it was time to fix the problem of the frayed hems and seams.
More Problems: Dress Too Short!
I cut off all frayed parts of the collar and hem of the dress. Then I finished all the hems on the collar and skirt with the 1920s imitation picot hem again which has never frayed on any of my other 1920s dresses before. And I also re-sewed the frayed waist seam. However, there was a new problem now: My 1920s hand-painted dress was too short now!
Related: How To Make A 1920s Slip
So I tried to either find a similar type of cotton Valenciennes lace like on yoke or a similar type of viscose crepe fabric to make the dress longer. But I had no luck: All fabric swatches of different types of viscose crepe and chiffon fabrics I ordered looked different than the fabric of the dress. They had a different texture and were less sheer. So I finally bought a lightweight off-white viscose chiffon fabric. The fabric was different but it was the closest match.
After the fabric arrived – and after pre-washing and ironing the fabric – I cut another circular skirt and attached it at the waist seam. So there are now two fabric layers below the waist – the new circular skirt is longer than the other.

More Hand Painting!
After attaching the new skirt part to the dress, I painted the bottom part of the circular skirt. And then my 1920s floral hand-painted dress was finally, finally finished! 😉 I started painting the dress in winter and wanted to finish it in spring or summer. But with all the problems it took until late fall until my 1920s dress was finally finished. Luckily, the trees were still unusually green on November 1st to take photos of my 1920s “summer” dress. 😉 However, the problems weren’t over yet: Because later that day I badly hurt my hand. But that’s another story.
1920s Accessories
Because my 1920s hand-painted dress is very sheer, I wear it over my 1920s-style pure silk slip which I embellished with antique Mechlin lace.
Related: My 1920s Slips
I also wear 1920s-style shoes, my DIY 1920s-style chiffon cloche hat and my 1920s-style DIY pearl necklace.
Related: How To Make A Knotted Pearl Necklace – Video Tutorial
Love it!
Thank you! 😀