I started the handwoven dress with a cone of beige cotton weaving yarn: I wove the yarn into fabric, washed it, dyed it and then sewed it into a dress. It was a lot of work but I love how my handwoven dress from scratch turned out! 😀
Weaving The Fabric
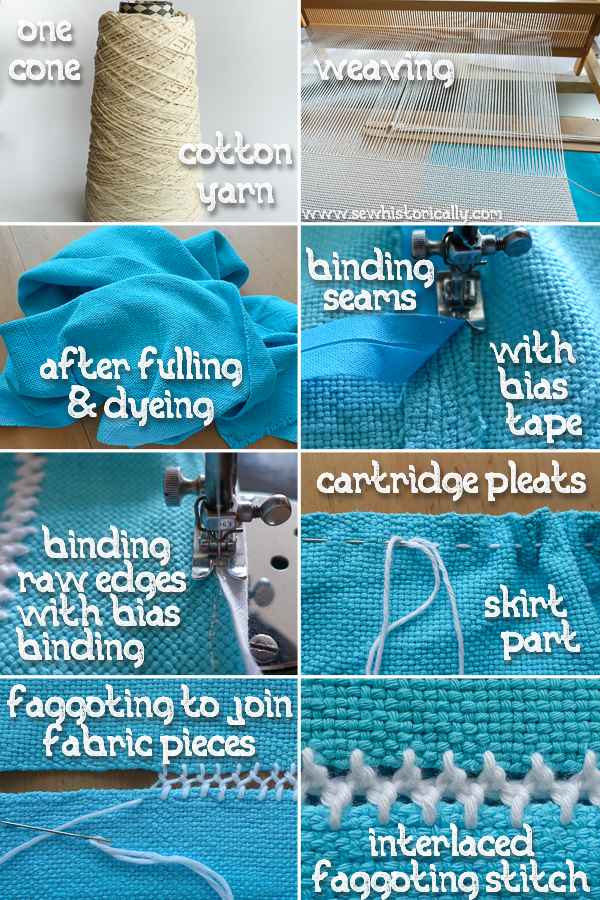
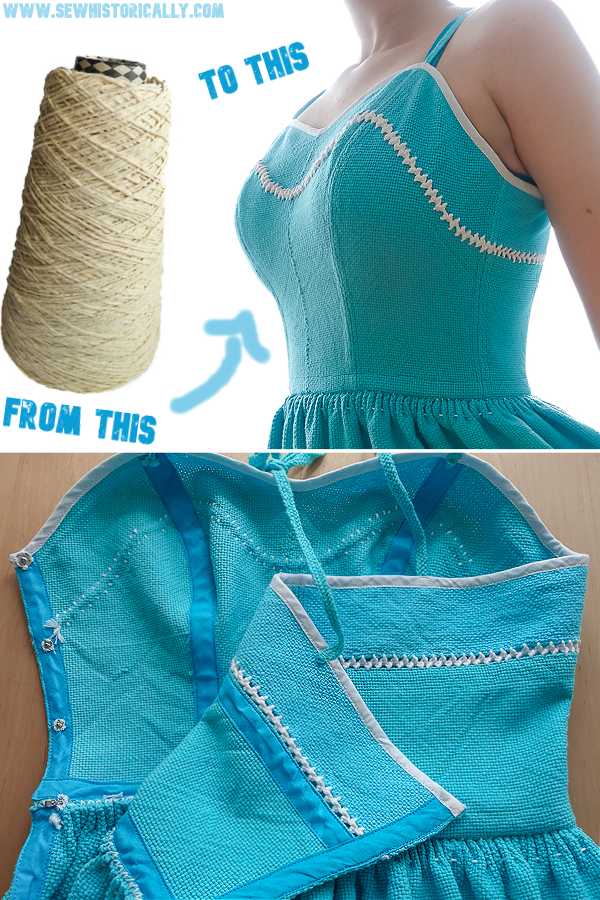
For my handwoven dress I used natural beige cotton weaving yarn from my stash. I wove the yarn on a rigid heddle loom in plain weave. Then after taking the cotton fabric off the loom, I washed the long piece of fabric. During the first washing process (fulling), a piece of handwoven cotton fabric shrinks considerably making the weave less see-through. Because of this shrinkage I wove the piece of fabric longer than I needed for the dress but it still came out too small after washing. 😉
So I took another thicker, white cotton weaving yarn from my stash and wove a long strip for the hem of my dress. After prewashing this long strip of fabric, it was time to dye my handwoven fabric!
Dyeing The Handwoven Fabric
Because I didn’t like the unbleached, natural beige color, I dyed the handwoven pieces of fabric and some leftover weaving yarn with turquoise fabric dye in the washing machine. And because I used different cotton weaving yarns, the fabric color dyed the large piece of fabric a little greener and the hem strip a little more bluish. But I like it! 🙂
Sewing The Handwoven Dress
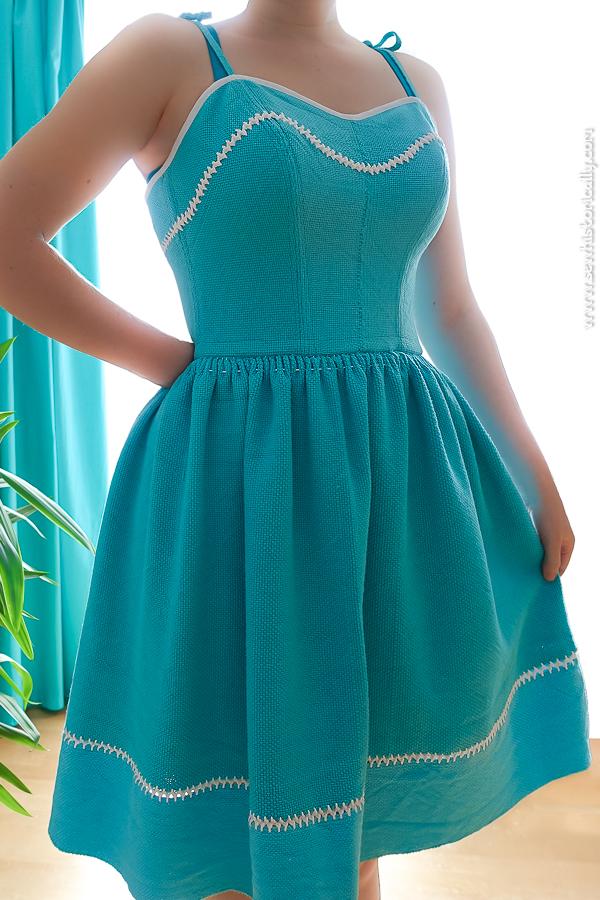
After ironing the large pieces of handwoven fabric, I could finally sew the dress! 😀 I used a small piece of the long piece of fabric for the bodice of the dress, and most of the fabric piece for the full skirt of my 1950s-style dress.
Wherever possible, I sewed the selvages of my handwoven fabric together with the old German seam (aka baseball stitch) by hand.
Related: How To: Baseball Stitch + Video
But of course I had to cut the pieces for the bodice of my dress. I finished all those raw fabric edges with turquoise cotton bias binding to prevent the handwoven fabric from fraying (more about this below). And I finished the raw edges at the neckline with white cotton bias binding.
Handwoven Fabric & Fraying
Handwoven fabric is prone to fraying. But I don’t like using fabric stabilizers, fabric glue, interfacing or any other non-natural, non-eco-friendly materials for my handmade clothing. Besides, in the past, handwoven fabric was cut and used to make clothing without using fabric glue or other modern plastic materials to prevent fraying. 😉
In the past, they used the selvage of handwoven fabrics for seams wherever possible. And where raw edges of fabric met, they either used flat felled seams, lapped seams, French seams or bound seams.
At first I wanted to finish the raw edges with flat felled seams. The flat felled seam is my favorite seam because it’s a strong seam with no visible raw edges. However, flat felled seams, lapped seams and French seams are rather bulky on handwoven fabric because handwoven cotton fabric is usually thicker than commercial cotton fabric. I used lapped seams on my handwoven corset top because lapped seams and flat felled seams were the typical seams of historical corsets: They help to stabilize a corset or bodice.
Related: Handwoven Corset Top
However, for my handwoven dress, I used bound seams to reduce the bulk at the seams. Seams bound with bias tape are still a tidy and strong seam finish for handwoven fabric because all raw edges are covered.
First, I made a plain seam and pressed the seam allowances apart. Then to further secure the seam, I stitched two parallel lines at each side of the seam. And then I finished the raw edges with cotton bias binding on the wrong side of the dress for a neat finish and to prevent fraying of my handwoven fabric.

Cartridge Pleats
I gathered the skirt of my 1950s-style dress with cartridge pleats. Cartridge pleats were very popular in the Victorian era: They add fullness to a skirt.
Related: How To Sew Cartridge Pleats
Interlaced Faggoting Stitch
And to join the hem and skirt of my handwoven dress, I used interlaced faggoting stitches. I like the sporty touch these embroidery stitches give to the dress! 😀
I also used interlaced faggoting stitches where I had to piece the bodice together at the back. Then I continued the line of the stitches at the front of the bodice. I used soft, white cotton crochet yarn for the interlaced faggoting stitches.
Handwoven Dress Closure
My handwoven dress is closed at the side with four snaps and one hook & eye at the waist. Snaps and hooks & eyes were often used on 1950s dresses! 🙂
Braided Shoulder Ties
To make the shoulder ties, I used leftover cotton weaving yarn that I’d also dyed turquoise. Because I wanted wide shoulder ties, I braided the cotton yarn into 8-strand braids.
To make the braided shoulder straps, I braided over-under-over-under and so on from left to right. I made four separate shoulder ties; two tied into a bow on each shoulder.
Making the handwoven dress was a lot of work but worth it! 😀
Please Pin It!
That’s a lot of work. It turned out great
Thank you! 😀
I am very impressed with your work and with the fact that you even know how to do this. Thanks for sharing.
Thank you so much! 😀
Very impressive!
Thanks! 🙂
Awesome! I used to sew my handwoven fabric into clothes. Very rewarding. Nothing as challenging as you have done. It is beautiful.
Thank you so much! 😀
Absolutely beautiful!!!
Thank you! 😀
that’s so awesome! How long and wide was your initial piece of woven cotton?
Thank you! 😀 As I mentioned in the post I had to weave more pieces because my initial piece wasn’t enough. 😉 But I ended up using 730g of cotton yarn for the whole dress. Hope this helps! 🙂
Absolutely gorgeous!
Thank you so much! 😀