A 1950s petticoat has been on my sewing list for years! And now I finally made one. 😀 I like how it turned out but it took way longer than I anticipated: I thought a 1950s petticoat would be a quick sewing project – but it definitely was not! 😉 It took me ages to cut, gather and finish all those long tiers of the petticoat.
While researching how to make a 1950s petticoat, I was surprised that there are not more tutorials on how to make a 1950s petticoat out there. So I thought I’d write how I made my 1950s petticoat in case you want to make one too. This is not an in-depth tutorial how to make the ultimate 1950s petticoat: it’s just how I made my 1950s-style petticoat. 😉
On a side note, my grandma was a dressmaker in the 1950s. And despite making a lot of fashionable dresses, she never made a petticoat for herself and her family. Because she thought that petticoats made people look fat (she was very skinny). But I still decided to make a 1950s-style petticoat. 😉
The Fabric
I used leftover curtain fabrics from my stash: yellowish organza fabric and white chiffon fabric. Both fabrics are made of polyester. So the petticoat is not historically correct because most 1950s petticoats were made of nylon or cotton.
The Tiers
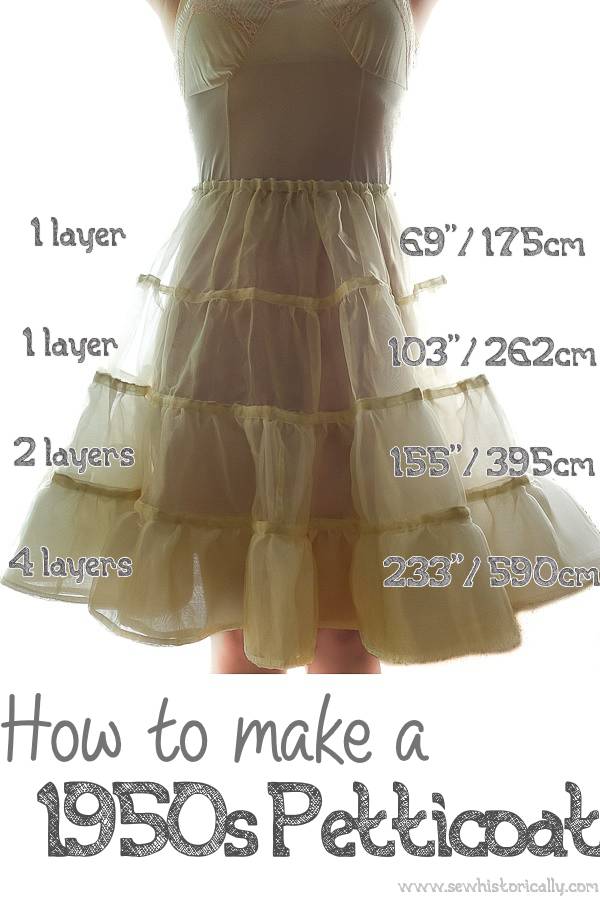
The petticoat has 4 tiers. Each tier is 6″ (15cm) wide, so the petticoat is 24″ (60cm) long.
Each tier is 1.5 times wider than the tier above. The first tier is 69″ (175cm) long, the second 103″ (262cm), the third 155″ (395cm) and the fourth 233″ (590cm).
The Seams
After cutting, I joined all seams of the tiers with flat-felled seams (you can also use French seams instead). Then I gathered the tiers with a piece of yarn (encased in the fabric), joined the tiers and finished the raw edges with a strip of organza fabric.
The Hem
I used the fabrics alternating for the ruffles at the bottom of the petticoat. There are four layers, so it’s white, yellow, white, yellow. The yellow organza fabric had a selvedge which I used for the hems. But the white chiffon did not so I finished it with a small hem.
Elastic Waistband
Then I finished the petticoat with an elastic waistband: I sewed a casing and threaded elastic through. And the petticoat was finally finished!
1950s Dress With 1950s Petticoat
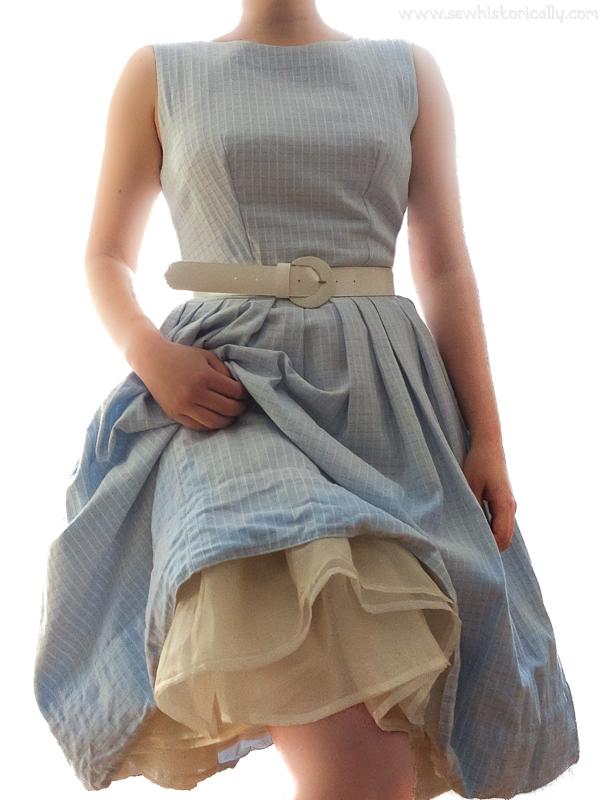
Because the 1950s petticoat is pretty sheer, I’m wearing it over my DIY vintage tap pants and a 1950s slip.
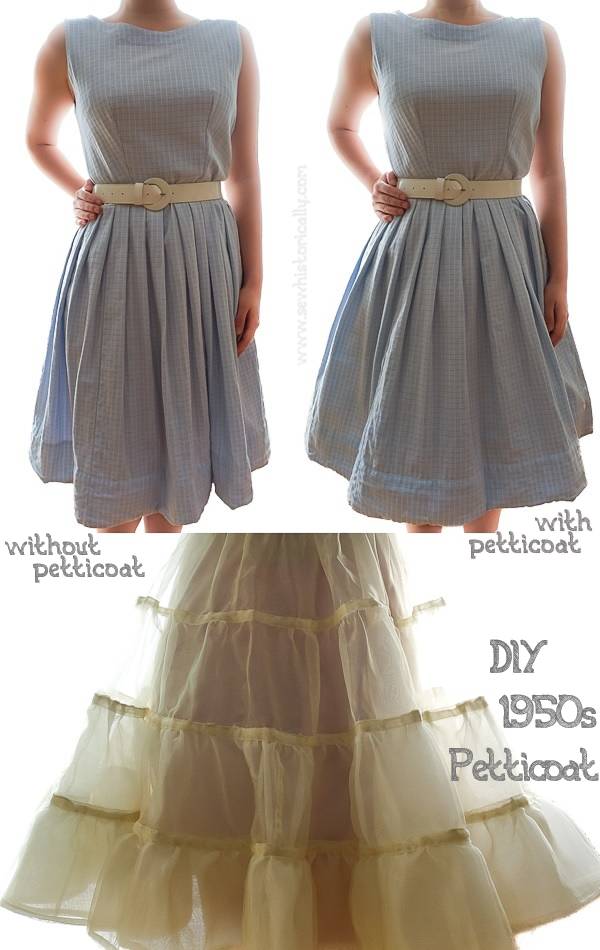
In the photo above you can see what the dress looks like with and without the petticoat. By the way, I refashioned this 1950s-style dress from an old duvet cover! But it doesn’t make much difference whether I wear the petticoat with this dress because I’ve already stiffened the hem of the dress with cotton twill fabric. With the petticoat, however, the skirt is slightly wider than without.
Related: 1950s Blue Check Curtain Dress
The petticoat is probably too hot in summer because it’s made of non-natural fibers. But for spring weather it’s perfect!
Please Pin It!
Thankyou for this. But I don’t quite understand the layers and how they are joined together. Each tier is 1.5 x length of layer above. I’m not sure what you mean when you say tier 2 is 2 layers, tier 3 is 3 layers, etc? Does that mean you cut 2 of tier 2, each 1.5 x tier 1 length? Do you join both layers together along both long edges or just on top edge, before gathering top edge and joining to previous tier? Some intermediate, or close up photos of how the tiers are joined would be helpful.
I didn’t take progress photos but I’m trying to answer your questions. The bottom tier of the petticoat has 4 layers. Each of these 4 layers is 233″ (590cm) long. I joined 2 of the layers together (on the top edge) before I attached them to the tier above.
I actually wanted to join the tiers together with a “receiving tuck” but I finally attached it with “finishing braid” (a strip of organza fabric). Here‘s an Edwardian tutorial (with photos) how to attach ruffles with a “receiving tuck” and “finishing braid”. Hope this helps! 🙂 Let me know if you have any further questions.
Hey! I think I have a similar question as Karey did. As an absolute beginner, I don’t know how to measure the ruffles. Do you start with gathering the lower tier to the width of the 3rd tier, add it to the 3rd, gather the 3rd tier, sew it to the 2nd and so on?
Yes, that’s right! 🙂
Can I just ask how you calculated the length of the first layer, in relation to your waist?
Thanks a lot!
The first layer is about 2.5 times my waist size.
Wow, thank you for this it is most helpful, as you yourself pointed out it is hard to find information on tired 1950’s under skirts. Can you tell me please it looks as if you attached a simple half slip underneath so the netting is not uncomfortable, is this correct? And if yes please would you give measurements. I of course may be completely wrong but it is what I plan to do if I make one is I find the so very very uncomfortable, especially if one is going somewhere in the summer ?thank you blessings Mary
Thank you! I’m wearing a separate vintage slip under the petticoat. Also, I didn’t use netting for the petticoat: I used organza and chiffon fabric. 😀
Hello, thank you very much for this tutorial. Can you tell if I want use natural fabric (cotton in this case), what type of fabric was usually used? I have had bad experiences with extended-wear polyester petticoats. Also, I discovered cotton net. Thanks for answer. 😀
Thank you! 😀 In the 1950s, cotton petticoats were either stiffened with homemade starch or with cording. I think any strong, plain-weave cotton fabric will work. But I think cotton net (like cotton bobbinet tulle) isn’t sturdy enough for a 1950s petticoat. Hope this helps!
Oh my goodness!!! This is the information I’ve been searching for for months! Thank you for sharing! I plan to try this with some cotton voile I have in my stash.
Thank you! 😀 Glad you find it helpful!
This is such a treat to find! Thank you so much for making this guide~
May I ask how many yards of fabric you used in total?
Thank you! Glad you find it helpful! Because I made the petticoat a long time ago, I can’t remember exactly: maybe about 4 or 5 yards?
wooow thank you for sharing. I’ve always wanted to make one but didn’t know how.
thank you 😊 💓 ☺️ 💗 💛
Thank you! Glad you like it!