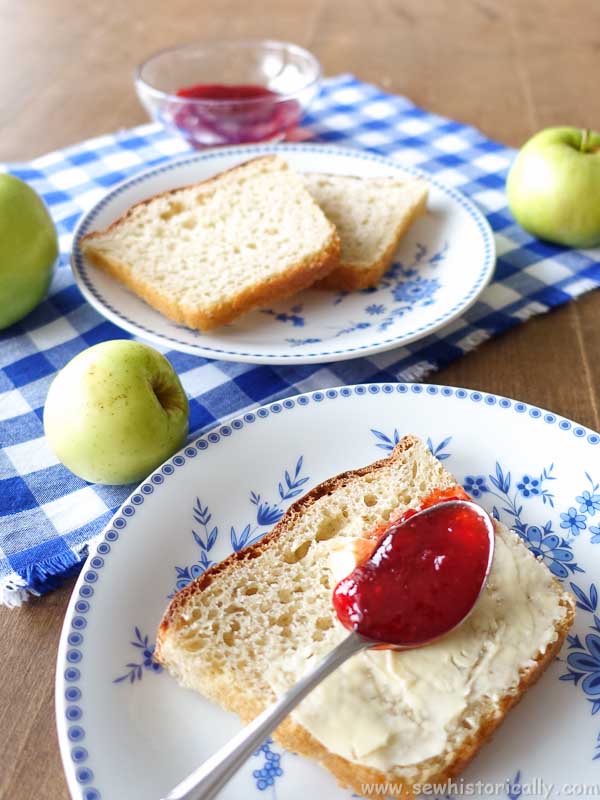
You don’t need commercial yeast to make a delicious loaf of bread! Bake homemade bread with wild yeast from scratch. I’ll show you two alternatives to make wild yeast starter from scratch at home with fermented honey water or fruit yeast water. Bread with wild yeast starter is easy and cheap to make and so delicious – it tastes just like ordinary yeast bread or even better!

Wild yeast bread is made by spontaneous fermentation involving wild yeasts and lactobacilli. Honey and fruit water is used to catch wild yeasts and lactobacilli which naturally leaven the bread. Wild yeast bread with fermented honey water or fruit yeast water has hardly any taste at all – a sweet and mild taste – like store-bought white bread. So start a fun kitchen science project today and bake bread with wild yeast from scratch!
Wild Yeast Bread Vs. Sourdough Bread
To be clear, this bread is no sourdough bread! Sourdough bread and wild yeast bread are made differently and also taste differently. Wild yeast bread is leavened with wild yeasts, such as Saccharomyces cerevisiae, and lactobacilli. Whereas sourdough bread is leavened with acetic acid bacteria and lactobacilli. So sourdough bread tastes sour because of the acetic acid bacteria, while wild yeast bread has a sweet and unobtrusive taste, more like sandwich bread.
Where Does Wild Yeast Come From?
There’s a debate about where wild yeasts come from. Some sources say that wild yeasts are flowing around in the air and honey or fruit water is used to catch those wild yeasts from the air. However, other sources say that wild yeasts are already in the honey or on the skin of fruits. The wild yeasts are just “asleep” and as soon as you combine them with water, spontaneous fermentation starts. Still other sources think that spontaneously fermented breads only rise because you introduce lactobacilli and acetic acid bacteria from your skin into the starter. So, wherever wild yeasts come from, they soon grow in your wild yeast starter and help to rise your bread! 🙂
How To Prevent Mold Growth
I get a lot of questions from my readers about how to prevent mold growth on wild yeast starter. To be honest, I haven’t had a problem with mold growth so far.
But to prevent mold growth, just stir wild yeast water once or twice a day. Because mold usually grows on the surface, stirring prevents the growth of mold. And as soon as the wild yeast water starter is populated with wild yeasts and lactobacilli, they inhibit the growth of undesirable organisms, such as mold.

Help! Why Does My Wild Yeast Bread Not Rise?
Wild yeast growth depends on a lot of factors: It depends on where you live, how the weather is, if it’s summer or winter, how often you bake wild yeast bread and and and.
I often make homemade yogurt, spontaneously fermented wild yeast bread and homemade sourdough bread from scratch, and sometimes even homemade small beer and vinegar in my kitchen. And while I had some problems when I started making homemade bread from scratch, with bread not rising well or sourdough developing a too sour of even a bad off-taste – way too-cheesy or even chemical. Now that I’m regularly making yogurt and bread in my kitchen, the problems disappeared. And not because I’m getting better 😉 but because my kitchen is now populated by wild yeasts and good bacteria which are essential for homemade yogurt and spontaneously fermented bread. So if your wild yeast bread failed the first time, just try again! 🙂
However, keep in mind that wild yeast bread will always taste different depending on where you live. There’s a myth about local yeasts that can only thrive in one area and die in another but this only a myth: For instance, Lactobacillus sanfranciscensis can also be found in French or German sourdough according to this source. So not the species that populate the wild yeast starter vary but the ratio. And therefore wild yeast bread taste different depending on where you live.
Winter Vs. Summer Baking
Yeasts and lactobacilli like warm temperatures, so your wild yeasts grow better and the bread rises faster during the hot summer months. And they don’t grow so well in the cooler months, on rainy days or if there’s a sudden change in temperature (e.g. if you open the window on a cold winter day). So in winter and on rainy days, just give the wild yeasts more time to grow and your bread more time to rise.
What Honey Should I Use?
I‘ve used organic orange blossom honey and wildflower honey so far but you can use other types of honey as well. And I’ve only used organic honey to catch wild yeast so far: I haven’t tried it with non-organic honey, so I don’t know if this also works.
Can I Use Tap Water
I always use tap water for wild yeast water. But tap water doesn’t have chlorine in it where I live. I haven’t made wild yeast starter with chlorinated tap water yet. If you’re worried about killing the yeasts with chlorinated tap water, you can simply use filtered tap water, spring water or bottled water instead.
What Flour Should I Use?
I always use whole wheat flour or first clear flour for the starter and all-purpose flour for the final bread dough. I use flour with some bran in it for the starter because I find that it helps with the rising. But if you don’t have whole wheat flour or first clear flour at home, just use all-purpose flour or bread flour for both, the starter and the bread dough.
Should I Add Salt?
I usually don’t add salt to wild yeast bread because I’m trying to reduce my salt intake because it’s supposed to be better for health. And unlike bread with commercial yeast, wild yeast bread tastes just as well without salt! Besides, salt retards yeast growth. So if you have problems with your wild yeast bread not rising well, just omit the salt. But if your wild bread rises well, you can add salt (or other spices) if you want.
Homemade Bread With Wild Yeast
Wild Yeast Water With Honey
- 1 tbsp honey
- 1 cup (200ml) lukewarm water
Make Wild Yeast Starter
Combine honey and lukewarm water in a glass or mug. Don’t use metal because honey is slightly acidic. Stir until the honey is dissolved.
Cover With Muslin
Now cover the honey water with cheesecloth or other thin fabric to keep off flies. And secure the fabric with a rubber band. You can also close the tumbler loosely with a lid but don’t close it tight because wild yeast water starter needs air. You may know that yeasts don’t actually need air because they can thrive with and without oxygen. But the yeast growth rate is higher if there’s air present.
Let Ferment For 5 Days
Let the wild yeast water starter ferment for 5 days at room temperature. Stir it once or twice a day.
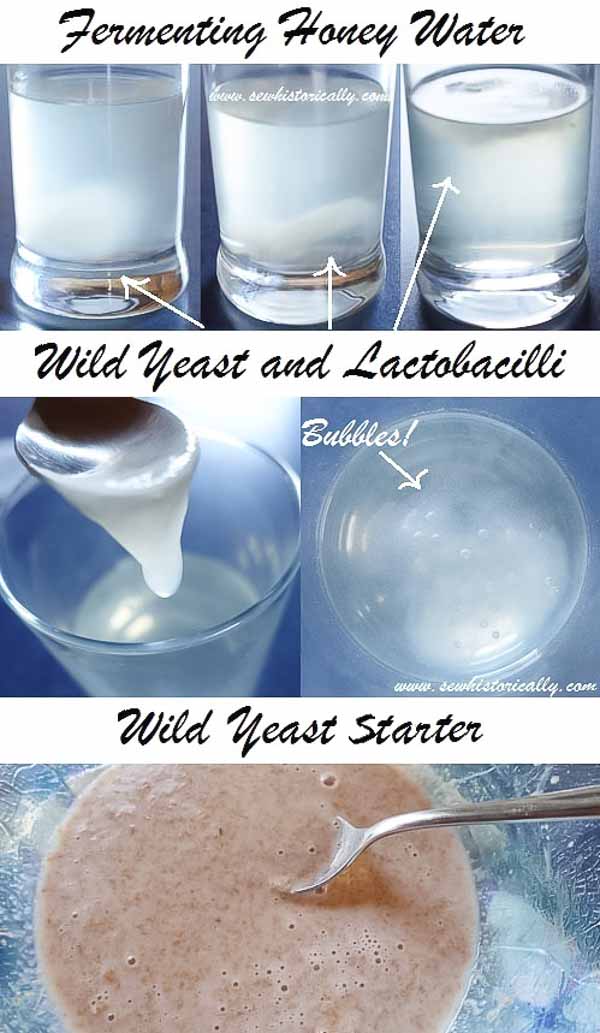
Symbiosis Of Wild Yeasts & Lactobacilli
After about 3 days, you can usually see that wild yeasts and lactobacilli are growing in the wild yeast water. There’s now a symbiotic culture of wild yeasts and lactobacilli in the wild yeast starter. The wild yeast-lactobacilli culture always looks a bit different. It always looks a bit like a jellyfish floating in water. But sometimes it’s more at the bottom, while sometimes it’s floating at the top.
Taste It
After 5 days, wild yeast water is strong enough and you can now use it to make wild yeast starter.
If you want, you can take a small sip of the fermented honey water: It’s absolutely safe to eat because it’s nothing else than young mead or honey wine. Honey water fermented with wild yeasts and lactobacilli is a probiotic beverage that boost your immune system and help you fight diseases according to this source. Fermented honey water tastes mild and slightly of alcohol and not at all sour like sourdough.
Wild Yeast Starter
- 1 cup (200ml) fermented honey water (wild yeast water)
- 1 cup (120g) whole wheat flour or first clear flour
Combine Ingredients & Let Rise Overnight
Combine flour and all of the wild yeast water above (fermented honey water) in a big glass or porcelain bowl. Again don’t use a metal bowl. Cover the bowl with a kitchen towel and let the starter rise for 12 to 24 hours depending on the weather and temperature.

Wild Yeast Bread
- 1 cup (200ml) wild yeast starter
- 1 cup (200ml) cold water or wild yeast starter
- 4-5 cups (500-600g) white flour
- optional: 1/2 tsp salt
Combine Ingredients & Let Rise Overnight
I usually use all of the wild yeast starter I made and make wild yeast starter from scratch again for my next wild yeast bread. But you can also use just 1 cup wild yeast starter and add 1 cup cold water because 1 cup wild yeast starter is usually enough for the dough.
Mix all ingredients for the bread dough. Put the dough into a greased pan and let it rise overnight covered with a kitchen towel.
Bake Bread
Preheat the oven to 400°F (200°C) and bake the wild yeast bread for about 30-40 minutes.

Alternative: Wild Yeast Bread With Fruit Yeast Water
You can also make bread with homemade fruit yeast instead of honey water. Wild yeast bread with fruit yeast water is much faster to make than bread with honey yeast water: While it takes between 6 days and one week to make wild yeast bread with honey water from scratch, it only takes a bit more than 2 days from start to finish to make fruit yeast water bread. You also don’t have to make a starter for fruit yeast bread, after 2 days you just combine all ingredients for the final bread dough.
Fruit Yeast Water
- peels and cores of 1 or 2 apples (or other fruits)
- 1 cup (200ml) cold water
- optional: 1 tbsp brown sugar
- optional: 1/2 tbsp organic apple cider vinegar

Make Fruit Yeast Water
Only use sound apple cores without mold for fruit yeast water. Put apple peels and cores into a glass or mug. Don’t use metal because apples are even more acidic than honey. Pour cold water over the apples peels and cores.
Optional: You can also add brown sugar and organic apple cider vinegar but this is optional because it works just as well without it (or even better). If you add vinegar and sugar, fruit yeast water usually needs more time to ferment.
Apple Seeds & Cyanide
You may know, that apple seeds contain cyanide (or rather amygdalin) which is poisonous. Cyanide is water-soluble but you don’t have to worry about adding apple seeds to your fruit yeast water because heat destroys cyanide. So after baking, fruit yeast water bread is absolutely safe to eat. Besides, you only use a small amount of apple seeds which can be detoxified by enzymes in your body even if eaten raw according to this source. Moreover, bitter almonds, peach kernels and cherry pits – which all contain cyanide (amygdalin) – are often used as flavoring.
Related: 30 Recipes With Apricot Kernels, Peach Kernels & Cherry Pits
And there’s an advantage of adding the seeds because I find it prevents the growth of mold on fruit yeast water.

Let Ferment For 2 Days
Now cover the glass with cheesecloth or loosely with a lid. And let the fruit yeast water starter ferment for 2 days at room temperature. Stir it once or twice a day.
After 2 days, the fruit yeast water becomes cloudy, brownish and bubbly. The fruit yeast water is ready when you see some foam on top and the fruit yeast water is actively bubbling: You can now use it to make wild yeast bread.
Bread With Fruit Yeast Water
- 1 cup (200ml) fruit yeast water
- 3 1/2 cups (420g) flour
- 1/2 cup (100ml) cold water
Make Bread Dough & Let Rise For 6-8 Hours
Remove the peels and cores from the fruit yeast water. Then combine all ingredients in a large bowl. Put the dough into a greased pan and let rise for 6 or 8 hours.
Bake Bread
Preheat the oven to 400°F (200°C). And bake the fruit yeast water bread for about 30-40 minutes.
More Bread Recipes Without Commercial Yeast
Please Pin It!

Very neat! I learned a lot in this post, thank you for sharing at #HomeMattersParty!
Thanks for stopping by! 🙂
I make my own bread all the time but this would be interesting to try. Thank you for sharing at Ravenwould.
Thank you! Bread with wild yeast is really easy to make and so delicious.
Now this is interesting. I never heard about this wild yeast with honey. It`s very interesting. Pinning it for later!
Thanks for pinning! 🙂
Lina, I’m always interested in the different ways people start a starter. Have never heard of anyone using honey water! I started my wild yeast sourdough starter with just flour and water. I make sourdough bread a couple times a week with it.
Hi, Jean. Yes, sourdough starter is made with just flour and water. But this isn’t sourdough: Bread made with honey water or fruit yeast starter doesn’t taste like sourdough bread, it tastes rather like yeast bread.
Yes, Lina, it sounds like something entirely new that I’ll want to take a closer look at! 🙂
I’m a little late!! Thanks so much for sharing on last week’s What’s for Dinner link up!
I’m a first time bread maker so I have a question about the recipe. For the dough it says 200 ml of wild yeast starter then 200 ml of water or wild yeast starter then flour. Do I end up using 400 ml of liquid?
Hi, Gayle! For the final bread dough I usually use 300g wild yeast starter (200ml honey water & 100g whole wheat flour), 100ml water, 500-600g white flour and and a pinch of salt. I hope this helps! 🙂
LIna.. that’s a bit confusing to me. Your recipe above says 200ml yeast starter (which is made 2:1 honey-water to ww-flour), plus 200ml water or yeast starter (again) and then 5-600ml of flour plus salt. Then above you say it’s 300ml yeast starter plus 100ml water plus the flour and salt.
I’m assuming it should be your reply to Gayle above – 300g wild yeast starter made from the honey water, plus 100g water and say 550g flour. So that gives you a hydration of 300/650 or 46 percent. Seems low to me..
Could you clear up my thinking on this.. thanks.. I’ve been brewing some honey water (from raw honey I harvested earlier this week) and just mixed 100g of fermenting honey water (smells like peaches!) and 50g whole wheat flour to sit over night.. let me know if you can.. thanks!
You can use 400ml wild yeast starter or 200ml wild yeast starter + 200ml water – I usually use 300ml wild yeast starter + 100ml water. Then just add enough flour until the dough has the consistency of bread dough made with store-bought yeast. Hope this helps!
Does this work with gluten free flour’s like coconut, almond, garbanzo, etc?
I’ve never made bread with gluten free flour but I think it should work when when it works with store bought yeast. Maybe it’s necessary to add a gluten substitute like xanthan gum. Please let me know if it works with gluten free flour! 🙂
I also made bread with homemade garbanzo starter.
Do you have a printable version of this. I want to give it to someone that doesn’t have a computer.
There’s no printable version yet but you should still be able to print the blog post. 🙂 If you don’t know how, there are a lot of tutorials online.
I just made this with honey and water-the yeast was visible in 5 days. I am gluten free and used bobs 1 to 1 flour and let it sit with a towel over it for 12 hrs. it smelled like yeast etc. Then I mixed more of the flour (2 cups) with it, plus 2 eggs and 1/2 stick of butter, as per my usual gluten free bread recipe, and let it rise in a warm oven for an hour. Then put it into a bread pan covered with saran wrap for 20 more minutes, as per my usual recip and it usually rises over the top of then pan a little. This didn’t rise, maybe a tiny bit. So I am baking it now and hoping its edible. I am assuming the wild yeast just isn’t as strong as commercial, and it really does need to sit overnight in the loaf pan to rise more. 🙁
Yes, the dough really has to rise overnight. 🙂
Do you have to make this new every time or is there a way to feed it and keep it going?
I make it new every time. If you feed it, I think you’ll probably get sourdough rather than yeast bread. But if you try, please let me know if it works. 🙂
I tried this but my solution is much more yellow and ended up growing mold. Any idea what I did wrong?
This can happen. You just have to try it again. 🙂
Hi! I tried this a week ago, but it just got moldy. Also, I noticed your honey is pretty clear where mine is yellow. What kind of honey do you use? Also, what am I doing wrong?
I used organic orange blossom honey. Sometimes mold develops: It depends on the weather or what other bacteria are in the air. You can try letting the solution ferment for a shorter time or stir it once or twice a day. Hope this helps! 🙂
That does thank you!! And sorry I posted twice!
Would love to try this out. I just am not sure how much of wach to ise since I do not use the metric system.
There are many unit converters online, where you enter the measurements and it converts it for you.
Hi Lina, does the bread have to rise overnight outside or in the refrigerator
Hi Sonia, the bread has to rise overnight at room temperature.
Hi, I am new to this. But for the apple yeast water, how do you tell when it’s fermented well? How do you recognise molds and how to avoid them? How much flour should you add to the 200ml apple yeast water you’ve prepared and do you have to knead the dough or do you just mix it well? Is there a technique for mixing to ensure fluffiness of bread? How do you know whether the dough texture is right? Sorry for the tirade of questions, but I am truly excited and want to get it right. In fact, why don’t you put a video — start to finish from making the apple water to the dough, will be very useful. TIA
Hi Pooja, when the apple yeast water is fermenting, it starts to bubble – here in my post about homemade vinegar you can see photos of how the apple yeast water should look after about two days. And you can taste it – it’s safe to eat because it’s nothing else than homemade must or mead: When it’s ready, the apple yeast water tastes sweet and sometimes slightly alcoholic; but it shouldn’t taste sour. Mold looks furry and usually grows on the surface of the apple water. So to be on the safe side, you can stir the apple water once or twice a day to prevent mold growth. And you can use the same recipe above “Bread With Wild Yeast”: just use apple yeast water instead of honey water. The dough texture should be similar to homemade yeast bread made with store-bought yeast. And to get fluffy bread, you have to let the dough rise for some hours or overnight. Hope this helps! 🙂
Hi Lina….was just wondering if you can use this honey water as a substitute for any recipe that calls for sourdough starter?
Hi Terri, this isn’t sourdough starter: the honey water is used to catch wild yeast. Sourdough tastes sour because of acetic acid bacteria, whereas this honey water tastes sweet. So you can rather use honey water in recipes that call for store-bought yeast. But you probably have to use a lot more honey water because wild yeast is less active than store-bought yeast, and you have to let the dough rise longer.
Thanks Lina. Your reply really does help. I didn’t get a notification about your reply, so I just started with honey yeast. I have used to it today to make my starter. I am trying with sorghum flour though. Let’s hope it works. Out of excitement, I had made double the honey yeast water. Is there a way to store the extra wild yeast water for later? Shall I refrigerate? If this turns out well, I am considering using it to make pull-apart rolls. Let me know
You can’t store the extra wild yeast water for later because it eventually turns into vinegar. 😉
Just wanted to also share the entire water didn’t become jelly like, only some at the bottom. I didn’t necessarily spot bubbles, but it does smell like alcohol and tastes sweet but alcoholy too. As I had made double the yeast water, I stirred it well and measured 200ml and added it to the sorghum flour. So not all that jelly like stuff has gone in the starter. Do you think the starter will still rise? How much rise should one expect?
Hi Lina,
I’m back with results. My bread flopped 🙁 It smelled a lot like alcohol, was dense and heavy (the ‘oven spring’ didn’t happen though it had risen a bit after I had kneaded and put it in the sandwich bread pan over night. The crust turned out hard, but the inside was damp even though I let the bread get some air for over six hours after it was baked. I am determined to give your recipe another go, but this time, not with sorghum flour as I previously tried, but white flour as you have suggested. Before I give it a second go, would love your help with these questions:
– How does your starter look and how much does it rise?
– When adding flour to the start how do you know the dough is fine: in terms of texture, hydration, etc.?
– What’s your kneading technique, duration and how many times do you do it?
– How much does it rise when you put leave it overnight after kneading?
– How long and at what temperature do you pre-heat your oven? (I use an OTG)
– Once you’re done baking, how do you figure out whether it’s well-done from inside too? Do you have any tips/tricks?
– How much oven spring should one expect? Does it turn out like store-bought sandwich bread/white bread or are there some differences I should expect?
– If it’s under-baked, what do you do?
– How long do you let it cool after it has baked before slicing it?
Hope to nail it this time, looking forward to your reply. Thanks a bunch!
Hi, sorry for the late reply. I guess it flopped because of the flour: I haven’t made this wild yeast bread with millet flour yet but I once made millet flour bread with store-bought yeast and the bread didn’t rise at all! 😉
The starter looks like thick pancake batter. And the starter doesn’t rise as much as starter with store-bought yeast. It also depends on the weather how much it will rise but it usually looks bubbly (after about 12-24 hours) when you stir it.
Sometimes I just stir the bread dough with a spoon until all ingredients are well incorporated, and sometimes I knead it like other yeast breads.
Bread with wild yeast usually rises slightly less than bread with store-bought yeast but more than homemade sourdough bread. It also depends on the weather: on warm summer days it rises better; on rainy days or cold winter days it often doesn’t rise well and it takes much longer to rise. You can also use a glass pan like I did so that you can see that the bread is light and airy (bubbles).
I preheat the oven to 200°C (400°F) and I preheat the oven until it says it’s preheated.
To tell if the bread is done I usually tap the bottom of the loaf: it should sound hollow when it’s done. But you can also use an instant read thermometer and take the internal temperature of the loaf.
Wild yeast bread usually doesn’t rise in the oven. By the way, you can‘t compare wild yeast bread to store-bought white bread. Even if it tastes similar, store-bought white bread has a softer, rubbery crust and is much fluffier because it’s made with baking ferments and other rising agents, enzymes, conditioners and additives. Homemade bread also weighs more than store-bought bread and fills you up faster because a loaf of store-bought bread contains less flour so bakeries can earn more money per loaf. 😉
If the bread is undercooked, you can preheat the oven again and bake the (cooled) loaf for another 10 to 20 minutes, similar to par-baked bread. And if you cut bread that hasn’t properly cooled it can also seem undercooked.
I let the bread cool completely before slicing (for some hours at least).
Hope this helps! 🙂 Let me know how your bread turns out.
Thanks a ton!! Will keep you posted!
I tried the grape must bread first with eincorn flour, it worked like a dream!! I have been so excited to try it again. In the mean time i tried the apple yeast water and did not have much luck. I believe that was because i tried adding honey so the proportions were off. Have you tried adding salt or a sweetner and had a sucsessful loaf? I know that salt can interfere with the dough rising. Thank you for taking the time to find this information and share it, I am super excited I came accross your website!
Glad it worked! 😀 You can add about 1/2 teaspoon salt before the final rise. But I haven’t added any sweetener yet: so I don’t know if it works. 🙂
I have never heard of honey water or fruit yeast. Potato yeast, pinned but haven’t tried yet. Sourdough, I’m not crazy about. Occasionally, maybe. But after reading this post, honey water is pinned too. Then I thought I’d look around at your other delights. And OH WOW!! Forget about the pin, I went straight to my bookmarks. You have a lot of helpful hints that I want to know. Thank you so much for coming into my line of sight and taste.
Thank you so much! 😀 Glad you like my recipes!