These three ways to attach lace to fabric are from the Edwardian era. In the 1900s, lace was attached to fabric either by hand or with a straight stitch sewing machine. Zig-zag stitches were never to sew lace to fabric in the Edwardian era.
Related: How To Make Edwardian Net Applique
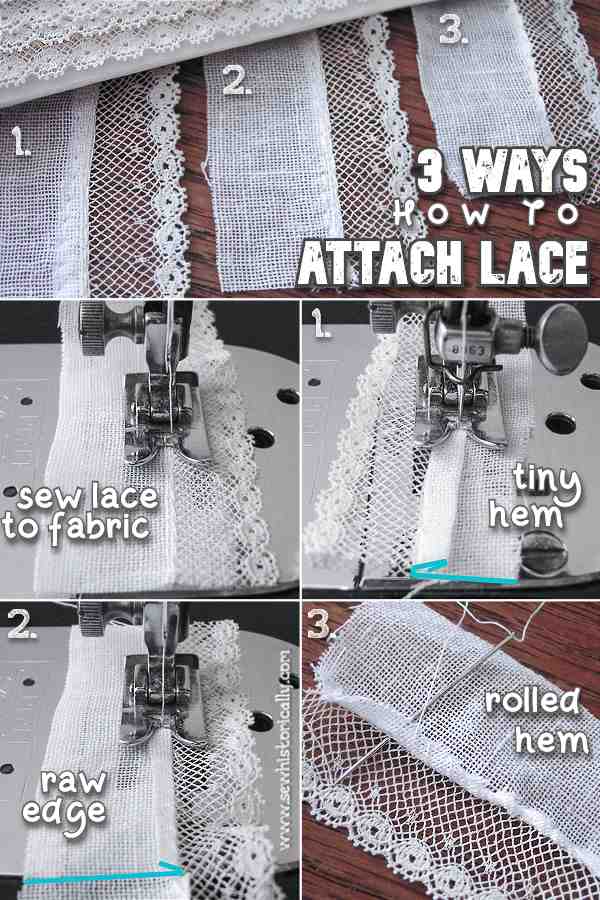
3 Ways How To Attach Lace To Fabric
Sew Lace To Fabric
Sew the lace to the right side of the fabric with straight stitches on your sewing machine or with running stitches by hand. Then turn the fabric to the wrong side and trim the raw edge of the fabric to about 1/4″ (6mm). Press the fabric away from the lace.
Related: 6 Ways How To Insert Lace
Method 1: Attach Lace With Tiny Hem
After attaching the lace to the fabric, fold the fabric twice to form a narrow hem. Then secure the tiny double-fold hem with another row of straight stitches on your sewing machine.
Related: How To Join Lace – Invisible Seam
This method from the 1910s is a very secure way to sew lace to fabric. But it’s also the most noticeable because you can see the hem on the right side of the fabric.
‘Put the right side of the lace to the right side of the garment with the selvage of the lace toward the raw edge. […] Stitch the lace to the garment, stitching very close to the edge of the lace. […] Fold the lace back over the seam you have just stitched and crease the material firmly. […] Turn the garment inside out. At the edge of the lace, turn as narrow a hem as possible (1/8″ if the material will allow it). Cut away any surplus material. […] Stitch very close to the edge of the turn.’ (Garments For Girls, 1919).
Method 2: Raw Edge
After attaching the lace to the fabric, fold the fabric just once. And secure the fold with another row of straight stitches.
‘Leaving about 1/4″ of the cloth […] fold this back and stitch it in place’ (School Sewing Based On Home Problems, 1916).
This method to attach lace leaves the fabric edge raw on the wrong side. At first I thought this Edwardian way to sew lace to fabric isn’t very secure. But I’ve often seen it used on antique clothing. And after trying this method on my Edwardian lace combing jacket and other historical garments I can now say it’s more secure than I thought: The raw edge hardly frays in the wash and and the lace hasn’t come loose so far. And this method of attaching lace works better than method 1 if you want to sew lace trim along a curved edge.
Related: Edwardian Lace Combing Jacket
Method 3: Hand-Rolled Hem
After attaching the lace to the fabric trim the raw edge of the fabric to about 1/8″ (3mm). Then finish the raw edge with closely spaced overcast stitches by hand. This creates a tiny faux hand-rolled hem which is almost invisible on the right side.
Related: 4 Edwardian Camisoles Made With Lace & Fabric Scraps
By the way, instead of first sewing the lace to the fabric and then finishing the raw edge, you could also attach the lace and finish the raw edge in one step.
Lace ‘may be set a scant one-eighth inch below the raw edge of the material and whipped to it. The edge has the appearance of being rolled.’ (Clothing For Women: Selection, Design, Construction, 1916)
The third Edwardian method to attach lace creates a secure and neat finish. And on the right side the faux rolled hem is almost invisible. Attaching lace with a hand-rolled hem was most commonly used in the Edwardian era: you can find it on all types of antique Edwardian garments, from underwear to blouses and dresses.
Please Pin It!
I am concerned about attaching heavy lace (9inches wide) to linen for a church alter cloth. Msgr wants the lace to hang down from the edge of the alter with the linen just on the top of the alter and the lace showing down in front only.
Do I leave about 3/4 inch over the edge to attach the lace to and box the corners, or do l hand whip the lace to the edge of the linen which would probably have to be double so the edge would not ravel?
I would finish the linen fabric with a double-fold hem, either with a sewing machine or with hemstitching (drawn thread work) by hand. Then I would hand whip the lace to the hem with strong sewing thread: If the the lace is also linen, I would use linen sewing thread. Or instead of whip stitching, you could also attach the lace with fagoting stitches, like I did here.