All these silk roses are made with pure silk fabric and silk ribbon. Making real silk roses from scratch takes some time but it’s so worth the effort! Real silk roses look so luxuriant and almost like real roses! Besides, silk fabric and silk ribbon is perfect for DIY roses because silk is thin enough to be used double, drapes well and has a subtle sheen not unlike real roses.
Silk Ribbon Roses
This tutorial for DIY silk roses is from the Edwardian era. It’s my favorite because it looks almost like a real rose! This ribbon rose ‘has exactly the appearance of a real flower, so that one is quite tempted to try the scent of it.’ (Every Woman’s Encyclopaedia, 1910-2)
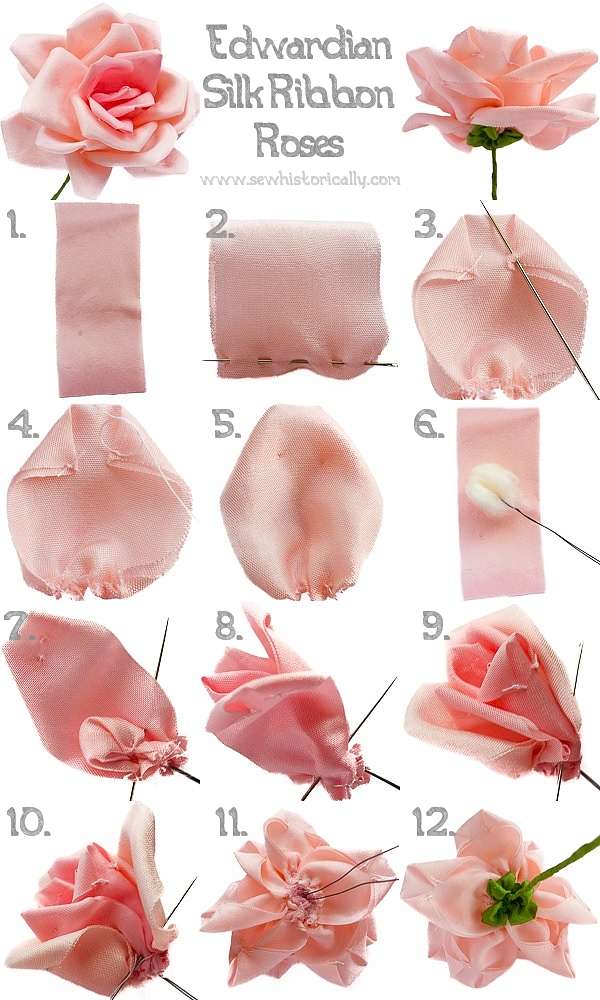
‘ A great point in getting this natural effect is to use two shades of ribbon with only a tone difference between them, the darker one in the centre. […] To start the rose […] cut off seven pieces of the darker shade of ribbon, five inches. Fold one of these in half, and gather raw edges together. […]
When this is done the corner of each petal turned down and caught invisibly with a single stitch in sewing silk to match the rose. The best way is just to pull the silk through and tie it. […]
Secure a little wad of wool on to one end of a piece of wire, and cover it with the ribbon. […] The petal thus formed must be rolled and stitched on to the wire at the base of the little wad. The remaining six petals are gathered up, and sewn on one after the other. Outside these should come about ten petals in the lighter shade.’ (Every Woman’s Encyclopaedia, 1910-2)
Click on the link below for the full tutorial:
Wired Silk Roses
The wired silk rose tutorial is also a historical tutorial: it’s from the 1920s! It’s the pink rose with green leaves in the photo above.
‘This rose, when carefully made, is most beautiful […] The first three petals are cut […] two inches long and one and three-quarters inches wide. The next five petals should be one-quarter of an inch larger, and each succeeding row of five petals should be one-quarter of an inch larger than the preceding one. […]
Cut a piece of the tie wire long enough to reach around the outside edge of each petal, plus one and one-half inches. Lay the petals down wrong side up, bend the wire to the shape of the petal, lay the wire close to the edge and turn the raw edge over the wire one-eighth of an inch and glue in place with milliner’s glue. Place a light weight on the petals until thoroughly dry.
Begin assembling the flower by first making a center from some of the scraps […] or yellow stamens may be used; fold several small pieces into bud-like shapes of about one inch in length, sew strongly and fasten on a loop of the wire six inches long. Keep the point where all the petals are joined in as small a circumference as possible.
Begin with the three small petals, pleat them at the bottom into as small a space as possible, and sew to the center with the wrong side to the center. After they have been arranged, the edges may be crinkled down somewhat. Add the remaining petals according to their size.’ (Make Your Own Hats, 1921)
Easy Silk Roses
Another Edwardian tutorial for silk roses: these are faster to make than the Edwardian silk ribbon roses above. For this rose I used polyester satin but the original tutorial uses silk scraps.
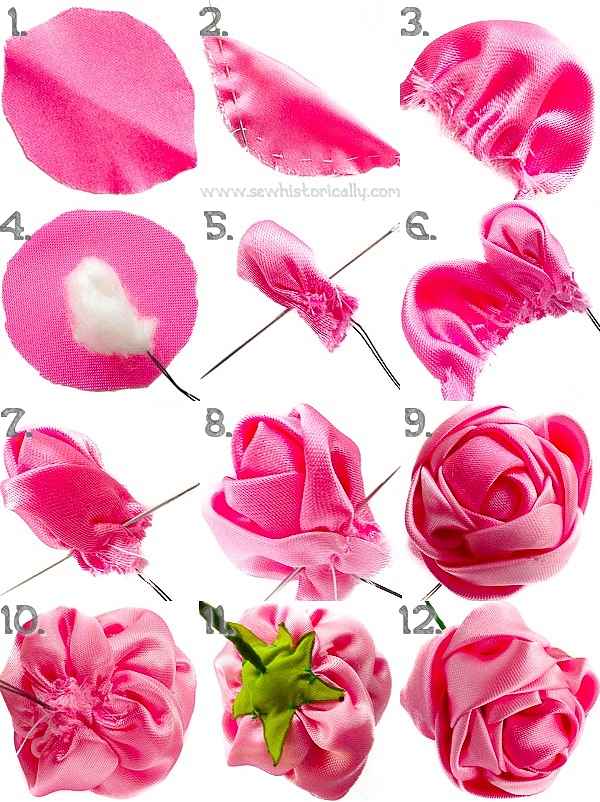
The large ‘cabbage-shaped rose […] is composed of piece silk on the cross […] Odd scraps of silk can easily be used, and the petals can be of any length […] The depth of the petals is also not important.’ (Every Woman’s Encyclopaedia, 1910-2) ‘Each petal is cut from a piece of folded material […] It is highly important that the folded edge be on a true bias.
Begin the rose by cutting three petals […] with the bias edge one and one-half inches long. Run gathering thread one-eighth of an inch from the curved edge, leaving a thread one inch long so that the petal may be adjusted as it is pinned in place.
Make a loop one inch long on the end of a piece of wire six inches long. Cover this loop with a small circle of the material like the rose. It is sometimes found to be advantageous to fill this circle with cotton to make a soft center for the rose. For an ordinary-sized rose there should be eighteen petals. […] The next larger in size should have a two-inch bias and be correspondingly wider; the next five should have a two and one-half-inch bias, and the next five a three-inch bias. […]
The three small petals should be arranged around the covered loop of wire and pinned in place before sewing. Sew securely. […] See that the face of the flower looks as nearly like a real rose as possible, allowing the back to look as it will.’ (Make Your Own Hats, 1921)
Starched Silk Roses
This DIY silk rose tutorial was one of my first flower making tutorials! I made full-blown roses and wild roses.
To make these silk roses, I painted white silk fabric with pink and green silk paints. Then I starched the silk fabric with homemade fabric starch, shaped the petals and stitched the silk roses together. I also added DIY beaded stamens.
-> Full Tutorial: Starched Silk Roses
Please Pin It!