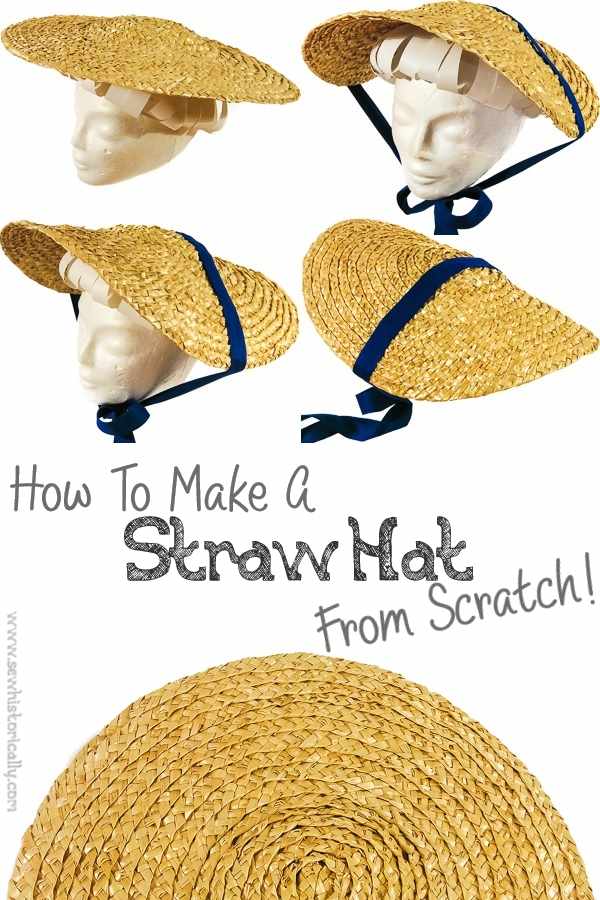
Learn how to make a straw hat from scratch with straw or grass!

In the Victorian era, straw hats were made from scratch: Straw or grass was cut, bleached and then braided. By the way, straw braiding was called straw plaiting or straw platting in the Victorian era. These straw braids were then sewn together to make DIY straw hats.
‘Everybody knows what is meant by a straw bonnet or a straw hat; but everybody does not know how one or the other is manufactured.’ (The British Workwoman Out And At Home, 1863)
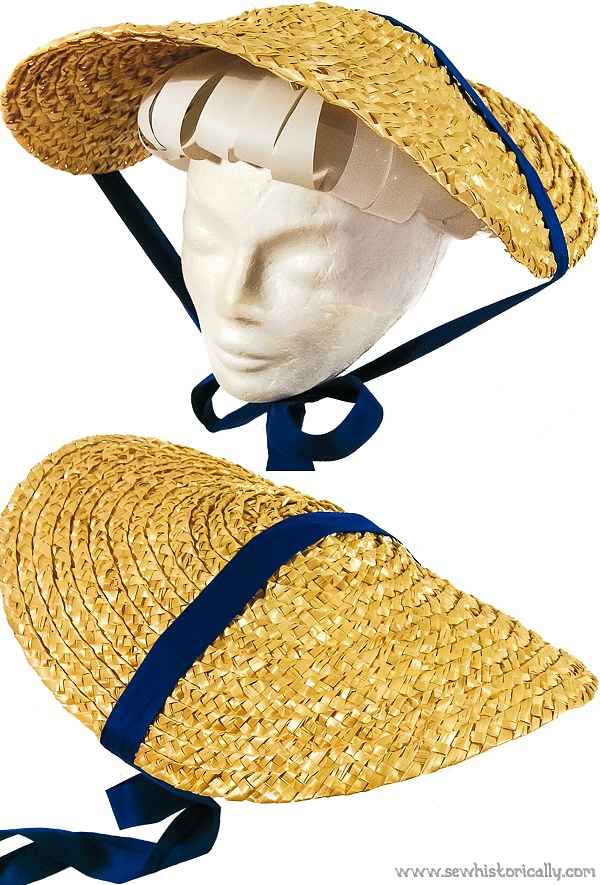
Here I made an 18th century hand-braided straw bergere hat. But you can also make a Victorian straw hat with a low crown or an Edwardian boater hat or a modern straw hat for next summer. So read on to learn how to make a hand-braided straw hat from scratch!
History Of Straw Braiding
‘The art of plaiting straw, the stems of grasses, and the leaves of palms and similar plants is almost as old as the human race, for plaiting was practiced before weaving’ (Report, 1892).
Straw braiding ‘is one of the oldest arts practiced by mankind, many specimens having been found in the tombs of the ancient Egyptians, and mention being made of plaiting by Herodotus and other early writers. The earliest notice we have of its systematic use in Europe as an article of clothing is in the records of the reign of Mary, queen of Scots, who […] observed that the peasants of Lorraine wore hats made of straw plait’ introduced ‘it into Scotland […] about the year 1562, but without much success.
Her son, James I., however, carried it into England, where it soon throve […] At first, the plait was what is called whole straw; that is, the straw was cut into suitable lengths without knots, and merely pressed flat during the operation of plaiting, and so it continued until the reign of George I., when […] some plait was made of split straw.’ (International Cyclopaedia, 1885)
Victorian Handmade Straw Hats
‘Many of the labourers now make their own straw hats to wear in summer. Poor rotten things, made out of straw of ripened grain. With what satisfaction will they learn that straw, twenty times as durable, to say nothing of the beauty, is to be got from every hedge? […]
In every labourer’s house a pot of water can be boiled. What labourer’s wife cannot, in the summer months, find time to cut and bleach grass enough to give her and her children work for a part of the winter? There is no necessity for all to be platters. Some may cut and bleach only. Others may prepare the straw’ (Cottage Economy, 1831).
‘Groups of women were standing at the garden gates or cottage doors talking and plaiting, rarely looking at their work; little girls just out of school were walking along the road with a similar inattention to the work of their fingers.’ (Sessional Papers, 1894)
What Straw Should I Use?
In the Victorian era, straw – wheat and rye – as well as grass (hay) was used for straw hats. Grass was cheaper but especially wheat straw was considered superior because of the color and pliability.
Related: How To Make Hay With A Scythe
‘Finer plat may be made from the straw of grass than can possibly be made from the straw of wheat or rye; but the grass plat is, all of it, more or less brittle; and none of it has the beautiful and uniform colour of the straw of wheat. […]
Wheat straw bleaches better than any other. It has that fine, pale, golden colour which no other straw has; it is much more simple, more pliant than any other straw; and, in short, this is the material. […] The Leghorn plat is all made of the straw of the spring wheat. […] The object is to have the straw as small as we can get it. The land must not, therefore, be too rich; yet it ought not to be very poor.’ (Cottage Economy, 1831)
What To Use Instead Of Straw
‘The straw of various other grasses besides wheat has also been employed in this country and in Ireland, especially that of the Traneen, or crested dog’s tail grass (Cynosurus cristatus), which was at one time in much repute.’ (Young Englishwoman, 1867)
‘Many other stalks of grain are utilized for plaiting for millinery purposes, and in addition, rushes and grasses of many kinds, raffia and wood pulp, as well as nettle stalks and other vegetable fibres, have also been used. […]
Related: DIY Candles With Rush Wicks
Wool, chenille, horsehair, tinsel, leather, cotton and paper pulp are constantly used for fashionable plaits. […] The Yedda plaits, made of Japanese and Chinese grass, are soft and pliable […] Bass and raffia are also very pliable and form artistic plaits […] Crinoline and tagel are, perhaps, the finest plaits, as well as the most transparent’ (Practical Millinery, 1922)
When To Cut Straw For Straw Hats
Straw for handmade straw hats is cut earlier than the traditional wheat harvest time in July or August. The grain is not yet ripe at this time and can therefore not be used.
‘It is fit to cut in just about one week after the bloom has dropped. If you examine the ear at that time, you will find the grain just beginning to be formed, and that is precisely the time to cut the wheat.’ (Cottage Economy, 1831)
Hand-Cut & Unthrashed Straw
For straw braids ‘we do not like straw which has been mown; it should be reaped […] The wheat is [also] not thrashed as ordinary wheat upon the floor or in a thrashing machine […] if the straw was at all broken it would not be at all suitable for making straw plait.’ (Report on the Best Means of Preventing the Pollution of Rivers, 1867)
Which Part Of The Straw?
‘The part of the straw used for platting is that part of the stalk which is above the upper joint; that part which is between the upper joint and the seed-branches. This part is taken out, and the rest of the straw thrown away.
But the whole plant must be cut and bleached; because, if you were to take off, when green, the part above described, that part would wither up next to nothing. This part must die in company with the whole plants, and be separated from the other parts after the bleaching has been performed.’ (Cottage Economy, 1831)
‘The straw used is rye-straw […] It is sorted according to its thickness into some eight qualities.
Related: How To Make Straw Heart Ornaments
How To Bleach Straw Naturally
To bleach straw or grass, tie it up in small bundles and put it ‘into a shallow tub, put boiling water upon it until […] covered by the water, let it remain in that state for ten minutes’. Then take it out and lay it ‘very thinly on a closely-mowed lawn […] Take the sheaves, and lay some of them along in a row; untie them, and lay the straw along in that row as thin as it can possibly be laid. If it were possible, no one straw ought to have another lying upon it, or across it.
If the sun be clear, it will require to lie twenty-four hours thus, then to be turned, and lie twenty-four hours on the other side. It the sun be not very clear, it must lie longer. […] If wet weather should come, and if your straw remain out in it any length of time, it will be spoiled’. The bleaching is ‘completed at the end of seven days from time of scalding and laying out.’ (Cottage Economy, 1831)
How To Bleach Straw With Chemicals
Since the Victorian era, straw has been bleached with chemicals, such as sulfur, lead, chlorine and potassium carbonate. Because it’s faster to bleach straw with chemicals than to bleach straw naturally, chemicals are still used today to bleach straw hats.
‘To bleach straw, take six quarts of water, and make a strong lather of soap; put in half an ounce of pearl ash, and half an ounce of sugar of lead – the mixture should be quite hot. Wash the straws well in it […] after which place the bundles in the fumigating box, which should be air-tight, and shut it down close after having previously lighted the stone brimstone [sulfur]’. (Simple Directions In Needle-Work And Cutting Out, 1853) ‘To bleach straw, there is no better process than treatment with sulphur in connection with very weak chlorine’ (The Techno-Chemical Receipt Book, 1887).
Italian straw hats, known as Leghorn in England, are ‘one of the most beautiful of manufactures. […] To bleach the straw, the Italians do nothing but expose it to the dew during the night, and then let it lie in the sun; after which, a fumigating with sulphur gives it the requisite brightness of colour.’ (Journal of a Tour in Italy, 1830)
Blueing Straw Instead Of Bleaching
‘During the last few years the practice has arisen of blueing instead of bleaching the straw, and this has been attended with the most beneficial results. Formerly much anxiety was occasioned lest the straw used for plaiting should become discoloured, and be otherwise affected by the weather before harvest, but this anxiety is now wholly removed, by the process of dyeing’ (A Dictionary, Practical, Theoretical, and Historical, Of Commerce And Commercial Navigation, 1859).
How To Dye Straw
‘Straw may be dyed, for ornamental purposes, of many different colours. Blue is given by a boiling-hot solution of indigo in sulphuric acid; yellow, by decoction of turmeric; red […] by cochineal, salt of tin, and tartar. Brazil wood and orchil are also employed for dyeing straw.’ (The English Cyclopaedia, 1861)
Related: How To Dye Blue With Red Cabbage
‘Many valuable patterns have been produced by mixing the white straws with others dyed. Of late years beautiful colored plaits have been produced of the newest colors, viz., mauve, magenta, blue, brown, etc.’ (The American Hatter, 1894) Brown and gray ‘are now in demand to a great extent both by men and women.’ (A Dictionary, Practical, Theoretical, and Historical, Of Commerce And Commercial Navigation, 1859)
‘Hats or bonnets may be dyed black by boiling them three or four hours in a strong liquor of logwood, adding a little copperas occasionally. Let the bonnets remain in the liquor all night’ (Practical Housekeeping, 1886). ‘Spotted or discolored straws are dyed either in pipe or in plait.’ (The Encyclopaedia Britannica, 1894)
When To Braid Straw: Winter Or Summer?
‘Plait is made all the year round, except during the interval of harvest time. […] In winter, plait is made indoors, and as the splits have to be worked partially wet, it is chilly work for the fingers. When plaiting near the fire the straws are liable to injury; winter made plait is not so good as that made in spring and summer, away from the fire in the open-air.’ (The British Workwoman Out And At Home, 1863)

Whole Straw Or Split Straw?
Straw for Victorian straw hats and bonnets was either used whole or split before braiding. ‘Some straws are plaited whole, being merely pressed flat to facilitate the working. Others are split into four, six, or eight strips.’ (Dictionary of Manufactures, Mining, Machinery, and the Industrial Arts, 1869)
‘Whole straw is used for all except the fines work. For this latter, split straw is used.’ (Second Report of the Royal Commissioners on Technical Instruction, 1884) ‘The plaiters work up the material in a damp state, either into whole straw or split straw plaits. Split straws are prepared with the aid of a small instrument having a projecting point which enters the straw pipe, and from which radiate the number of knife-edged cutters into which the straw is to be split.’ (The Encyclopaedia Britannica, 1894)
‘In plait made of split straw, unless two splints are laid together with their inside surfaces towards each other, as in the patent Dunstable, it necessarily happens that the face of the plait exhibits alternatively the outer and inner surfaces of the straw, which differ from each other in colour and gloss. Articles made of split straw are also inferior to those of whole straw of equal fineness, in pliability and durability.’ (The National Encyclopaedia, 1879)
‘But the finest plaits now made are not split; they come from villages in Tuscany and are made from a fine bright wheat-straw, which is sown thickly in a thin, light earth.’ (The Boy’s Own Annual, 1900) ‘The most primitive form of the manufacture is termed a whole straw-plait, which means that the straw pipes are plaited without being split or divided. Notwithstanding all recent improvements and changes, this plait still maintains its ground, being much used by ladies for morning or undress bonnets – women of the lower classes having a prejudice in favor of a finer material.’ (The Living Age, 1855)
I don’t like the look and feel of split straw for straw hats and straw ornaments therefore I used whole straw for my hand-braided straw hat.
Related: How To Make Straw Ornaments
Soak The Straw Before Braiding
‘Last before braiding the straw requires soaking in warm soft water sufficiently to render it pliable, and prevent it being easily broken. The cover of a wash boiler will answer to soak straw in if set on the stove where it will not allow the water to become too hot, and the water requires changing every other day as it becomes slightly offensive.’ (Southern Cultivator, 1880)
How To Braid Straw For Straw Hats
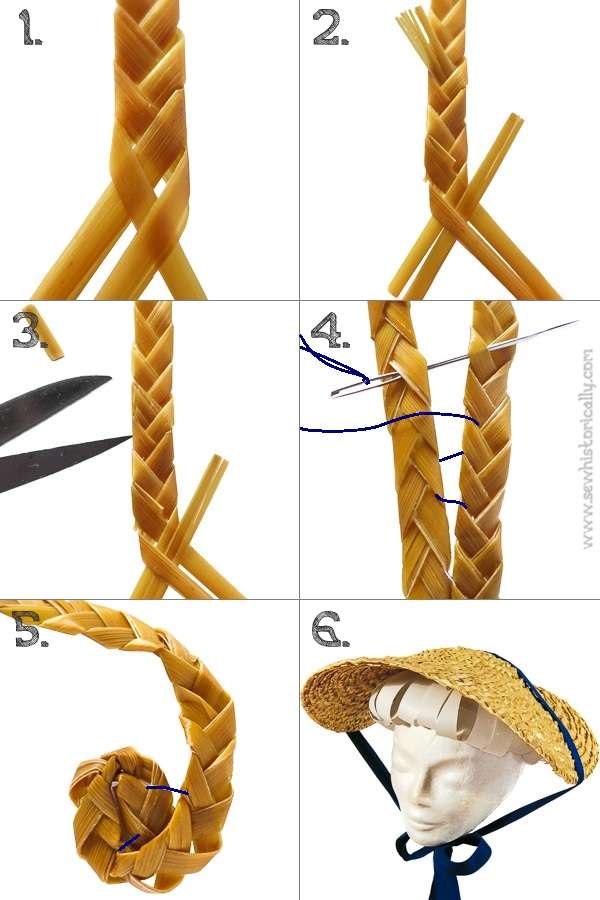
‘The straws, as many of them as are to make one width of plait, are fastened at one end, and rapidly plaited one over another diagonally’ (Dictionary of Manufactures, Mining, Machinery, and the Industrial Arts, 1869).
‘Clip closely with scissors projecting ends of straw turned out along the braid […] After a little practice from two to four yards of braid can be finished in an hour. Fifteen yards will make a hat, men’s size’ (Southern Cultivator, 1880).
How To Join Straw While Braiding
If a straw becomes too short, the ‘plaiter then takes another straw, and puts it under the short end at the point of the angle (the middle of the plait), and, by another straw coming under and over the joined one from both sides of the angle in the operation of plaiting, it will become fastened; the short end being then left out underneath the plait, and the newly fastened straw taking its place on that side of the angle to which the short one was directed.’ (The English Cyclopaedia, 1861)
Types Of Straw Braids
‘The plait may consist of any number of straws […] The names given to the straw plaits are exceedingly various. There are patent Dunstable, Bedford, Leghorn, Rutland, Italian, Devon, Rustic or Double Pearl, and a variety of others. Pearl braid is made by turning the straw on the upper edge in such a way as to present a bead or pearl-like appearance. There are also moss-edged braids, made by working the straw over wire, besides many varieties made with white and coloured straws mixed. These mixed plaits, made in many different patterns, were, for a long time, in great request.
What is known as the double plait is, and has been, very popular. One particular kind is called whipcord edge, from the fact of the straw being whipped over, as it were. […] From the time of making the first single plait, called split, early in the present century, many fancy kinds of plait were invented in the split straw. The plait called “corkscrew” was one’ (The British Workwoman Out And At Home, 1863). ‘Purl edged braid is so called because of an edge formed upon it by the use of a knitting needle at one side of the braid while it is being braided, the knitting needle being withdrawn leaves an edge or purl of loops along the side.’ (Documents of the Assembly of the State of New York, 1865)
How To Braid Dunstable Plait
‘1. Fasten seven straws, keep four on one side and three on the other; turn the outside fourth straw under one and over two.
2. Then, on the other side, turn the outside straw under one, over two, and so on, each side alternately.’ (Simple Directions In Needle-Work And Cutting Out, 1853)
How To Make Rustic Plait
‘1. Fasten four straws, place them side to side, turn the straw next the right hand under one and over one, turn the next straw on the same side straight across from right to left, under the two middle ones and over the outside.
2. Next turn the same straw from the left side, under one, and over one; and the next straw on the same side straight across from left to right, under the two middle straws and over the outside one; continue in this manner turning twice on each side, remembering when joining on a new straw, to let the ends all lie on the farther side.’ (Simple Directions In Needle-Work And Cutting Out, 1853)
How To Braid Tuscan Plait & Leghorn Plait
‘1. Join eleven straws; keep six to the right hand and five to the left; place them side to side, and turn the straw next the right hand under one, over two, and under two.
2. Then on the left side turn the outside straw under one, over two, and under two; continue in this manner on each alternate side. The only difference between this plat and the Leghorn is, that the latter consists of thirteen straws instead of eleven, and that the outside straw is passed under two straws instead of one.’ (Simple Directions In Needle-Work And Cutting Out, 1853)
How To Sew Straw Braids Together
‘Stitches must never show on the right side […] Never use more braid than is absolutely necessary; only lap the rows just enough to sew firmly and stretch enough to take out all possible fullness from the inner edges. […] To join braids that are of the insertion kind, and do not lap nicely; the lacing is really flat slipstitching, weaving the needle back and forth into the edges of the two braids held in correct position (i.e., drawn to shape) together.’ (The Art Of Millinery, 1909)
‘British plait is usually joined by making the several rows of plait overwrap each other a little, and then stitching through the two overwrapping pieces with a needle and thread. The surface of a hat or bonnet joined in this manner consists of a series of ridges, and part of each row of plait is concealed by that next above it, so that an unnecessarily large quantity is required to form a given extent of surface. Leghorn plait is formed in such a manner that it may be joined without this loss, the edge of one row being, as it were, knitted into the edge of the other in such a way that the pattern may appear uninterrupted, and the line of junction may be almost invisible. […]
The work is done entirely by hand, the use of the sewing machine being impossible in plait-sewing’ (The National Encyclopaedia, 1879). It’s best to sew the straw braids together by hand so that the hats and bonnets ‘may be readily unsown without injury, and made up again into other forms, suitable to the prevailing fashion or fancy of the wearer’ (Journal Of The Franklin Institute, 1826).
‘The thread by which the two rows of plait are held together is here straight, and is entirely concealed in the plait. The joint is, indeed, only to be detected on either side by the slightly increased thickness of the plait where the angles are inserted into each other […] The operation is performed by pushing a needle through the folds in the required order, and, after passing it through as many as can be conveniently done at once, drawing it through […]
In arranging the plait in a spiral coil, as in making a hat, it is necessary, in a few places, to force two loops of the smaller circle into one of the larger circle adjoining it, to allow for their different diameters.’ (The English Cyclopaedia, 1861)
How To Make A Straw Hat
‘It is by needlework that the plaits are made up into hats and bonnets […] The spiral arrangement of the plaits to form a hat begins at the centre of the crown, and is extended outward over the body and brim’ (Dictionary of Manufactures, Mining, Machinery, and the Industrial Arts, 1869). ‘The bonnet is formed of the plait, by first preparing a centre for the top, about which a sufficient number of rounds is sewed’ (The Book of Trades, 1837).
‘Like wire shape making, there are two methods of working straws: one in the hand, the other over a shape. The first method is utilised when the form of shape desired is not to be procured. When working by either method it is usual to make crown and brim separately and join them afterwards’ (Millinery: Theoretical And Practical, 1909).
‘The method of working and moulding a hat of plait, either in the hand, guided by measurements, of from a paper pattern of the shape desired, is much more difficult […] The heavier plaits, e.g. wheat, rush, bass, etc., are the most suitable for this method, as they are firmer […] and do not lose either gloss or crinkle when damped or steamed. […]
Accurate measurements, a strong paper pattern, or a block of the shape being made, should be used as a guide. […] Some workers prefer to sew the straw to a thin paper pattern row by row, afterwards tearing away the paper before steaming and pressing.’ (Practical Millinery, 1922)
Related: Edwardian & WW1 Tam O’Shanter Hats – Free Knit & Crochet Patterns
How To Form The Crown
‘In working the crown, whether flat, conical, round, or beefeater in form, the starting-point is the centre, and the oval or round tip – as the case may be – is invariably formed by sewing one end of the straw into a point or pivot, around which the rest of the straw is made to circle until the full size of tip is obtained.’ (Millinery: Theoretical And Practical, 1909)
How To Make The Band
‘The length required to form first row of sideband is then measured, but not cut off, and a sharp line made along the width lengthwise, so that one half of the width forms […] the first downward portion or beginning sideband. The straw is then worked under this, row after row, eased to form slope or just sewn on in straight lengths, with or without gussets, as form of crown may require.’ (Millinery: Theoretical And Practical, 1909)
How To Make A Straw Hat Over A Wire Shape
‘A length of wire the size of the head measurement is inserted or sewn on the top inner edge of straw, and if a flat brim is required the straw is eased on the wire just enough to make it lie flat when placed upon the table; if required to flute at any part more fullness is left at that part. […]
The crown is begun at its base, the headline, the first row pinned as the brim to the shape, the second to the first, and so on until the centre of top is reached, when the end is twisted into the crown.’ (Millinery: Theoretical And Practical, 1909)

Freeform Straw Hat With Wire
‘Another and favorite way with the best Parisian designers is to run fine wire through the inner edge of the braid, or if this is not practical it is darned in finely; by this wire the rows are drawn to shape and size, the scallops of each row pinned over the inner edge of the previous row till the desired shape is obtained. This is then sewn, usually with the slanted slip or invisible stitch between the two braids, so that the work is absolutely neat on both sides. Such hats can be bent to any shape’ (The Art Of Millinery, 1909).
How To Wire A Straw Hat
‘Leghorn flats, unless for children, are seldom left in their original shape, i.e., a flat, round, even brim; to enable the milliner to curve and bend them, they are “braced” with wire. This should be a finer number than that used in frames, and of course matching the hat in color […] The number and size of the braces, and if to be over or under the brim, depend entirely on the shape to be developed, and where the trimming will best hide the braces […] if a hat is to be curved up, naturally the wire would be put on the upper brim […]
the wire is cut off, allowing an inch at each end extra to run up inside or outside of the crown; these two ends are sewn first, the outside corners pinned in place, then the surface wire sewn’ with buttonhole stitches (The Art Of Millinery, 1909).
Related: Edwardian Straw Hat
How To Press A Straw Hat
‘Bonnets and hats are pressed after they are made.’ (Cottage Economy, 1831) ‘While yet damp iron the braid with a flat iron rather hot to press and polish.’ (Southern Cultivator, 1880)
‘The beauty of hand sewn hats is their soft appearance; hence they are seldom pressed, but if this seems necessary, the brims are laid right side down on a thick ironing cloth, a damp cloth is spread over, and a good, warm iron (not scorching hot) is pressed over; do not push the iron about, but press, then move to another spot, letting the iron lap the first a little; when all is done, remove the cloth and go over it with iron only to dry off.’ (The Art Of Millinery, 1909)
‘As rolled or curved brims […] cannot be pressed in this way and retain their form, another method is employed in their case, for which two people are required, one to hold the flat-iron face uppermost, the other to manipulate the straw into the desired form during the process of pressing.’ (Millinery: Theoretical And Practical, 1909)
How To Stiffen & Block A Straw Hat
‘After the straw bonnet is finished, ‘the bonnet must be stiffened, which is effected with fine white gelatine, put on the surface with a brush; and when dry, it is fit for the next operation, which is blocking. […]
Blocking means pressing the bonnet. It is effected with a box-iron, wet muslin cloths being constantly placed on the straw during the operation. […] The bonnet is now wired, and it is finished.’ (The Living Age, 1855)
Hat Block Alternative
‘Unfortunately the expense of a block when hats are always changing in form is usually beyond the individual student’s purse; as a substitute, an old bowler hat may often render useful service.’ (Practical Millinery, 1922)
How To Upcycle An Old Straw Hat
‘A hand-made hat of plait is easily renovated, and if the plait is wisely chosen and a good quality and colouring are obtained, it is well worth turning and remodelling when it becomes faded. Often the best pieces of plait from two worn hats may be combined and made into one good wearable hat […] Small hats and toques […] can frequently be made from large-brimmed hats that have lost their freshness […]
Machine-made hats may in some cases be altered by the amateur milliner; the crowns can be either raised by inserting a band of stiffening, or lowered by removing a few rows of plait; brims can be made less or enlarged, and if necessary be bound at the edge.’ (Practical Millinery, 1922)
Related: Refashioned Edwardian Tam Hat
How I Made My Hand-Braided 18th C. Straw Hat
After soaking the straws in hot water for a few hours, I braided three straws into a long continuous braid. Then I sewed the braid together with invisible stitches starting in the center of the crown.
I didn’t use a shape or pattern; I simply shaped the straw hat – crown and brim – in the hand while sewing. After the straw hat was finished, I also didn’t press it: I just let it air dry.
Apart from the soaking time of the straw, it was really quick and easy to make a straw hat from scratch!
Related: My Hand-Braided 18th Century Straw Bergère Hat
Please Pin It!
I would like to take on plaiting straw .
Please help me locate where to purchase the straw . I can’t seem to find the material/ stalks .
Many thanks Rhonda
You can usually find it at arts and crafts stores.
This is an absolutely amazing tutorial! Thank you for putting all these bits of instruction together, including your own project. My husband pointed out today that this summer’s straw hat (machine made) is already breaking and as a farmer who’s also a ginger he’s worried both about it not sufficiently protecting him and about spending almost an hour’s wages to buy a new one. We have a ton of wheat growing, ready to harvest for plaiting. I’ll be able to follow along here and surprise him with a hat!
Thank you! Glad you found it helpful! 😀