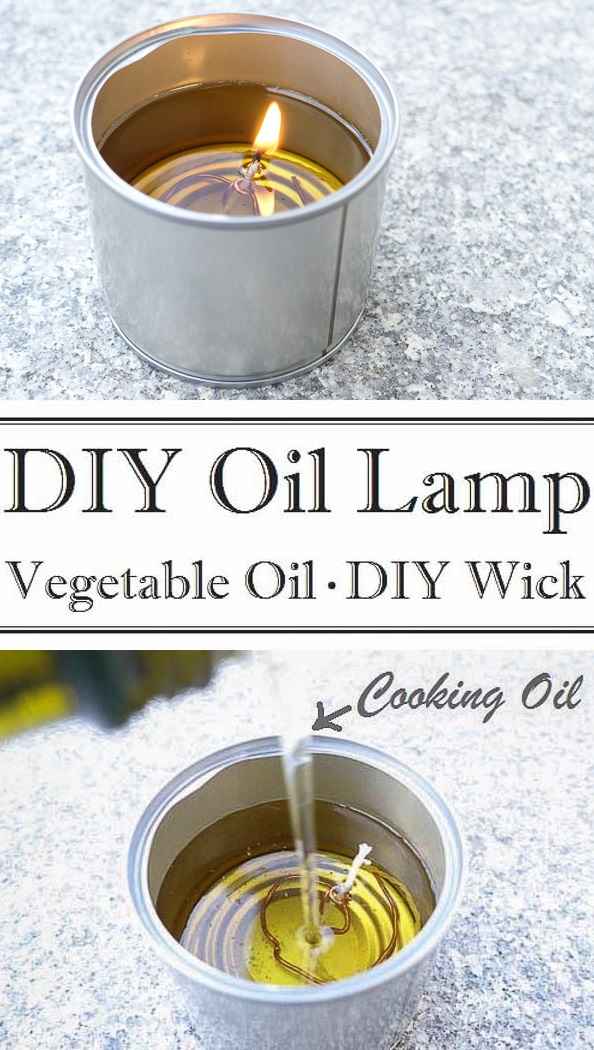
Make an eco-friendly DIY oil lamp from scratch with supplies that you already have at home! All you need is vegetable oil, cotton string, some wire and a tin can.
It takes less than 5 minutes to turn an empty tin can into this DIY oil lamp!
Making an oil lamp from scratch with vegetable oil and DIY wicks is a fun craft for kids and for you too: So that you know how to make a DIY oil lamp in an emergency situation like a power outage!
You can use the DIY tin can oil lamp indoors and outdoors: Use them instead of candles during the holiday season and illuminate your porch, patio or balcony on warm summer evenings.
Why I Use Oil Lamps Instead Of Candles
- Oil lamps give more light than a candle
- Some candles emit toxins like lead, zinc etc.
- Oil lamps are safer than a candle or regular oil lamps with lamp oil because the flash point of vegetable oil is so high that the fuel can’t ignite if the oil lamp is knocked over
- Oil lamps also burn with a steady flame and produce less soot
- They’re economical and cheap: Oil lamps are a great way to use up leftover cooking grease – even rancid oil doesn’t smell rancid when it’s burned in an oil lamp
- And if you’re sensitive to smell: oil lamps don’t smell like candles or tealights, they hardly smell at all while burning. Just when you blow out the oil lamp, there’s a wonderful barbecue smell! 😀
DIY Easy Tin Can Oil Lamp – Tutorial
You’ll need:
- empty tin can *
- 100% cotton string
- copper wire
- cooking oil
- scissor
- round nose pliers
* You can also use a glass jar or glass candle holder instead of the tin can, but be careful: glass can break if the heat is concentrated in one area.
DIY Candle Wick
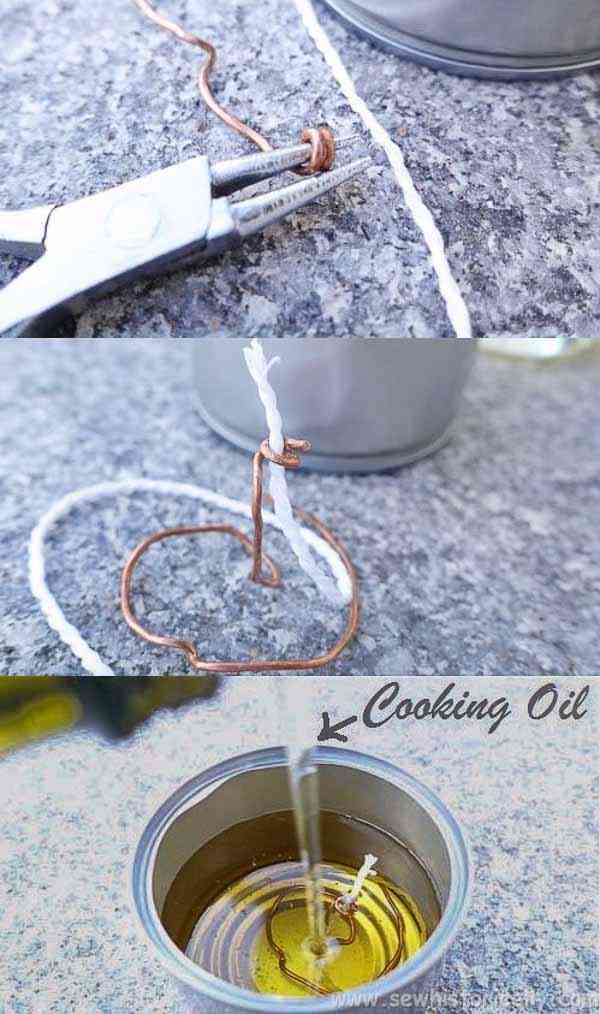
Use a thick 100% cotton string or braid together three thinner cotton strings.
Trim the candle wick after each use: just cut off the black part of the cotton string.
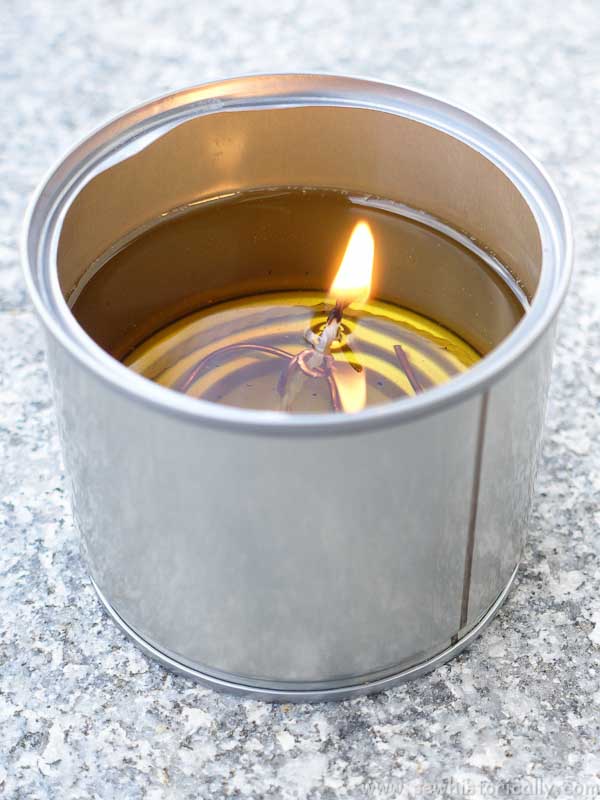
DIY Oil Lamp
Wash the tin can with soap and water and dry it.
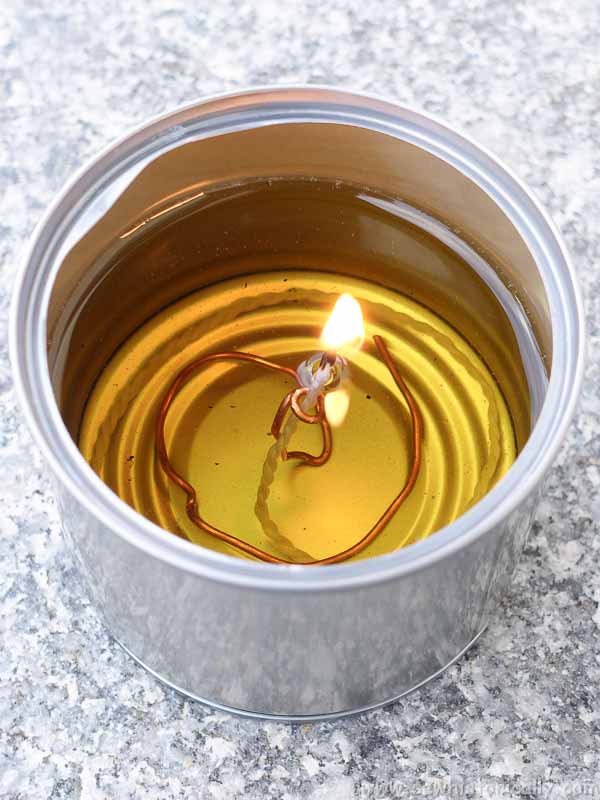
Use the round nose pliers to bend one end of the copper wire into a coil, big enough so that you can insert the wick easily, but small enough to hold the wick. Bend the other end of the wire into a large spiral.
Pour cooking oil into the tin can up to the wire coil or slightly above. Wait some minutes until the wick has soaked up the oil.
Then light your DIY tin can oil lamp and enjoy the beautiful glow! 😀
More DIY Oil Lamps
Please Pin It!
I have never even thought about trying to make something like this. I can’t actually believe how easy it is. Your step by step is great. I’d like to give this a try in the summer when we eat outside. I also feel like this is the kind of thing we all need to know in case of a zombie apocalypse !
Yes, isn’t it great that one can make an oil lamp with repurposed trash: tin can, scrap piece of wire and old cooking oil? 😀
This is so great! I never thought to use regular cooking oil.
Thank you! 😀
I tried to save this post to Pinterest and was not able to. Do you think the problem is on my end or are your posts not set for posting on Pinterest. I really love this idea and plan on trying it.
That’s a problem of my provider which I’m trying to resolve at the moment. You can save the post to Pinterest by clicking on the link >>> PIN IT FOR LATER <<< at the beginning of the post. Sorry for the inconvenience.
Would/could you add essential oils?
Personally I wouldn’t add essential oil but I think the oil lamp still works if you add essential oils. But I don’t know if essential oil in an oil lamp smells as strong as you’d like.
Extremely difficult to get the wick to stay upright. Shame as I have loads of unused oil from old jars of sun dried tomatoes.
You can also use a shallow clay bowl or something similar, like a stone, with an indentation in the middle. And simply lay the wick in the oil, like I did here (scroll down for pictures) similar to an Indian diya oil lamp.
If using the authors exact plans and your wick won’t stay up, it’s too long and/or the coil is too loose or too tight.
IMHO the total fluid should be about 2 inches of water and the rest oil. So, 2 inches water, 1/2 – 1 inch oil. Use a wick from an old birthday candle or any wicking for that matter, just clean off the wax. You can use a metal lid with all rubber and plastic removed- like a baby food jar lid, upside down with a small hole in the center, it will float and you can forget about a coil. Make your own floating lid with a couple layers of aluminum foil and the center pushed up just a hair or two. Push/pull wick through center hole. The hole shouldn’t be too tight, just loose enough to just hold the wick snugly. Leave most of the wicking below the surface and have about 1/4 inch or so of wick showing. That will carry the flame. Pull up as necessary. If you want a smaller flame, smaller exposed wick. Let it sit for about 15 minutes. to absorb oil. The bottom of the wicking should be surrounded by oil only. Light your wick and done. If the flame wont hold, it’s because the wick isn’t getting oil. Change wick, make sure it is clean and dry, then soaked in oil and try again. Make sure hole is allowing oil to up-flow on the wicking. If waxed wick, it may not allow oil to absorb onto the wick. Give it a quick burn with a match or lighter to remove wax and try again. You now have a floating candle. Looks beautiful in an old crystal wine glass.
Love your site. I wanted to look up starch on your page on homemade glues. Got distracted at wheat paste and oil lamps…
I am making oil candles using the used tea light aluminum, its wick holder and vegetable oil. I did break one glass holder. Does the copper spread the heat out more evenly? If so, can other metal work the same way?
BTW, not one who follows recipes too closely, I used xanthum gum in place of gum Arabic for glue. It works well as long as I don’t add all the water at first. The XG dissolves easier with minimal water added to start. Not very Edwardian tho.
Thank you! Sorry, I don’t know if copper spreads the heat out more evenly than other metals. I used copper wire because that’s what I had at home. 😉