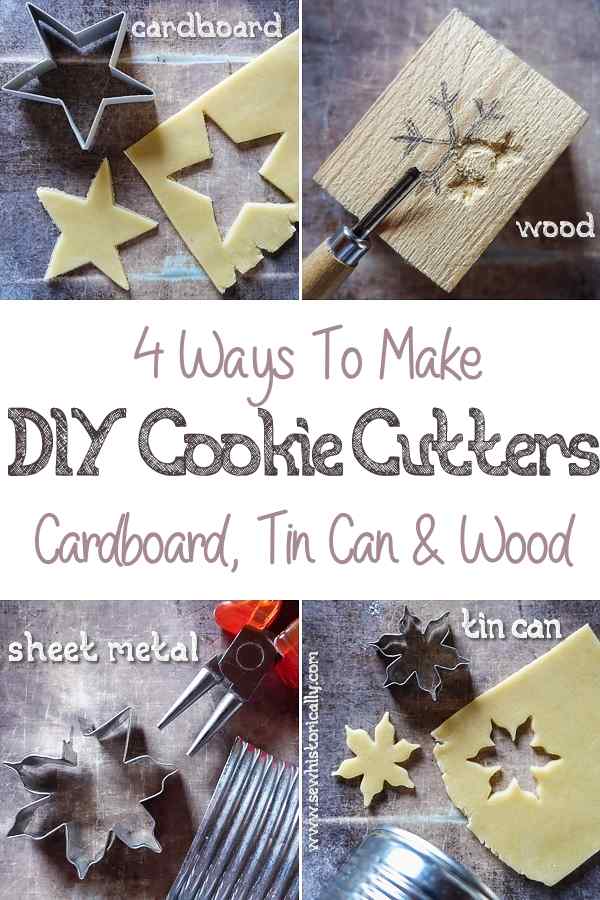
Did you know that you can make you own cookie cutters at home for almost free? 4 ways how to make DIY cookie cutters from a tin can, cardboard, sheet metal or wood.
Maybe you need a special cookie cutter that you can’t buy. Or you just don’t want to spend money on something that you can make at home for almost free. So make your own DIY cookie cutters at home!
You can make DIY cookie cutters out of a tin can or sheet metal: Metal cookie cutters take some time to make. But they’re exactly like store-bought cookie cutters and you can use them over and over again. If you need a quick and easy cookie cutter make a cookie cutter out of cardboard instead. However, cardboard cookie cutters can only be used for one cookie recipe. And if you rather want a mold, you can carve a simple wooden mold with a scrap piece of wood. So get crafting and make your own DIY cookie cutters!
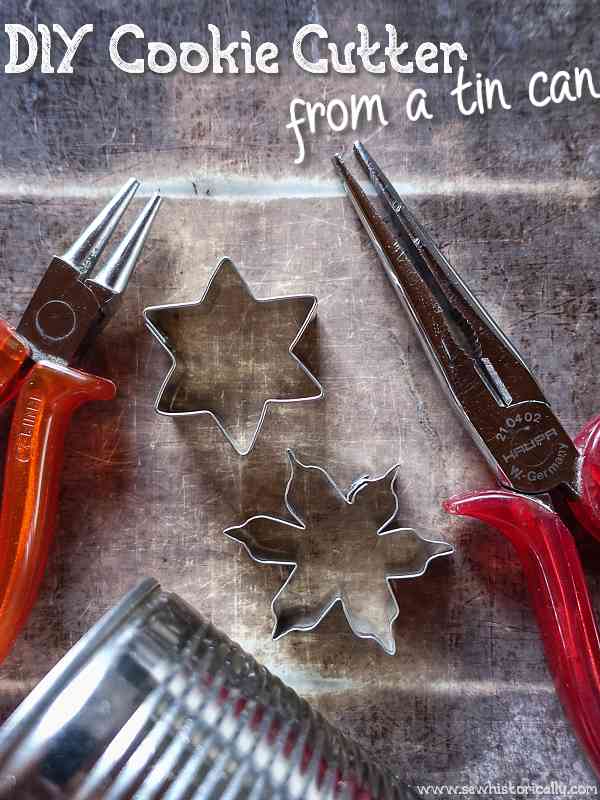
How To Make DIY Cookie Cutters From A Tin Can
You’ll Need:
- tin can
- nibbler or tin snips
- needle-nose pliers
- round-nose pliers
- chisel
- hammer
1. Cut Strip From Tin Can
Wash and dry the empty tin can. Then remove the bottom of the tin can with a can opener. And cut the tin can open with a nibbler or tin snips.
Now cut off a tin strip for the DIY cookie cutter. Be careful: the edges of the tin strip are very sharp! Use pliers to fold over one of the sharp edges – you can use a store-bought cookie cutter as a pattern. Flatten the folded edge with a hammer.
2. Bend DIY Cookie Cutter
Here I made a snowflake cookie cutter. For this type of cookie cutter – and similar cookie cutters such as stars – fold the tin strip like an accordion.
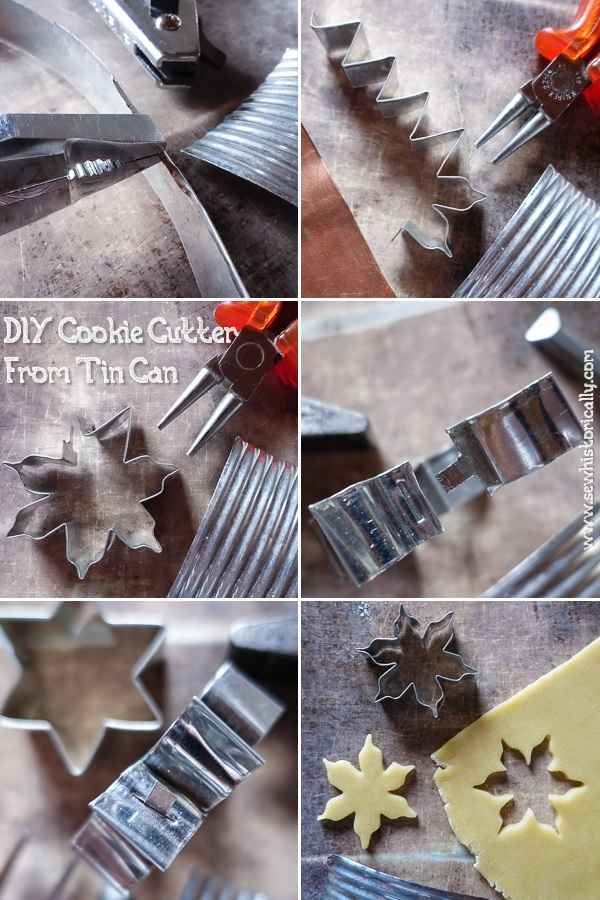
3. DIY Snowflake Cookie Cutter
For the snowflake cookie cutter, bend the edges of the star-shaped cookie cutter with round-nose pliers. By the way, the DIY cookie cutter doesn’t have to be perfect: Even store-bought cookie cutters are never perfectly symmetrical!
Related: DIY Tin Star Ornaments From Tin Cans
4. Join The Tin Strip
The ends of cookie cutters are either joined with a rivet joint or with this simple connection that I use here:
Using hammer and chisel, make a slit into one end of the tin strip. And cut the other end into a tab with a nibbler or tin snips.
5. Secure The Connection
Push the tab through the slit and bend the tab back on itself with needle-nose pliers. This creates a secure connection without glue: The ends of the DIY cookie cutter stay together even after frequent use and washing.
6. Bake Cookies
Now wash the DIY tin can cookie cutter with soapy water and bake some cookies!
Related: All-Natural Blue Snowflake Cookies
How To Make DIY Cookie Cutters From Sheet Metal
You’ll Need:
- sheet metal
- nibbler or tin snips
- needle-nose pliers
- round-nose pliers
- chisel
- hammer
Instead of a tin can, you can also use sheet metal. Use food-safe metal that is easy to work with: such as tin, aluminum or copper. By the way, stainless steel is too difficult to bend.
To make a DIY cookie cutter from sheet metal, follow the steps above for the tin can cookie cutter.
Related: DIY Metal Hair Cuff From Sheet Metal
How To Make DIY Cookie Cutters From Cardboard
You’ll Need:
- cardboard
- scissors
- flour
- water
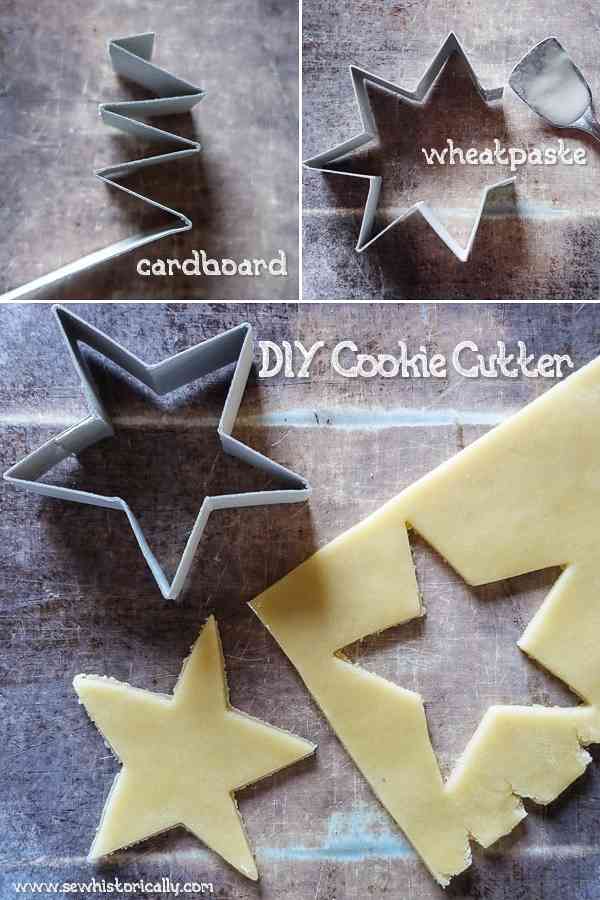
1. Cut A Strip Of Cardboard
Use the scissors to cut a strip of cardboard. For a star-shaped cookie cutter, fold the cardboard like an accordion. By the way, you can only make simple cookie cutters with cardboard: such as a star, heart or tree.
2. Glue Ends Together With Wheatpaste
Glue the ends of the cardboard cookie cutter together with DIY wheatpaste. Wheatpaste is a natural, food-safe glue that you can easily make at home. All you need is flour and water: Stir together about 1 teaspoon flour with some drops cold water until the mixture has a consistency of thick pancake batter. Let the wheatpaste glue stand for a couple of minutes. Then you can use it like regular glue.
Glue the ends of cookie cutter together with wheatpaste. Let it dry for a while.
3. Bake Cookies
Now you can bake cookies with your DIY cardboard cookie cutter. Unlike metal and wood cookie cutters, you can use cardboard cookie cutters only once.
How To Make DIY Cookie Cutters From Wood
This DIY wood cookie cutter is rather a mold than a cookie cutter. But you can still use it to bake perfect cookies!
You’ll Need:
- piece of scrap wood
- U-shaped gouge
1. Carve The Mold
Draw a design on the wood block. Then carve the design using V- or U-shaped gouges.
2. Smooth The Wood
Smooth the wood with sandpaper. And wash the DIY wooden cookie mold with soapy water.
3. Bake Cookies
Now bake some cookies: Simply press the dough into the mold or the mold onto the rolled out dough. And cut off the excess dough with a knife.
By the way, cookie molds were the predecessors of cookie cutters. Metal and wooden cookie molds were used in medieval times to shape gingerbread.
Related: Medieval Gingerbread Recipe
Please Pin It!